Happy Monday morning to you! Can you believe this year is over? For me, this past year has been one of exciting changes. I’ve made and finally met in person some wonderful friends – I’m so lucky! My daughters are striking out on their own. They are both so talented and independent, and they are following their dreams now. They are awesome young adults – I’m so lucky! No resolutions for me, I never make them. I can only hope that the path I’ve traveled in 2007 continues well into 2008! Sometimes you have to veer off and take the path less traveled, but what an adventure it is! Here’s wishing each and every one of you a Happy and Adventurous New Year!

This Friday, January 4, Hanna Stamps is releasing their new Valentine’s Set, Sweet Celebrations. I’ve got some sneak peeks ready for you, and my first one is today. I think I’ll save my favorite for last – nope, just changed my mind! I’m gonna show you my favorite today. I’ve just decided what a great way to end of the year. By the way, with this new template I’m using, my photos need to be smaller. So if you want to see the pic better, click on it and a new window will open with the larger image.

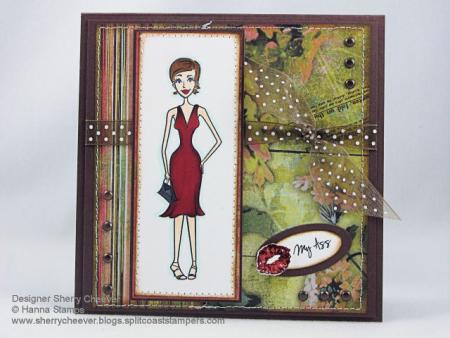
Kiss My Ass

The image was colored with Copic Markers, edges sponged with distress ink, and then all the panels were sewn together. The edges of background panels (BasicGrey Stella Ruby) were sponged with the same distress ink and then sewn to a larger background panel. The sentiment was generated on the computer and punched out. The lips were stamped in one color of distress ink and then the second pair of lips were stamped in a darker color of distress ink and embossed with clear embossing powder. The image panel and the lips are both raised on mounting tape.

Stamps: Sweet Celebrations by Hanna Stamps

Paper: Neenah Classic Crest Solar White, BasicGrey Stella Ruby, SU Chocolate Chip

Ink: Brilliance Graphite Black, Fired Brick, Aged Mahogany and Vintage Photo Tim Holtz Distress Inks

Accessories: Copic Markers, Sewing Machine, Computer for Sentiment, Large and small oval punches, Brads, Ribbon, Ranger UTEE

Good Saturday morning! It just dawned on me that we have another long Holiday weekend coming up – WOO HOO! I’ll be hiding in my stamp room trying to be creative! My first Stamp Club meeting of the year is next Saturday, I have new SU stamps not yet mounted and projects need to be planned. The same day the SU pre orders arrived, I also received my new Tim Holtz Anthology stamps. Which by the way, Rubbernecker Stamp Company currently has on sale!

Mallory was home the day the Anthology stamps arrived and needless to say, she went nuts over them. I also have had some Grunge Board around here for the last few weeks, which Mallory had already been into. Being my typical daughter, she wanted to know if I was going to make her a new journal to take back to school. The thought had crossed my mind, but her asking me to make one was just the push I needed. We sat down, discussed what colors she would like, and I went to work last night.

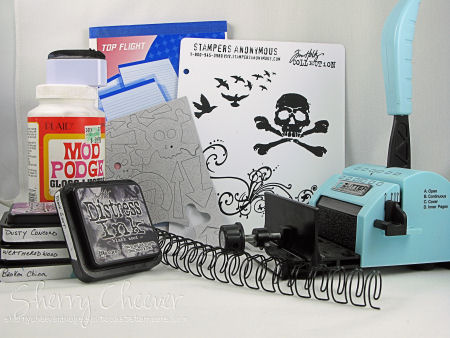
I think today, the first thing I will do is show you the products used to make the journal. This might turn into a mini tutorial of sorts and I would rather you know what is being used as we go along.
Dec 29

The list of what I used: Zutter Bind-it-All, 3/4″ Double OWire Binding, 7.5 x 5″ Chipboard Cover; Tim Holtz Distress Inks; Tsukineko Sponge Dauber; Tim Holtz Anthology Stamps, Tim Holtz Grunge Board Elements; White Cardstock; 6×9″ ruled writing tablet; and Mod Podge. (Most of these items you can find at My Favorite’s Page, and they also happen to be on sale.)
Anthology Journal Cover

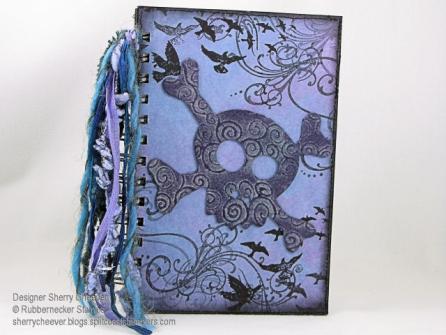
To start, cut the white cardstock to size so that you have four pieces to cover the front and back of the chipboard covers. Using Dusty Concord, Weathered Wood and Broken China Distress Inks, work the color onto the white cardstock with a sponge dauber, and then sponged the edges with Black Soot Distress Ink. (You can find these specific techniques in my Distressing Tutorial). Once these pages have dried, stamp the main images randomly using Black Soot. To add more texture to the pages, stitching around the edges was done with black thread.

To begin preparing the journal, the edges of the cover were inked with the Black Soot Distress Ink and then sponged toward the middle of the cover. (Since this particular journal is not covered completely with designer paper, I did not want the edges of the covers to show.)

Adhere the paper to the covers using Mod Podge. A thin coat of Mod Podge was painted on the cover, the paper was placed on the cover and using a brayer, roll across the top of the paper to get out any air bubbles and to make sure that all edges of the paper are adhered. This is important when running a cover through the Bind-it-All, so that the paper around the punched holes doesn’t come loose.

If you like lined pages in a journal, you can trim down the pages of writing tablet. These pages were trimmed down to 7-1/4″ x 4-3/4″ so that they would fit in the journal, but not come out to the edges.

We are not ready to assemble the journal. I find it easiest to work in order and assemble in order. Starting with the back cover, and using the Cover setting [C] on the Bind-it-All, line up the cover, press down in the center and then punch the first set of holes. To continue along with the line of punching, set the Bind-it-All to the Continuous setting [B], line up the next to last-punched hole in the notch, and continue punching. It is important to line up the next to last-punched hole, leaving one at the end, so that the punching will be continuous. You’ll find that if you don’t do this, you will have a gap in the holes. (How do I know this, well – I’ve done it!) At this point, I go ahead and punch the front cover and set it aside.

For the inside pages, use the Inner Pages setting [D], butt the edge of the paper up to the end, press down in the center and punch the first set of holes. Continue punching the remaining holes using the Continuous setting [B] as with the covers.

Once all the pages are punched, assemble the journal back to front as it would look when bound. Now here is the important part – flip that back cover over to the front, just as you would if it was attached with the coils. So what you have in order is, inside back cover, outside front cover, lined pages. Now thread the binding through the pages so that the square edge is on your left. To bind the journal, set the Bind-it-All to the width of the bindings. For this journal, 3/4″ since we are using 3/4″ Owires. Hold the journal by the covers and pages, placing the Owires into the binding section. Gently press the down on the handle until you feel the Owires come together.

To finish the front of the journal, I picked the largest Skull and Cross-Bones from the Grunge Board and covered it with Weathered Gray Distress Ink. I worked the ink down into the grooves of the Grunge Board, and then scraped the Dusty Concord pad across the top to highlight the design in the Grunge.

And here’s a picture of the inside of journal.
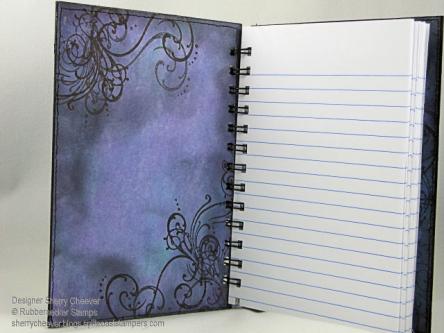
Anthology Journal Inside

Can you believe that it’s Friday already! I spoke with a good friend this morning who was so excited that her counter tops where being installed in her stamp room. She had a fabulous room before she began the remodel, but now she is adding cabinets, granite counter top and more storage space. I was so jealous listening to her talk and swoon over her new room! Every time I get new stamps, inks or anything, I’m on a day long reorganization to make it all fit. Hmmmmm some day, some day! Don’t get me wrong, I love my stamp room, but I have seriously outgrown it. Here are my options – get rid of things I don’t use everyday (can’t do that) or move to the middle of the basement and make a game room/mud room out of my current stamp room – might work, but then if I want to work late into the night, I will be down in the basement between the bedrooms. Not a good thing when one is a very light sleeper! Decisions, decisions!

Anyhoo, enough of my dilemmas. Lets talk stamping! I’m still trying to get in as many of the daily challenges on Splitcoast that is possible. Today is the Limited Supply Challenge, and Jen never fails to surprise on what she is going to do next. Today she is having another of her Follow the List challenges. As she said, a real challenge and yes it was! One stamped image that could be colored, an optional sentiment or an image to ground the main image; any shade of white paper and 2-3 patterned paper – NO other colored cardstock; No specialty tools, just coloring tools; One piece of ribbon – NO other embellishments. Here’s my card, with some creative embellishing.

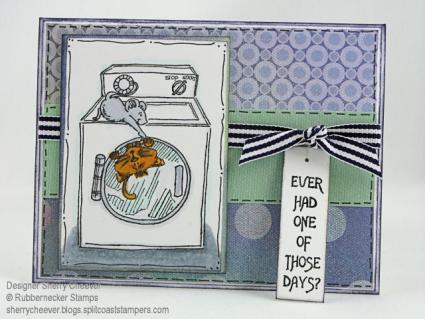
LSC148

The main image was colored with Copic Markers and to ground the image, I added some shading with the markers. The designer paper I used for the background was cut in layers and then faux stitched. I made a tag for the sentiment and attached it to the ribbon (which by the way is purple and white even though it looks black and white in the photo). The edges of the tag, the actual card and the layer of white the designer paper is attached to, were all sponged with Adirondack Eggplant ink.

Stamps: 82-18 Washing Machine and 82-24 Those Days Text from Rubbernecker Stamp Company

Paper: Neenah Classic Crest Solar White, Memory Box Echo

Ink: Adirondack Pitch Black and Eggplant (Rubbernecker)

Accessories: Copic Markers, Tsukineko Sponge Dauber, Faber-Castell Black Artist Pen, Ribbon

Hey ya’ll! Had a few errands to run this morning with Mallory, so didn’t get to stamp any until this afternoon. How many of you wear Crocs? That was one of our errands this morning – winter Crocs. Oh my badness, I slipped my feet in and knew right there on the spot I had to have them! Luckily they had my size and color I wanted. Poor Mallory is just striking out on shoes this Christmas. Not only were her new Ugg boots not right, but then she couldn’t find her size or color today! She’s hoping that her dad will stop at the Croc Outlet on the way back to school – of course he will; she is Daddy’s Little Princess still!

What do you think of my new Blog Banner? Michelle Laycock made this for me as a Christmas present! She’s been making a number of banners for some of the Dirty Girls and I have to tell you, they are nothing but spectacular! She sent it to me last night and I couldn’t wait to upload it — WOO HOO!

So today’s challenge on Splitcoast is the Ways to Use It Challenge. The challenge today is to use Stazon. I use Stazon when I watercolor, but don’t use it for much else. In an effort to step outside my box, and I had some vellum stuck back in my stash, I decided to stamp on vellum.

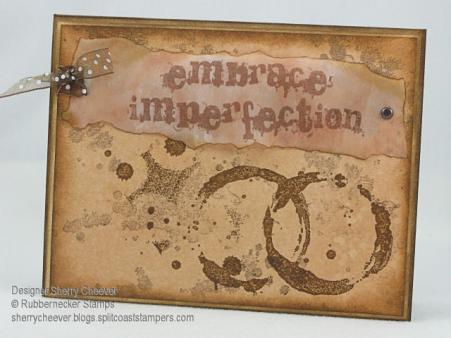
WT146

The card base is kraft cardstock and the second panel is vanilla cardstock, that I sponged the edges of both with Vintage Photo Distress Ink. The main background panel started out as vanilla cardstock, which I distressed with Tea Dye Distress Ink and a water mister. The splatters were inked with Vintage Photo Distress Ink, stamped off once and then stamped on the background. The spill was stamped in Walnut Stain. The edges of the background panel were then sponged with Vintage Photo. I stamped the sentiment on the front of the vellum in Vintage Photo, and then on the back I distressed the vellum with Tea Dye, misted it with water and then dabbed the excess water off. Because the edges of the vellum were torn, they picked up the color of the Tea Dye, and then I sponged some Vintage Photo on the front. To attach the vellum, there is a brad on one side, and then I made a slot punch and tied the other side off with ribbon.

More information on the distressing techniques used can be found in my Distressing Tutorial.

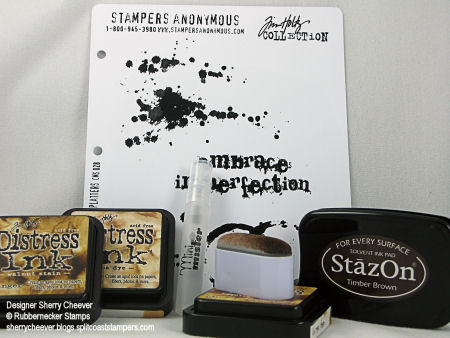
Stamps: Tim Holtz Spills & Splatters Collection by Stampers Anonymous from Rubbernecker Stamp Company

Paper: Kraft and Vanilla Cardstock, Translucent Vellum

Ink: Timber Brown Stazon, Tim Holtz Vintage Photo, Walnut Stain and Tea Dye Distress Inks

Accessories: Brads, Ribbon, Tsukineko Sponge Dauber, Ranger Mini Mister, Slot Punch

The products used to make this card can be found at Rubbernecker Stamp Company at my Favorite’s Page.

Dec 27 Product

Good Morning ya’ll! I hope everyone had a wonderful Holiday and that Santa was very good to you! We had two straight days of mass pandemonium, but I do believe that Santa was good to everyone. Well almost everyone! Mallory’s new Ugg boots have a major flaw in the leather and will have to be returned – pretty tough when you need them for winter weather on a college campus; AND, they are your big gift! She will be going back to school one well dressed coed, however, thanks to her grandmother! Santa brought me an iPod docking station (since I now am the proud owner of Mallory’s old iPod) and a car adaptor. Now the car adaptor was a gift from Mallory, because mom took hers. Well, I just couldn’t help myself! Her car is sitting in the driveway, an iPod adaptor in the front, and I was making a long car trip – to pick Mallory up from school. – needless to say, she wasn’t too happy with me. So now, I have my own personal iPod car adaptor! My oldest daughter, Kate, went to extremes. She bought me a new crock-pot. That is either a hint that I need to cook more (since she does cook quite a bit around here) or that she thought my old one is bad! Personally, I like my old slow cooker – it’s a Regal and I’ve had it for close to 28 years. It actually has a thermostat that you can adjust and does a myriad of things. Deep fry, roast, fry . . . well you get the picture. I’ll try the new one, and see how it compares to my old one, but the old Regal is not going in the garbage just yet! Kate also made me a fabulous fleece blanket which is so warm! Bless her little heart!

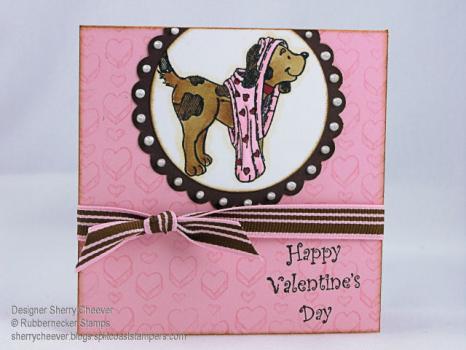
I did get some new rubbah on Monday too! Not only did my SU pre-orders show up, but the new Rubbernecker stamps arrived too! I took a look at today’s Splitcoast Sketch Challenge, and being so tired of Holiday images, I decided to use a few of the new ones! Valentines baby, Valentines!

SC156

The above card is a 4-1/4 square card and I used the Marvy Uchida 2-1/2” and 3” circle punches to make the required circle. The image of the dog (too cute in his heart pants), was colored with Copic Markers, punched out, and the edges were sponged with Tim Holtz Vintage Photo Distress Ink. To highlight the hearts on the pants, I colored them with a Red Spica marker. I used Ranger White Opal Liquid Pearls on the scallops of the brown circle, and the hearts are stamped on the background in Adirondack Shell Pink. I stamped the sentiment, added the ribbon, put on the main image, AND then added the stickles! Hehe – I’m getting better!

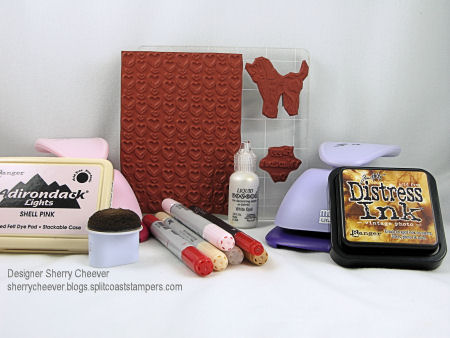
Stamps: 82-11 Dog Stuck in Underwear, 28-04 Petite Happy Valentine’s Day Text and 28-10 Heart Background from Rubbenecker Stamp Company

Paper: Neenah Classic Crest Solar White; Pink and Brown cardstock

Ink: Adirondack Pitch Black, Espresso and Shell Pink; Tim Holtz Vintage Photo Distress Ink

Accessories: Copic Markers, Spica Markers, Tsukineko Sponge Dauber, Ranger Liquid Pearls, Mary Uchida 2-1/2 and 3″ Punches

Here’s the photo of products I used today. The Marvy Uchida Punches can be found at Gina K. Designs. The Copic and Spica Markers can be found at Eclectic Paperie. All remaining product can be found at Rubberneck Stamp Company. Visit my favorite’s page for an easy search!

Dec 26 product

© 2015 Suffusion theme by Sayontan Sinha