I hope everyone is having a great weekend so far. I’ve been fairly lazy myself today. It took me forever to walk down to the studio and stamp a little. Mallory came home last night, and there just seems to be a lot going on in the house. Tomorrow I will be having the family over for a barbecue. My sister’s excuse for coming to my home, was that I grill better than she does. My mother used to always do something for every holiday, but now it seems that if Carrie or I don’t plan it, it doesn’t happen. So we did the morning phone call thing and planned the menu. Now I’ve got to dust and clean the bathrooms — Smiley from millan.net household cleaning. Doesn’t she know that I would rather be creative than clean? Smiley from millan.net

Talking about being creative, not too long ago I mentioned that I had been missing some fun in my stamping. Well, I have to say that over the last two weeks I’ve had more fun trying new techniques and just letting the mojo flow. I myself feel that I’ve done some of my most creative work recently. (No heckling from the peanut gallery.)

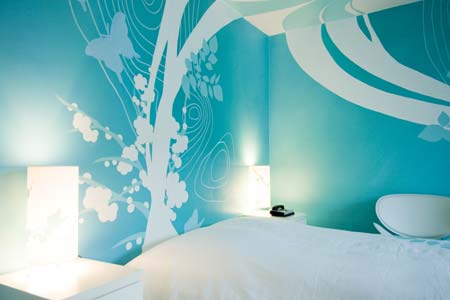
What I have for you today is a card I made for the Inspiration Challenge on Splitcoaststampers. We were given pictures of hotel rooms from the Hotel Fox in Copenhagen, Denmark, as our inspiration piece. This is the room that I chose.

IC143 Room

This is the card that I made.

IC143

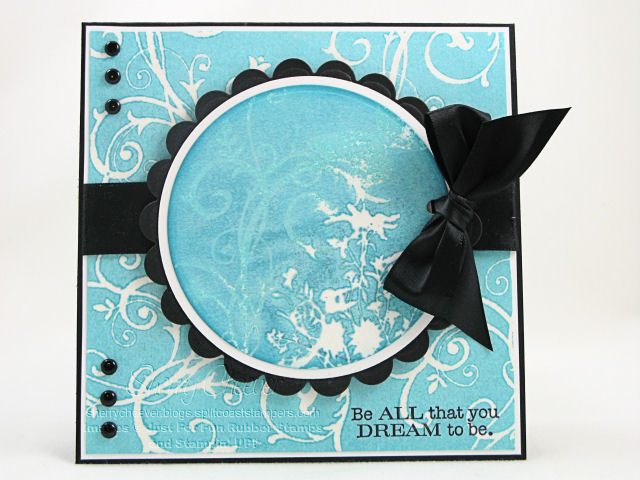
I used a variation of the Faux Bleach Technique that I used earlier in the week. I stamped the flourish and a butterfly in VersaMark and heat set. The floral silhouette was then stamped in VersaMark but was embossed with clear EP. I sprayed the image panel with a Broken China/Pearl distressed pearlized spray, and then placed the image between two pieces of copier paper and ironed. As you can see from this close-up, embossed area when ironed takes on the color of the background paper. However, the images stamped in VersaMark and not embossed, picked up a faint color from the distressed pearlized spray.

IC143 close up

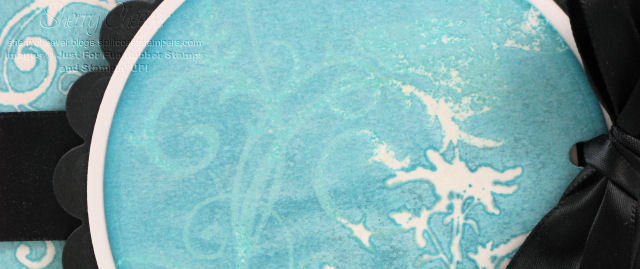
The background panel was stamped with the flourish, embossed with clear EP, and then ironed (the faux bleach part of the technique).

  • Stamps: SU Baroque Motifs and Happiness Always; Wildflower Silhouette from Just for Fun Rubber Stamps
  • Paper: SU Whisper White and Basic Black
  • Ink: Tsukineko VersaMark; Ranger Archival Jet Black and Broken China Distress
  • Accessories: Spellbinders Plain and Scalloped Circle Nestabilities; Ranger Mini Mister, Pearl Perfect Pearls, Super Fine Detail Clear EP, Craft Sheet; Brads; Ribbon; Iron

I hope you all have a great weekend, and if you are doing family things – have a great time!

Smiley from millan.net

It’s Smiley from millan.net afternoon, the start of a long Holiday weekend. Mallory will be home early evening with all her laundry. That means I need to get mine finished up this afternoon so that the laundry room isn’t too big a mess. I’ve only been trying to get it done all week. Ah well, the best intentions often go astray . . . especially if one suffers from CRS! I know when I started writing this post that I actually had a point. What it was, I don’t remember. Here’s what happened . . . open Word Perfect, start typing; let dogs out; reheat something for lunch; get email about Labor Day Sale; think about post; let dogs in; get lunch from the microwave; oops cokes in the garage – go get them; get paper while in the garage in case there is a sale ad; stare at computer screen; fight the little shitz’ off my lap while eating; think about this post; clean dishes; stare at computer screen some more; check paper, no ad; stare at computer screen and realize . . . what the hell am I doing? I don’t remember! There you have it . . . CRS!

I know there is a card somewhere in here, because it has only taken me 2 days to finish one. Yesterday’s Ways to Use it Challenge was to use colored pencils. Great challenge! I haven’t used them in so long and was looking forward to it. I colored an image, made a card – hated it, threw it in the garbage. Started a second image and it just wasn’t working for me either. Into the garbage it went. Last night after dinner I gave it another try. The image worked but I left it and said enough for one day. This morning, when I checked on today’s Limited Supply Challenge, I knew that I could finish my card today. So, here is my card – three challenges rolled into one! This week’s SCS Sketch (layout was something borrowed), Ways to Use It (using colored pencils) and Limited Supply Challenge (something new, something old, something borrowed, something blue).

LSC183

My something new: stamps from Whipper Snapper and paper from StarLitStudio. Something borrowed: the SCS sketch from this week. Something old: Textile CB Embossing folder and Prismacolor Colored Pencils. Something blue: the little butterfly in the image.

  • Stamps: Anna Wight’s Blossoms and Butterflies from Whipper Snapper Designs
  • Paper: 7 Gypsies Henna from Morocco Journey; SU Chocolate Chip; Prism Papaya Puree; Neenah Classic Crest Solar White
  • Ink: Ranger Archival Jet Black and Vintage Photo Distress
  • Accessories: Spellbinders Wizard; Cuttlebug Textile Embossing Folder; Prismacolor Colored Pencils; Turpenoid; Blending Stumps; Tsukineko Sponger Dauber; Brads; Ribbon

I’m going to finish the laundry before I get into something else, and I forget again. Don’t ya just hate it when you have a load in the wash that you started 3 days ago and you forget all about it? I hope you have a great Labor Day Weekend! Hey and don’t forget about my Twisted Humor Challenge . . . I so need some good laughs!

One more card from me! This is for today’s SCS Sketch Challenge. I love this sketch and especially liked being able to use a little tag on the card. For the tag itself, I used the Color Wash Faux Bleach technique. I learned this technique in the Ranger class I took at Summer CHA, and just went looking for a tutorial for you. I may have overlooked it, but I didn’t see one, so I’ll try to explain the best I can.

SC191

I picked a medium size white tag to start. The image was stamped on the tag in VersaMark and then embossed with clear EP. Now the next step is the messy part, so I always prepare my work surface first. I preheat the iron, lay down a few layers of paper towel and grab a sheet of printer paper which is folded in half. At another table is where I spray the Color Wash. I have an old box with the top flaps folded up that I place a few more layers of paper towel in the bottom of. I place my embossed image on the paper towel and then spray with the Color Wash. The box keeps the Color Wash from going all over the place and the paper towel soaks up the mist on the bottom of the box. Because your paper is very wet and runny, pick it up with the paper towels and carefully take it to your printer paper. Remove it from the messy and wet paper towel and play it on your printer paper, making a sandwich fold the other end of the printer paper over the now Color Washed image. Carefully iron the top of the printer paper until you see the embossed image come through the paper. That’s when you know that the EP has melted and the printer paper has picked it up. You’re done! Now you can embellish and stamp on the image to your heart’s desire. For this one, I distressed the edges, sponged on some Vintage Photo ink and stamped a sentiment.

My background paper is BasicGrey Scarlet’s Letter, which I sponged the edges on and then stitched to the front of my card. The tag was raised with foam mounting tape after I tied the ribbon and added my hardware.

  • Stamps: Jeanne Streiff Collection White Flower SKU:403-03 and Stamp Oasis Petite Word Set Petite Believe SKU:2000-04 from Rubbernecker Stamp Company
  • Paper: Medium White Tag; BasicGrey Scarlet’s Letter and SU Chocolate Chip
  • Ink: Ranger Vintage Photo Distress; Archival Coffee; Lettuce, Butterscotch and Red Pepper Color Wash; Tsukineko VersaMark
  • Accessories: Ranger Inkssentials Ink Blending Tool, Ultra-Fine Clear EP; Tonic Tim Holtz Distress Tool; Tim Holtz idea-ology Philosophy Tag and Trinket Pin; Tsukineko Sponger Dauber; Sewing Machine; Iron; Ribbon; Brads

Darn it all, I just realized where I first saw this technique – after I have typed the whole thing out. It’s right here on t!m’s blog! Well anyway, I hope you have a great day!

Good morning! Smiley from millan.net Are you ready for some fun? A little humor? Some slightly twisted humor? I KNOW I AM! It truly has been a very long time since I have sat down to stamp and intentionally make a twisted card! Since I started thinking about this, I’ve become a little overjoyed actually – some fun stamping, just for the heck of it! Smiley from millan.net

I calling for all you twisted stampers! You know who you are! Anyone who wants to stamp for the fun of it and add a little humor to your stamping. Please join me for the very first . . . Twisted Humor Challenge!

The important thing about this challenge is to simply have fun and enjoy what you are stamping! All you have to do, is make a card and upload it to your online gallery and/or blog. Come back here, and post a link so that we can all enjoy your creations! There is no time limit either. To make it simple, if you upload to Splitcoaststampers, please use keyword THC1. Hopefully there won’t be any conflicts with that keyword (crossing my fingers and all 9 toes here). Now here is my only restriction with this challenge. Please don’t use any nudity or drop the “F” Bomb. You can push the envelope, etc., but let’s remember that we have young stampers among us!

My challenge for you (if you wish to accept), is to make anything your little heart desires, with the SOCK MONKEY. If you don’t have the Sock Monkey set from SU, that’s okay! Do you have a sock stamp, a monkey stamp, or any sock monkey stamp? If you do, you can still play along because I know you are creative!

Oh how much fun I had making this card –

THC1

I colored all the images with Copic Markers, and cut out the chicken and sock monkey. They were placed on the toilet with foam tape for a little dimension. Do you see where the hen is sitting? On the handle ready to flush! BWAHAHAHAHAHAHAHAHA!! (Oh I just kill myself!) The sentiment was computer generated.

  • Stamps: SU Sock Monkey and Best of Cluck; Way to Go! From Gina K. Designs
  • Paper: SU Chocolate Chip, True Thyme and Cranberry Crisp; BasicGrey Sugared; Neenah Classic Crest Solar White
  • Ink: Ranger Adirondack Pitch Black and Black Soot Distress
  • Accessories: Copic Markers; Venture Foam Tape; Black Gel Pen; Ribbon; Computer

Have a great day, and I can’t wait to see your creations! I haven’t decided yet how often I’ll run this challenge, right now I’m thinking once a month, probably the last Wednesday. But that may change, depending on participation and how well it is (or isn’t) received.

Avast ye mateys! It be Tuesday, Smiley from millan.net Treasure Hunt Tuesday at Rubbernecker! You can find today’s clue and all the necessary deets on the Rubbernecker Home Page. While you’re there, take note that this week’s Sale Product is the Mini Scor-it. The Colorbox Fluid Chalk Pads are on sale for one more week too.

Don’t forget to visit the blogs of the Design Team Members to see what they have for you today.

Bev – Savor the Journey


Broni – Splashes of Watercolor (Blog Candy)


Candy – Candys Land


Jules – Stampin with Inky Fingers


Kittie – Kittie Kraft


Linda – Linda’s Works of Heart (Blog Candy)


Shelly – Stamp with Shelly


Tami – A Walk on the Mild Side

As you know, I’ve become addicted to soldering. Well . . . over the weekend I was working on a project using chalk inks. When it was complete, I kept looking at it thinking okay, I can solder this and it can become

Faux Sea Glass Sun Catcher Door

A Sun Catcher!

A few days ago, I was browsing some of my favorite blogs and sites, and ran across this video tutorial by Suze Weinberg for Faux Sea Glass. I just HAD to try it. The top piece of the sun catchers is a 2″ square of Frosted Memory Glass. Instead of using pigment inks that Suze did in her tutorial, I used chalk inks. Actually I made two, one with chalk inks and one with pigment inks. I like the one with the chalk inks better, and the technique works just as well as with the pigments that Suze demonstrates. I’m not going to go into detail here. It’s all on Suze’s video. If you don’t see it right away, click one of the videos and then stop it. A panel will come up across the bottom of the screen and you can search for Faux Sea Glass.

The bottom panel is a piece of 1×3 Memory Glass that I inked the back with chalk inks and then embossed with two coats of clear UTEE. The sentiment was stamped on the front of the glass in Archival Jet Black Ink. To finish off the sun catcher, I added some wire and beads so that the sentiment panel would hang below the diamond. The hanger is double wire looped at the top so that I can hang it in my kitchen window (when it’s clean). By the way, when you solder the Faux Sea Glass, the UTEE on the front will melt, so be careful. I actually thought that the melting gave the glass a more distressed look and LOVED it!

I had a heck of a time getting decent pictures, but here is one of the sun catcher showing the actual colors of the glass.


Faux Sea Glass Sun Catcher

  • Stamps: Stamp Oasis Face ATC Set from Rubbernecker Stamp Company
  • Ink: Pink Pastel, Lavender, Aquamarine and Ice Jade Colorbox Fluid Chalk, Ranger Archival Jet Black
  • Accessories: Ranger Perfect Medium, UTEE, Gold and Pearl Perfect Pearls, 2″ Square Frosted Memory Glass, 1×3″ Memory Glass; Soldering Tool and Solder; Wire; Beads; Copper Foil Tape; Jump Rings

I hope you’ll be back tomorrow, when I post the first Twisted and Demented Challenge. I am sooooooooo excited!!!! Hints: socks, swingin’ and now tails!

Have a great day!

© 2015 Suffusion theme by Sayontan Sinha