Happy Thursday!  How y’all doin’?  Thanks for your responses yesterday on my class project.  I met with the girls from Lavender Sentiments yesterday and I’ve made a few changes to the project.  Those will come later in the week.  We did decided on everything else though.  My class will be on Monday, December 14, 2009, 6:00 pm., at Lavender Sentiments on Charlestown Road in New Albany.  The class fee is $20 and you can sign up by calling 812/945-0790.

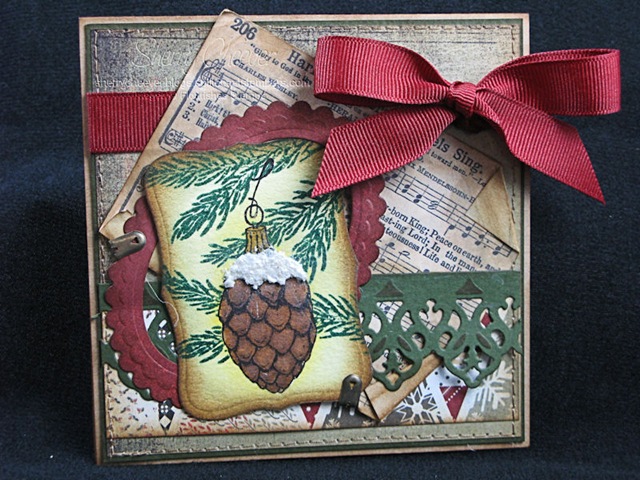
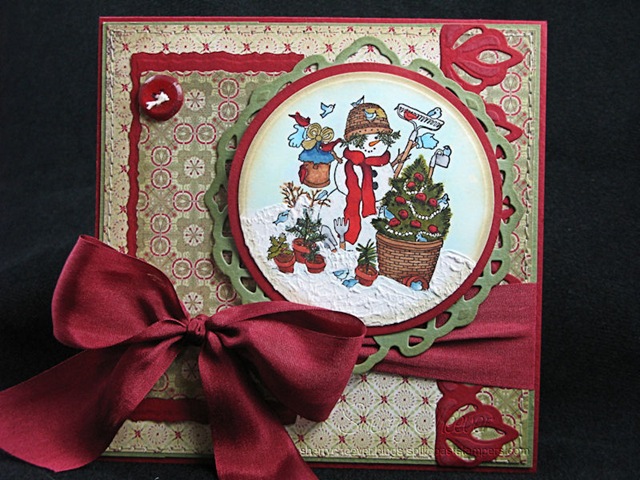
Now for today’s card.  I started working on this last night and needed to wait until this morning to finish it.  While browsing StarLit Studio last week, I noticed that Cindy had the recipe for Tim’s snow listed on her site.  Since I had all the required elements to make the snow, I decided to try my hand at it.  That’s why I needed to wait . . . the snow needed to dry before I could go any further!

PineConeNov18

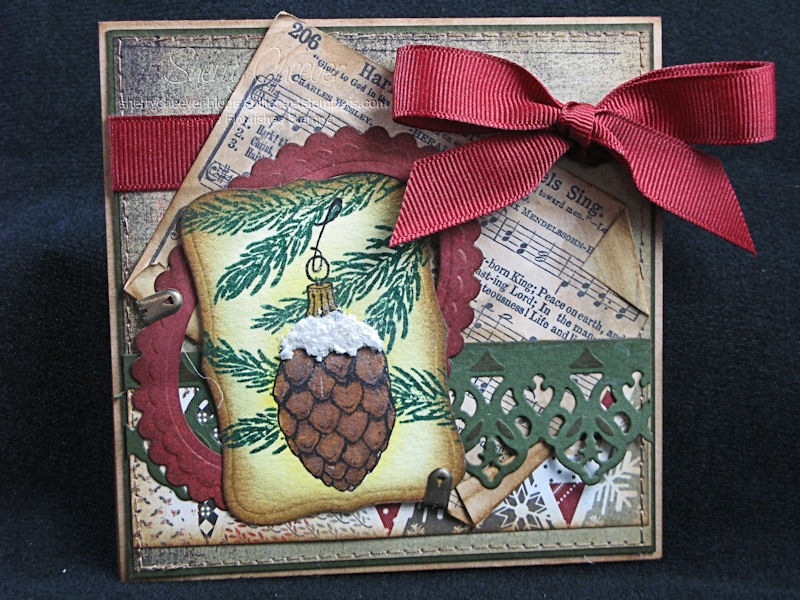
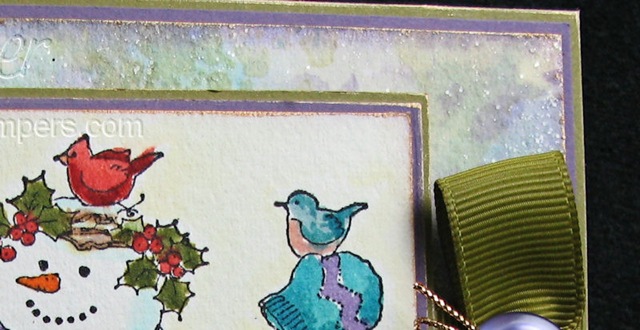
The pinecone was water colored with Distress Re-Inkers, masked and then the branches were stamped.  I die cut/embossed the image using Spellbinders™ Labels 8 before I added the snow to the ornament.  The fun part for me was adding the carol, Hark the Herald Angels Sing, as a background panel.  My grandfather’s sister was a teacher in a one room school house and played the organ for their church.  I happen to have the old pump organ that she played along with all her hymnals.  I remember singing from these hymnals as a little girl.  I had put them away a few years ago and couldn’t find them (that memory lapse thing) a few months back when I was looking for them.  This morning I went into the storage room and pulled them right out of storage . . . yep, that memory thing!  I can’t tell you the name of the hymnal, as it’s been battered and torn, but some of the others were published in 1920.  That should give us some guess at the age  . . . somewhere between 80 to 90 years old.

I copied the song onto regular printer paper, added some Old Paper Distress Ink, and then lightly added Vintage Photo around the edges.  You can see I even left the Hymnal No. on the page.

  • Stamps:  All that Glitters from Flourishes Stamps
  • Paper:  Arches Watercolor; BasicGrey Wassail; Prism Herbal Garden Dark; Papertrey Kraft
  • Ink:  Ranger Archival Jet Black and Old Paper, Pine Needles, Vintage Photo, Mustard Seed, Scattered Straw, Frayed Burlap Distress
  • Accessories:  Spellbinders™ S5-019 Labels 8, S4-140 Petite Ovals – Small, S4-139 Petite Scalloped Ovals – Large, and S7-014 Grand 12” Classic Lace Border; Ranger Matte Accents, Glossy Accents, UTEE, White UTEE, Pearl Perfect Pearls; Tsukineko Sponge Daubers; 7 Gypsies Paper Fasteners; Sewing Machine; Ribbon; Art Institute Krystallos Vintage Glass Glitter; Sulyn Crystal Glitter

Thanks for stopping by and I hope you have a fabulous day!

Good Tuesday morning!  I hope you had a great weekend and your week has started off good!  I spent Saturday with my mom, aunt and sister.  We went to Hodgenville to visit my uncle and check on things there.  After lunch we were going back through the town square and there was a little shop that I had never been in before.  We stopped and oh my gosh . . . what a great place.  No, I don’t remember the name BUT we are planning on going back this coming Saturday and I’ll find out then.  I might even remember to take my camera and get some pictures!

My project today is a sample for the class I’ll be teaching next month and is a work in progress.  We’ll be seeing this change over the next few days and I thought it would be fun to watch the transformation.

LSSClassSample

I’m not too sure about the round flower on the bottom and that’s probably going to be the first thing that goes.  I’m still looking at it trying to decide.  I’m also not too sure about the colors, but they do happen to be my favorite combination.   What do you think . . . is this something you would like to make in a class?

Good Friday morning!  In my attempt to use some of my old snowmen stamps, I ran into an image that I have never colored before.  Not only have I not colored it, I don’t even have the stamp.  My sister, Carrie, is a Longaberger collector and has made numerous trips to the the factory.  One year she was so excited when she found a rubber stamp in the shop and she bought it.   Even though I wish Carrie would stamp with me, she is not a stamper but a cross-stitcher.  When she showed me the stamp, I stamped out numerous images and then gave the stamp back to her.  I had forgotten all about those images until the other day.  I was going through a box of old images looking for snowmen, snowballs, whatever I could find, when I ran across the Garden Snowman.  I did a Google search looking the stamp, but came up empty-handed.  I didn’t even come across the coasters that Carrie also purchased that day.

Anyhoo, here’s my second snowman card of the year.

LongabergerGardenSnowmanNov13

The image was colored with Copic Markers and then I applied a light coat of Ranger Rock Candy Stickles on the snowman.  For the snow at the bottom, I used Tulip White Puffy Paint that was painted on with a paint brush and then heat set to puff.  I was super excited when I was digging through my button stash and found the old red button.  It’s cracked and distressed and I knew it would make a perfect embellishment.

  • Stamps:  Longaberger Garden Snowman
  • Paper:  Neenah Classic Crest Solar White; Memory Box Spiceberry; Prism Blush Red Dark and Herbal Garden Medium
  • Ink:  Ranger Pitch Black and Old Paper Distress
  • Accessories:  Spellbinders™ S5-014 Deckled Mega Rectangles – Small, S5-015 Deckled Mega Rectangles – Large, S4-114 Standard Circles – Large, S4-116 Standard Circles – Small, S4-213 Fleur De Lis Borderabilities, S4-210 Lattice Pendant; May Arts Ribbon; Tulip White Puffy Paint; Copic Markers; Sewing Machine; Foam Mounting Tape; Tsukineko Sponge Daubers, Ranger Matte Accents and Rock Candy Stickles; DMC Embroidery Floss

I hope you have a fabulous day and thanks for stopping by!

Hey y’all!  I just now realized that is was Wednesday, so Smiley from millan.net. I thought I would have this post up earlier today, but we’ve been having some computer issues. I spent the morning working on the network and organizing the mess of wires upstairs. Thank goodness it is finally done and Mr. Stodgy will leave me alone about the Ethernet cord running along the kitchen floor, down the basement stairs, into my studio. Smiley from millan.net  You’d think he could see that the cord was there and would walk step over it . . . Smiley from millan.net

I remember when I was a child (well now, under 10 okay?) and we would have more snow than we get now.  I lived in the south end of Louisville at the foot of a hill.  All the streets started at the top of the hill and ran down to our street.  These hills were great for go-carts, bikes, skates and most importantly sleds.  You know I never remember school being cancelled for snow.  I just knew we had snow and we played outside all day making snow people and sledding.  I was always hoping to share those memories with my own children, but it seemed that the more the years went bye, the fewer snowfalls we’ve had.  I had a Flexible Flyer and couldn’t wait to purchase one for my girls (it’s hanging in the shed waiting for my grandchildren to come along one day).

When I saw the stamp I’ve used today, The Back Door by Just for Fun Rubber Stamps, I KNEW I had to have it.  This looks more like our own back door when my girls were little than when I was a little girls (we had a covered porch then).  I even painted the house that god awful red stain color that we have on our house now.   The backside even has the same type of siding!

TheBackDoorNov11

I colored the image with Ranger Distress Re-Inkers, die cut and embossed with Spellbinders™  Oval Nesties and then distressed the edges.  While I was putting this card together, the image seemed too bright for the paper and I wanted it to look more aged.  I grabbed my Hot Wax Stylus and some natural beeswax and applied a light layer over the image.  Now here’s the neat part . . .  even though I didn’t need to fuse the wax because I had used the stylus, I decided to take the heat gun to it anyway.  The watercolor paper soaked up the wax and now the image is duller but there is no shiny coat.  I LOVE it!  I make an additional background layer, I took a mini manila tag and worked with the Wrinkle Free Distress Technique.

  • Stamps:  H2298 The Back Door and D2615 All Good Cheer from Just For Fun Rubber Stamps
  • Paper:  Arches Watercolor; Mini Manila Tags; Memory Box Spiceberry; Cranberry Crisp and True Thyme
  • Ink:  Ranger Distress Embossing, Shabby Shutters, Pine Needles, Peeled Paint, Fired Brick, Aged Mahogany, Weathered Wood, Broken China, Old Paper, Vintage Photo, Walnut Stain, Faded Jeans, More Mustard, Spiced Marmalade; and Ranger Archival Black and Coffee
  • Accessories:  Spellbinders™ S5-015 Deckled Mega Rectangles – Large, S4-140 Petite Ovals – Small, S4-138 Petite Ovals – Large, and S4-141 Petite Scalloped Ovals – Small; Ranger Non-Stick Craft Mat, Mini Mister, Gold Adirondack Paint Dabber, White Inkssentials Gel Pen and Rock Candy Distress Stickles; Tim Holtz Tonic Distress Tool; 7 Gypsies Paper Fasteners; Tsukineko Sponge Daubers; May Arts Ribbon; Foam Mounting Tape; Sewing Machine; Vintage Button; Papertrey Rustic Cream Button Twine; Gold Spica Pen

Well that’s all folks!  I hope you’ve had a fabulous day and thanks for stopping by!

Happy Tuesday!  I meant to have this post ready for early this morning, BUT last night I wasn’t happy with the photo and decided to redo everything.  I had worked on this card all day yesterday (and the day before), and decided I needed to wait until this morning after my pot of coffee to finish it. 

I have so many snowman images and last year wasn’t able to find the time to work with them.  I’ve decided this year, that I will make the time and color each and every one.  It’s been a long time since I worked with some of these images and for the fun of it all, want to revisit them.

I just went rooting through my gallery on Splitcoaststampers and found the last card I made with today’s image and it was on November 21, 2006.  Wow that’s been a few years!

Snowman and Friends

I water colored the image with Ranger Distress Re-Inkers, and had paper all picked out for the image.  The only problem was I couldn’t find the right ribbon, etc., to go with it so I spent most of the day trying to come up with a layout and paper.  I finally decided to hang it up and try the Wrinkle Free Distress technique for the background.  Using the three dominate colors (blue, purple and green) and watercolor paper, I made my background.  To add some glitter to the background, I covered the entire piece of paper with Ranger Rock Candy Distress Stickles.  I’ve tried to get a close-up so that you can see how it looks  . . . and don’t you dare look at my out of the line coloring! 

Snowman and Friends closeup

I ended up adding the snowflake as an embellishment.  To color the watercolor paper, I misted some extra ink with more water and while the paper was still in the die, I ran it through the inky water.  It was a nice effect but it was just a little too light, so I added more ink to the edges and covered the snowflakes with Rock Candy Stickles.

All said and done, not bad for taking so much time.

  • Stamps:  Snowman and Friends from Penny Black; Believe from Papertrey 
  • Paper:  Arches Watercolor; Papertrey Plum Pudding and Ripe Avocado
  • Ink:  Ranger Mustard Seed, Broken China, Fired Brick, Shabby Shutters, Peeled Paint, Vintage Photo, Frayed Burlap, Tattered Rose, Black Soot and Dusty Concord Distress
  • Accessories:  Spellbinders™ S4-222 Create A Flake 1 and S3-030 Tag Shape 3; Papertrey Buttons and Ripe Avocado Ribbon; Watercolor Brushes; Gold Cord; Ranger Rock Candy Stickles, Non-Stick Craft Sheet and Mini Mister

I hope you have a fabulous day and thanks for stopping by!

© 2015 Suffusion theme by Sayontan Sinha