
Good morning! Well, I really wanted to get this project posted yesterday, but in the middle of it all I decided to do a video tutorial. Yes, you asked for it and here it is . . . a video tutorial on how to make those paper flowers using Spellbinders™ Nestabilities!
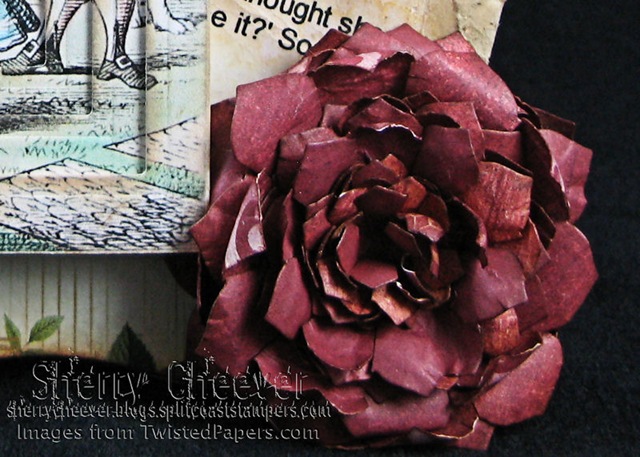
Here’s the flower that I was working on yesterday when I decided to stop and make the video.
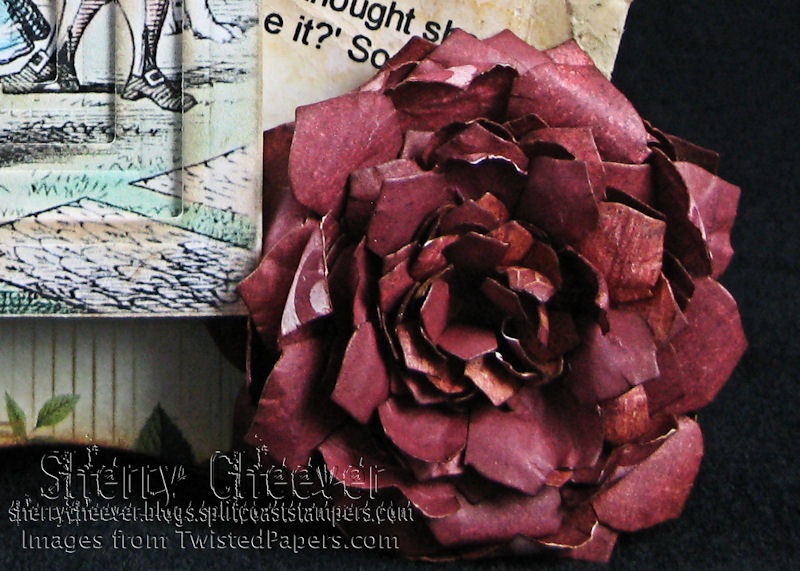
Here’s the video on how to make that flower.
and here’s my project using the flower.
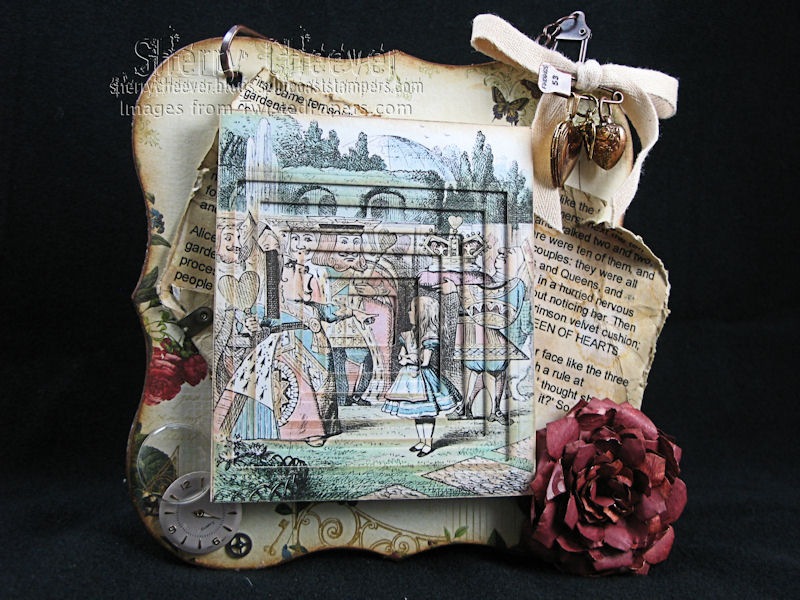
For some background on this project, the guys at TwistedPapers.com contacted me right before they were going to upload the colored images of Alice. They thought it would be really cool if I made a project using one of the images with the negative Pyramid (get it . . . . down into the rabbit hole). I’ve been singing
One pill makes you larger
And one pill makes you small
And the ones that mother gives you
Don’t do anything at all
Go ask Alice
When she’s ten feet tall
. . . . for weeks now! I might have to dig out of the old Jefferson Airplane album (yes, I said album . . . and yes I still have a turntable in the basement just to play them on).
I made the positive and negative Pyramid images using Spellbinders™ Square Nestabilities. After I had the layers made into the pyramid, I decided that the negative image needed more than a card. I went digging through some supplies and found a Grunge Book from my last Tim Holtz class at CHA and used two of the pages from the book. I glued them together and then glued a sheet of Webster’s Pages Postcards from Paris on both front and back. For an additional layer, I printed out a section of Alice in Wonderland from the net about the croquet game (because it matched this image), did a little Wrinkle Free Distress using Old Paper and Vintage photo, then distressed the hell of all the edges.
For some added fun I tore up a few old watches to get some parts that I added to the bottom left. While doing that, I came up with another wonderful idea and have made note to get it done in the next few days. In the image we have the Queen of Hearts so it wouldn’t do . . . I had to add some hearts to the project.
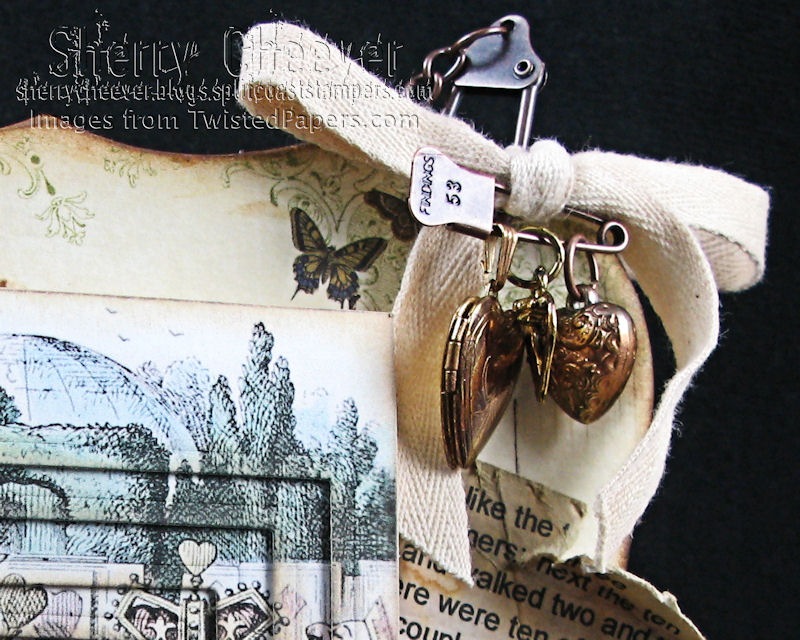
To hang the project, I added some Tim Holtz idea-ology Swivel Clasps and link chain. Thought that was pretty darn clever myself!
- Images: Alice in Wonderland from TwistedPapers.com
- Paper: Neenah Classic Crest Solar White; Webster’s Pages Postcards from Paris; BasicGrey Wassail
- Ink: Ranger Vintage Photo and Old Paper Distress
- Accessories: Spellbinders™ S4-232 Blossom Two and S4-126 Classic Squares – Large; Tim Holtz idea-ology Grunge Book pages, Swivel Clasps, Jump Rings, Trinket Pin and Link Chain; Ivory Twill; Ranger Matte Accents; Sponge Dauber
Well that’s all for today folks! As if it wasn’t enough. I’m off junking it with my sister today. Hopefully I’ll find some great alterable junk!
Thanks for stopping by and remember . . . life is short, make the most of the day’s adventures!


Sherry, love your flower….You seem to have the magic touch with them!
Sherry you are a GENIUS! I love your project and the paper flower tutorial is wonderful. Thanks a million for making it and sharing it!
You are the greatest. I love the flower and thanks for showing us how you make them. I’ve tried on my own and they never look just right. Thanks again.
What a wonderfull project you have made.
I love it!!!
Thank you so much for the video tutorial. I always learn so much from them. You are so creative!! 🙂
AMAZING (as always) Sherry! This is really detailed and beautiful- thanks for the tutorial- we all appreciate it!
Sherry –
OMG! This is just STUNNING!!!! Boy when you create, you CREATE! I am so in love with this piece and the flower is just perfect! Thank you so much for the tutorial. You always make things seem soooo easy!
Elaine Allen
Sherry,
Thank you so much! Just in time for a birthday box I’m making. You inspired me to try my hand at some of these techniques.
Great work as always. Thanks for the tutorial.
Wow Sherry! Your project is so neat. I loved the video and hopefully I will be able to try to make a flower like this! They are beautiful and it is so sweet of you to make the video for us.
Thanks for sharing your video Sherry. Your flowers are wonderful. I was wondering what kind of paper you use to make them? They seem a little thinner than regular card stock?
Thanks for the video, you did such a great job! I really like your flower and will have to give it a try.
wow…super job on the video Sherry..thanks so much for sharing your art!
Sherry – what a beautiful flower – I never thought you would use a stylist in every petal – but boy the results are amazing! Love the lockets that you added to the trinket pin also!
Awesome video, Sherry! And just a GORGEOUS project. You are the layering QUEEN!
Thanks Sherry for sharing with us. I love to see how you do what you do so well. The videos really help for people who are visual learners like me. Have a great day!
Your flowers are always wonderful. Thanks for doing this video Sherry. Was this made with scrapbook paper? I loved the colour you chose and I also loved the patterned side of the flower paper too by the way, it would have made an awesome flower too I’m thinking.
hugs
Alexandra
Two wonderful projects in one day! You are amazing. Love the Alice project!! And your flowers are beautiful. Thanks for taking the time to make the tutorial.
Susan
Sherry, you are heaven sent! Your flower is breathtaking & your video tutorial is perfection. LOVE your into the mirror project–incredible!
This a a great tutorial Sherry! Thank you so much I am going to try it out!! You have inspired me. Thanks Mary 🙂
Would you consider showing us how you make the stacked, negative image thingy? I just can’t figure it out….
thanks
dmc
Hello Sherry.
I’ve been wanting to make the flower since I saw it on one of your cards. Thanks for the video and the lovely project.
I’m now shopping around for a Nestabilities Blossom 2.
I love your blog and look forward to it.
Thanks Hilda.
Sherry,
I loved the tutorial… maybe I’ll get brave & give it a try. Video’s always seem to help me more than anything… Now ya just need to do a tutorial on negative Pyramid… lol.
Thanks for sharing your fantastic creativity….
Cookie
Thank you so much for the tutorial! I have done the paper flowers before, but have never used my embossing tool. I think I need to dig that thing out! It really adds that extra special touch. TFS!
I loved the tutorial. My flower came out much too perfect so thanks for the petal shaping tips!
WooHoo! Thanks for the great tutorial on making your beautiful flowers!!! That Blossums template set is now at the top of my wish list, thanks to you! Love your projects, blog, sharing and willingness to do tutorials for us visual learners! : )
Great work! Love the details you added like the charms and watch parts and the book page. You captured Alice in Wonderland quite nicely!
‘…And a very happy un-birthday to you!’ 😀
Thanks for sharing!
Oh Sherry I love your project and thank you so much for the video to make your gorgeous flowers! Thanks for the tip on how you get your flowers to curl. I can’t wait to give it a try.
Thank you so much!
Sherry, this is absolutely gorgeous. So shabby-chic. Thanks for doing the clever video on your gorgeous flower. I always wonder how things are done and your technique was so easy to follow. I love how you embellished your project, such attention to detail. Have fun junking it with your sister. TFS!!! 😀
Thanks for the great tutorial!! I love your projects and your blog, so since I think I’ve got that set of Nesties, I’m off to my craftroom to try out the flowers!
you are awesome!
Thanks so much, Sherry! Now I know why my flowers aren’t as full as yours. Never thought about using 4 layers of each size!
waouhhhhhhhhhhhhhhhhhhhhhhhhhhhhhhhhh super super , que des bravossssssssssssss
MD
Sherry, I love your wonderful creativeness! I can copy real well, but I sure have problems creating! Your flowers are awesome. Thank you so much for thiis wonderful tutorial and your sharing! You’re terrific!!
Wow thankyou for this wonderful tutorial, I have the shapeability flower creations set 3 and when it arrived I just sat looking at it wondering where to start. Ive watched this and ran out to try, I used natural paper and I am so chuffed with the results of my first ever flower……….I couldnt have done it without you!
Sherry, thanks so much for the awesome tutorial on this flower technique! LOVED it!
Very clever how you used the stylus to create such wonderful dimension!
[…] to finish up a pyramid image that I had done some time back. It’s the companion to this piece Into the Looking Glass. That one was the negative pyramid. While I was working on the negative, I also finished up the […]
I Love, Love, Love your nestabilities flower tutorial. Haven’t seen one quite as easy and I’m anxious to get to the craft room to try it. Thanks for sharing.
Sherry, thanks for doing the flower video. I used your ideas with my punches and it worked reasonably well.