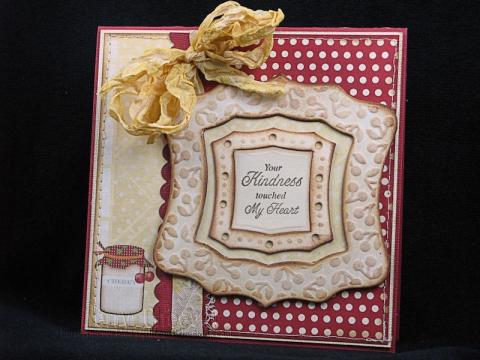
Good Tuesday morning! Oh what a day I had yesterday . . . cleaning, laundry, errands . . . thank BADness I got that extra crafty time in over the weekend.
Remember the first card I did with the Spellbinders™ Cherry Pickin’ Frame? If you don’t, you can see it here. A week or so ago, I received an email from our Blog Team Coordinator and she wanted to know if I still had that card. If I did, which I do, she asked if I could send it to her for the upcoming Spellbinders appearance on HSN (which appearance is May 6 and 7). Now that’s pretty cool . . . they want to use one of my cards as a sample for television! The last time they were on and I was watching, I saw my Chunky Tag on display! Did I get excited you ask . . . yeah! I said to myself, out loud even, “oh my gosh there’s my tag!”
I’m getting ready to mail that card off this week and thought I would include one more sample with the Cherry Pickin’ die template . . . just in case!
It just so happens that some of the designs in the new Webster’s Page Triple Pack Collection has some cherries in it . . . which immediately made me think of the die template anyway.
So the background papers are Webster’s Pages Spring Market, Yacht Club & County Estates Collection, which have been sewn down to other cardstock. The sentiment is from JustRite Signs of Life (which I just recently received). Oh and I dyed the seam binding with Scattered Straw Distress Ink because I wanted to pick up some of the yellow in the paper.
The outer frame was cut from a piece of illustration board. Now the die template won’t cut all the way through the thicker illustration board. What I do is get the outline of the die from a few passes in die cutting machine, and then I can finish cutting out the thicker frame with either scissors or mat knife. The inner frame was die cut/embossed from a thin chipboard coaster . . . no problem at all . . . its cuts like butter through the thin coasters. I then covered both frames with Antique Linen Distress Stains, highlight the embossed area and edges with Vintage Photo. To give some added dimension to the frames, I die cut a square from another thin coaster before I adhered the designer paper on. the frames are then mounted on that square. It worked great to raise the frame off the card for some extra height.
That’s about it for me on this project. You’re gonna love tomorrow’s project . . . it’s another E-Team Blog Hop and all I can say is . . . Honey, you’re gonna have a POPpin’ good time!
Thanks for stopping by and remember . . . life is short, embrace the adventures that come your way!
Project Supplies:
|
|
|
|
|
|
|
|
|
|
|
|
|
|
|
|
|
|
|


