Smiley from millan.net Hey y’all! It’s hard for me to believe that it’s already Thursday . . . I’m wondering were my time/days have gone.

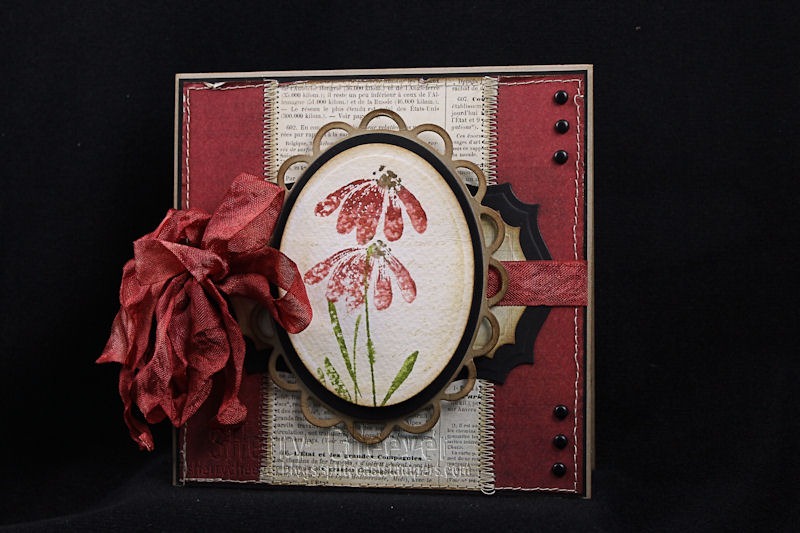
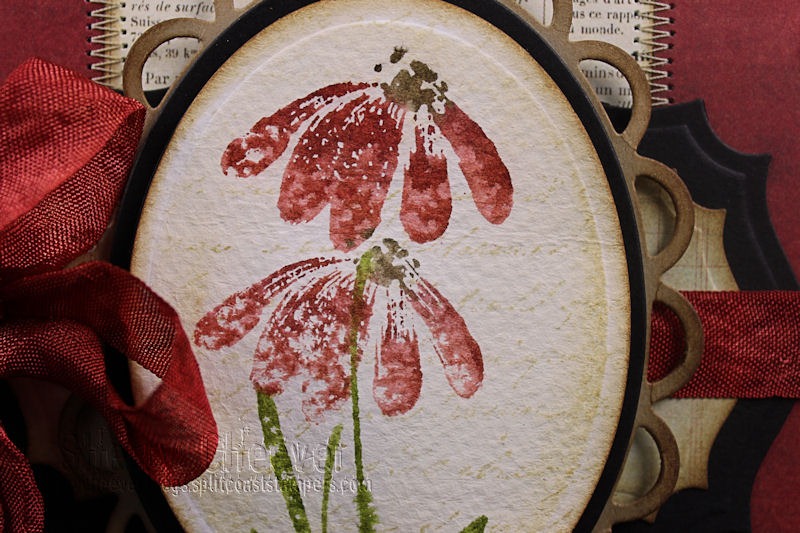
A couple of weeks ago the Ranger Distress Markers arrived at my door.  I’ve been playing around with them, mainly water coloring.  My first instinct is that I don’t like them for that.  So far I haven’t gotten excellent results using them to watercolor images . . . definitely not like my Tombow markers.  The Distress Markers don’t seem to float with the water the way the Tombow do.  I’ll keep experimenting with this one though.

However!  I do love them to stamp with.   They are definitely excellent to color your stamps with, give them a little mist of water and then stamp the image.  A few years ago before all these alcohol markers became so popular, this was one of my favorite techniques.   SO, while playing with my NEW toys, I pulled out one of my all time favorite stamps (Penny Black Blush) and made this card.

PennyBlackFlowerCard(4)

I used Peeled Paint, Fired Brick, Aged Mahogany and Frayed Burlap markers on the image, misted it with water and then stamped on slightly damp watercolor paper.  I have a video tutorial on this technique that you can find here.

After the image had dried, the background stamp from Studio 490 – Live and Mark Art, was stamped over the flower in Old Paper Distress Ink.  Hopefully you’ll be able to see it in this photo.  I know it’s there, so of course I see it!

PennyBlackCloseUpFLOWER

The ribbon is white seam binding that I dyed with Fired Brick and Aged Mahogany.  (Tutorial here)  The image was die cut/embossed with Spellbinders™ Classic Ovals, mounted on Lacey Ovals and then placed over Labels Twenty-Five.

Well, that’s all for me . . . thanks for stopping by and I hope you have a fabulous day!

SHERRY SIGNATURE

Project Supplies:

Happy Tuesday!  How y’all doing?  Wow it has been busy around here . . . lots of crafty time!  I’ve been super busy with monthly projects, tutorials and class projects.  Yes, you read correct class projects . . . we’ll cover that a little more later.

I’ve had a couple of sets of stamps sitting around the studio since November or December.  I can’t really remember when I got them, all I can remember is that I haven’t had time to get them inky.  This weekend I made a point to sit down and color up some images (some for some special projects and some for play).  After walking the little shihtz’ this morning (great weather here finally), I decided to put together a card or two with some of those images.

The one I have today is made with JustRite Stampers Botanical Butterflies.  The image was colored with Copic Markers and then die cut/embossed/layered with Spellbinders™ circles.

ButterflySpellbindersCardMarch13(6)

I don’t know why I’m in a white mood lately, but white paper is calling me.  Instead of building upon the white, I added some black and then dyed the seam binding to match the colors of the butterfly.

ButterflyCardMarch13

To get the seam binding to just the right color, I started with Dusty Concord Distress Ink.  It was a little too red for my taste, so I kept adding Chipped Sapphire to be the right touch of blue with the purple.

The background was embossed with the new M-Bossabilities, Elite.  I couldn’t resist a little sponging, with Antique Linen, and some sewing.  The end flap on the card was die cut/embossed with Grand Labels Four.

That’s all I have for now.  Thanks for stopping by today!

SHERRY SIGNATURE


Project Supplies:

Hey y’all!  I hope you had a good start to your week . . . I took the pups to the groomer and spent the rest of the day working in the studio.  One good thing . . . I now have sweet smelling pups!

I want to share one more card made with Stately Flowers 2 with you today.  This time I colored the Hawthorne image with Copic Markers.

HawthornCard

The paper is Graphic 45 Le’Romantique and the seam binding is dyed with Tattered Rose Distress Ink.

For this card, and you can see the overlapping black and pink cardstock on the front, the black is actually the back of the card.  The pink layer is slipped into a fold in the black.  I have plans on working up a tutorial of this one for you in a few days.  The bad thing is I decided to stitch the designer paper to the cardstock and then I had the stitching on the back.  I didn’t like seeing that when I opened the card, so I covered the stitching with another layer of the designer paper.  I don’t know that I like that either . . . so no tutorial today.  I want to work out the kinks first!

That’s all I have for today.  Thanks for stopping by today and remember . . . life is short, enjoy the adventures that come your way!

SHERRY SIGNATURE

Project Supplies:

Good Monday morning!  I hope y’all had a good weekend.  After lunching and shopping with my girls on Saturday, I found some time to work in the studio.  Now that it’s all clean and all!  I spent a couple days last week putting away all the Christmas decorations and cleaning up my CHA messes.  It sure it nice to have a clean room without a path leading into it.

Before I left for CHA, I received a note from Melanie Muenchinger, stamp designer for Gina K. Designs.  She had noticed that I was from the Kentucky area and wanted to know if I was interested in her set Stately Flowers 2, which has a Goldenrod image, the State Flower of Kentucky.  Well of course I said yes!

Here’s my first card with this set.

GoldenrodCard

The image was embossed with Ranger’s Queen’s Gold embossing powder and then water colored with Tombow Markers.   The paper is from Cosmo Cricket Circa 1934.   I couldn’t have asked for a more perfect match for Goldenrod.

I have to admit here that I had this huge post written all about my girls and our recent weather.  However, when I went to post it to my blog, Live Writer crapped out on me and I lost my post.

Friday’s weather was absolutely uncanny.  Here at my house we didn’t have that first drop of rain, but not even 5 miles up the road tornados!  I’ll tell ya . . . I love storms.  Love to listen to them, watch them, etc.,  but I was a little edgy all day Friday.  I had the local weather on staying updated and our tornado siren (at the end of my street) was going off about every 5 minutes.  Mallory was already home for break and I had her in the basement with the dogs (all of them scared of storms), water, flashlights, etc., just in case.  I worried about Kate who was working north of us, where the tornados were.  All the students had left for the day but as they were in route, the sirens went off.  The bus drivers turned around and headed back to the school where they were able to get the students into a safe area.  Thankfully they were all safe and protected.   The tornado that had been spotted by her town headed north a few miles and completely devastated the town and the school (where she taught her first year).  If you haven’t already seen some of the sights on the news, here’s a link to some Google images.   Friday was also Kate’s 26th birthday . . . for some reason I can always associate her birthdays with certain events.  On her 2nd and 16th birthdays, Mr. Stodgy found himself in the hospital.  It was also her 2nd birthday when I found out I was pregnant with Mallory.  Now I’ll remember her 26th birthday with the storms.

Mallory and I spent Sunday getting some clothes together to drop off for some of Kate’s students that did lose their home.  So many have been devastated with loss and the outpouring of prayers, aid and support from the surrounding communities has been remarkable.

To shorten this post, I’ll included Mallory’s update later.

Thanks for stopping by today!

SHERRY SIGNATURE

Project Supplies:

© 2015 Suffusion theme by Sayontan Sinha