Can you believe it’s Thursday already? I can’t! Not only that, I can’t believe it’s already afternoon here. We are still having some technical difficulties with the blogs, but I have no doubt that the guys will figure it out. They have been working the last few days and are probably screaming as loudly as we are. I’ve got to give them props though, they are the best!


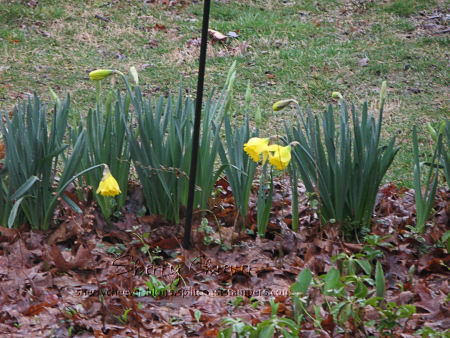
A few days ago I was out walking the dogs and noticed that my Bleeding Hearts were starting to bloom, but the Hyacinth are so pretty this year that I had to snap a picture.


Flower bed


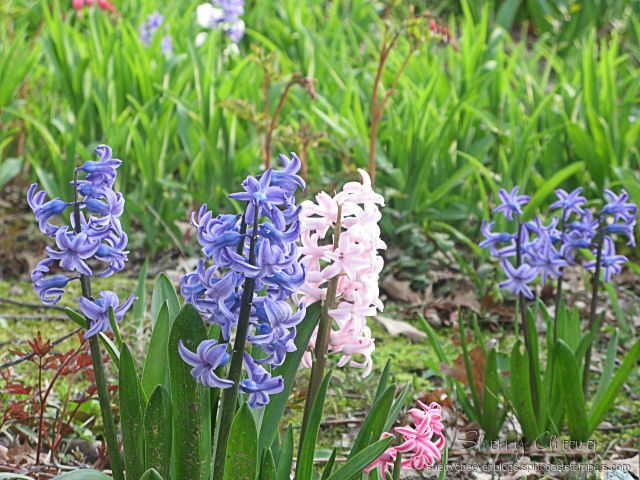
You can just barely see the Bleeding Hearts in the background. I also see the Astilbe peaking up behind the Hyacinth. I also see tons of work to be done in the flower bed and should really be out there while it’s pretty and not in the house. I also need to move some hostas from the front walk, but I keep procrastinating. Do you think the gardening fairies will come visit?


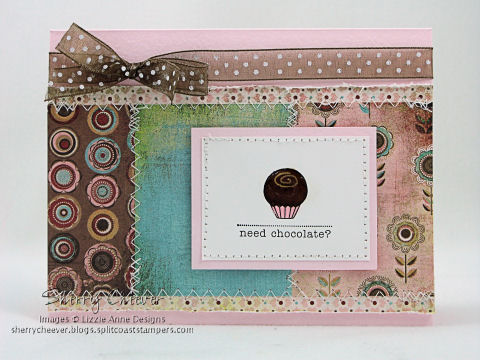
Today’s Ways to Use it Challenge on Splitcoast is to find ways to use eyelets, grommets, etc. Now lets face it, I’m not an eyelet person. I LOVE my brads and never ever reach for anything that resembles an eyelet. For me, this definitely WAS a challenge!


WT161 Thanks Bunches


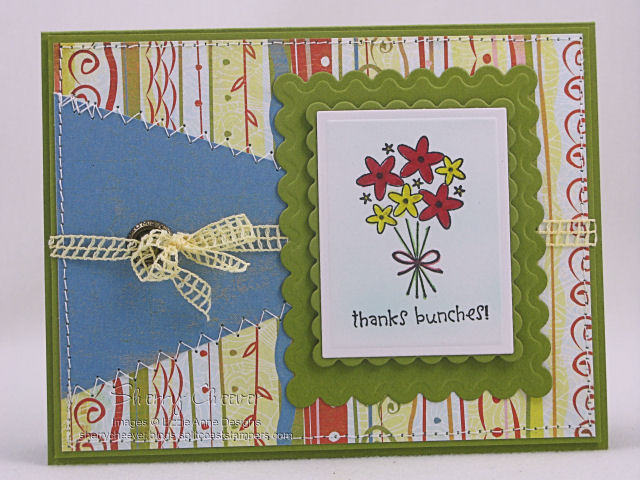
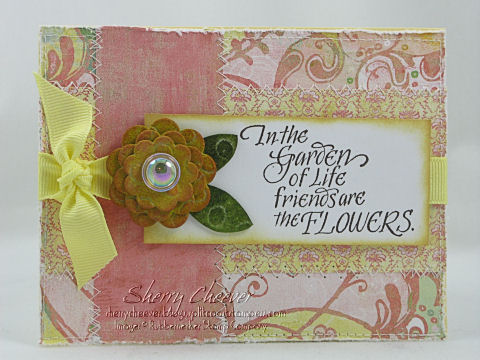
The image was stamped, and then cut out with rectangle Nestabilities. I embossed it, and then using the die as a stencil, the background was airbrushed very lightly. I colored the image with Copic Markers, and then decided that it was too flat and highlighted the flowers with Spica Glitter pens. Which, you can’t even see in the photo. The background paper, my new BasicGrey Cupcake, was sewn to a panel of SU Old Olive. The grommet was inserted into the triangle panel (it helps if you have something that will set these things – I thought a Crop-o-dile would – BWAHAHAHAHAHA), and the ribbon was wrapped around the background panel, up through the grommet and tied in a bow. I was a little bothered with the size of the flower panel, and decided to cut a larger scalloped panel for the bottom. I then raised the top panel with mounting tape. I like it better.

WT161 PRODUCT


Stamps: Thanks Bunches from Lizzie Anne Designs


Paper: Neenah Classic Crest Solar White; SU Old Olive; BasicGrey Cupcake


Ink: Ranger Adirondack Pitch Black


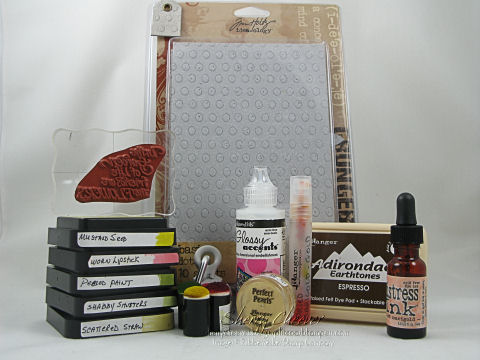
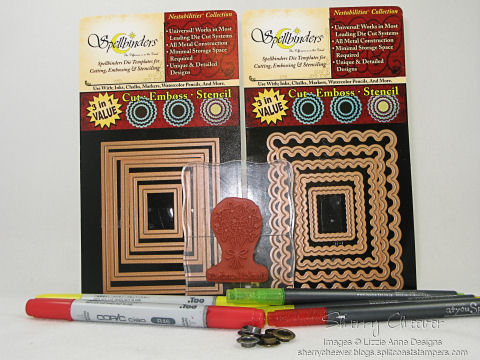
Accessories: Copic Markers, Airbrush System and Spica Glitter Pens; Spellbinders Rectangle Nestabilities and Wizard; Karen Foster Favorite Things Grommet; Sewing Machine; Ribbon


I hope all of you have a terrific day and if the sun is shining where you are – enjoy! It’s gonna be in the mid-70’s here today but we are expecting thunderstorms. I need to catch up on some projects I have going and I keep getting farther and farther behind.

NEW SIG

Good Wednesday morning! Remember this picture I showed you just a few weeks ago?

Saturday Morning Snow

Well, this is what I have today – flooding! It has rained and rained and rained. This first photo is taken from my side yard looking down the street.

Flooded Street

Here’s a photo of my side yard. Now this photo is important because this is the side of the house where my new stamp room is located. I also want to watch and see how much water accumulates in this area.

Side Yard Flooding

Then walking back into the garage, I saw these daffodils. Yep, daffodils in bloom.

Daffodils

Before I came up from the stamp room, I had been working feverishly picking up carpet squares and suctioning up water with the carpet cleaner. I had always Kate if her room was wet when it rained like this – she would just shrug it off. Okay, so now I know and this is the reason that nothing, and I mean nothing is sitting directly on the floor.

While cleaning up water, I was able to make a card for today’s Sketch Challenge on Splitcoast. Great sketch today – It’s perfect for using up little scraps of designer paper!

SC168

I stamped the chocolate image and then colored it with Copic Markers. It actually looked good, until I decided to add some Glossy Accents to the chocolate to make it look glossy. It took away from the coloring and plus, when I was trimming the image, it smudged just a bit. Oh well, it does happen! I stitched up the image panel on a layer of pink cardstock, and it is raised on mounting tape. I chose pink for my card base, and then used scraps of BasicGrey Blush to make the panels. All the panels are stitched together and then I distressed the top and bottom edges with my distressing tool. This panel was then affixed to the card front.

SC168 Product

Stamps: Petite Phrases by Lizzie Anne Designs

Paper: Prism Iced Pink, BasicGrey Blush

Ink: Brilliance Graphite Black

Accessories: Copic Markers, Sewing Machine, Ranger Glossy Accents and Inkssentials White Opaque Pen; Tonic Tim Holtz Distress Tool; Ribbon

I hope everyone has a fabulous day and you are able to stay dry!

Look what’s happening at my house this morning! SNOW – Lots of SNOW!

Morning Snow

From the time I took this picture, got it uploaded and fixed, it has snowed more and more! They have forecasted 8-12 for this area. Hmmmm, it is the Ohio Valley and you can never really tell! Anyhoo, get this picture,

Ellie in the snow

Miss Ellie loves playing in the snow. She slid half way across the deck – too funny!

Now, as much as I have begged for snow, pleaded for snow, want snow, NOT today. I need to drive close to two hours away on a good day, to pick Mallory up. She’s on Spring Break next week, leaving tomorrow – maybe, for somewhere sunny and warm! Lucky college kids!

I’m gonna play the proud mom a bit this morning. Our oldest, Kate, was inducted into the Mu Psi Chapter of Kappa Delta Pi, International Honor Society in Education, last night! Needless to say, most of the family was there to celebrate such an honor with her. After the Induction Ceremony (where I couldn’t get a good picture if my life depended on it), there was a scrumptious banquet. Here are Kate and her other half, Will. Will graduates this May and is hoping to land a football coaching/teaching position. He has been coaching High School Football for his alma mater for three years now. Kate has another year, which one semester will be spent student teaching. Both of these kids work (close to full time) and carry heavy schedules. We are very PROUD of them!

Kate and Will at induction

Here’s Kate with her Aunt Carrie (my sister). Carrie checks in here every day – so Carrie this one’s for you!

Kate and Carre

Before I hit the road to pick up Mallory, I wanted to get to the SCS Limited Supply Challenge. I am so mad at myself over this card – I really screwed it up with the sentiment, and I honestly didn’t have the time to fix it today. BUT, I will!

The challenge today is a small card. Cards smaller than 4.25×4.25. Love making little cards, and I’ve had this idea for a few days and needed to try it. Gina K pointed out the other day that she had actually used Copic Markers on her stamps. Leave it Gina to figure that one out – or have the guts to try it! Of course, if she messes up her stamp, she does have plenty on hand.

LSC158

Using the wildflower from Lizzie Anne’s In the Meadow, I colored directly on the stamp with Copic Markers, misted with Rubbing Alcohol and then stamped the image three times. I then got this wild hair that I wanted some type of background, so I found a square Nestability that fit the image, and using my Copic Airbrush System, I airbrushed the background with Cool Shadow. It left a perfect edge along the frame! Since, I had all the Nestabilities out, I went ahead and cut a scalloped edged square for my background layer. Now, here’s where I am mad at myself! I wanted a sentiment on the image, something light that wouldn’t take away from the image. I chose Old Paper Distress Ink for this, and I’ll be darned if it’s not crooked and too light – Live and Learn! The background for the card, which is 4×4 by the way, is made from scraps of BasicGrey Scarlett’s Letter. I distressed the edges and then sewed them to the card front on the sewing machine. The white dots were made with the new Inkssentials White Opaque Pen which should be available to purchase sometime soon. I’ll have to check on that!

Stamps: In the Meadow by Lizzie Anne Designs

Paper: Neenah Classic Crest Solar White, SU Soft Sky, BasicGrey Scarlett’s Letter

Ink: Tim Holtz Old Paper Distress Ink

Accessories: Copic Markers and Air Brush System; Spellbinders Nestabilities; Cuttlebug (anxiously awaiting my new Wizard); Sewing Machine; Ranger Mini Mister and Tim Holtz Distress Tool; Inkssentials White Opaque Pen; Ribbon; Mounting Tape Distress Tool; Rubbing Alcohol;

Here’s the photo of the products used today, as I slap my head because I failed to add in the Mini Mister and Distress Tool.

LSC158 Product

As promised earlier, I’m back with my Sketch Challenge card. I so adore the sketch today and see that it will be used a lot! As a matter of fact, my Stamp Club meets this Saturday and they have asked to work with chipboard. I think I’ll work up another card for them based on my Sketch Challenge card today! I might even let this sew this time – they are such a rowdy bunch that keeping them focused is rather difficult! I’ve been afraid that one of them might sew their fingers to the cardstock –

Before I show you my card however, I promised Robbi I would show pictures of my puppies today.

Here’s Miss Ellie trying to stay out of trouble;

Ellie

and here’s Sydney.

Syd

Now, for my card.

SC166

The background paper is BasicGrey Two Scoops, which I sewed to a basic card panel of yellow cardstock. Before I stitched the paper, I distressed all the outer edges and then sanded away the rough spots. The sentiment is stamped in Adirondack Espresso and then sponged with Scattered Straw Distress Ink. The flower was made by running Basic Grunge Board through my Cuttlebug with the 2×2 flower dies. I sponged the different layers with Mustard Seed Distress Ink and then lightly tapped the Dried Marigold on the top to highlight the spots. The edges were then sponged with the Dried Marigold and I lightly misted them with Dried Marigold/Gold Shimmer Mist. I found an old iridescent button in my button jar, and knew that it had to be the flower center. To assemble the flower, I used Ranger Glossy Accents and glued each layer down. Once I had them layered, I punched a hole in the center with my Crop-o-Dile, added some more Glossy Accents to the base of the button and pushed the end of the button through the hole. The leaves were hand cut, sponged with Shabby Shutters Distress Ink and then highlighted with Peeled Paint Distress Ink. The petals were glued to the sentiment panel using Glossy Accents and the flower is raised on mounting tape.

Stamps: Sentiment from Rubbernecker Stamp Company

Paper: Georgia Pacific White, Prism Frosted Yellow, BasicGrey Two Scoops

Ink: Ranger Adirondack Espresso; Tim Holtz Mustard Seed, Worn Lipstick, Peeled Paint, Shabby Shutters, and Scattered Straw Distress Ink

Accessories: Sewing Machine; Tim Holtz idea-ology Basic Grunge Board; Ranger Glossy Accents, Tim Holtz Distressing Tool, Mini Mister, Gold Perfect Pearls, Dried Marigold Distress Reinker; Tsukineko Daubers; Cuttlebug and 2×2 Flower Cutting Dies; Crop-o-Dile; Ribbon; Old Button

All products shown below can be found on My Favorite Product page.

SC166 Product

Ahoy ye mateys! It’s TREASURE HUNT TUESDAY @ RUBBERNECKER. The Treasure if you find it, will be a free image. However, to receive the Treasure a purchase of any size is required, and your treasure must be claimed between 4:00 am PST until 9:00 pm PST today (7:00 am EST – 12:00 am EST). Not only is today Treasure Hunt Day, but for every $50 in stamps purchased, you will receive one FREE stamp. You can check out more information on the Rubbernecker Home Page.

While you are on the Rubbernecker Homepage make sure and read about the Rubbernecker Bucks Monthly Drawing AND the FREE stamp offer:

Each month you can qualify to win $100 coupon good for Rubbernecker or Stamp Oasis stamps! For every $20 you spend, your name is entered once into a drawing.

For every $50 you spend on Rubbernecker or Stamp Oasis stamps, you get to choose a FREE stamp!

Not only do I have some Tawdry Treats for you today, but so do Jeanne Streiff and Shelly Kuck.

RN 10 Buck

In order to win, all you have to do is leave a comment. I’ll be traveling home on Wednesday, so I will announce the winner Thursday morning. I also have the first clue in the Treasure Hunt today, but I’ll give that to you later in the post.

While walking along the wharf in San Francisco, we ran into this guy — can you tell that we couldn’t resist getting our picture taken? He might have to be our new mascot!

Treasure Hunters

I do have a card for you today, even though I’ve been traveling for the last week. It’s one I made for a booth sample some months back, and never got around to posting. It is one of my favorites however.

Sunflower blog

The image was colored with Copic Markers and then cut out. The main background panel was white paper that was sponged with various colors of Distress Inks until the desired color was achieved. The Crackle background was then stamped in Vintage Photo Distress Ink. The same technique was used for the second panel of the flower layer as was used in the background panel. The sentiment was stamped in Walnut Stain and all the edges of the cardstock were sponged in Vintage Photo Distress Ink. Mounting Tape is used to raise the flower image and main panel.

Stamps: Rubbernecker Brush Floral Collection 63-08 Triple Sunflower Scroll, Little Note Sentiment and Crackle Background by Rubbernecker Stamp Company

Papers: Neenah Classic Crest Solar White, Prism Vanilla, Tawny Dark and Spring Willow Med

Inks: Adirondack Pitch Black; Tim Holtz Walnut Stain, Vintage Photo, Peeled Paint, and Spiced Marmalade Distress Inks

Accessories: Copic Markers, Tsukineko Sponge Dauber, Mounting Tape, Ribbon, Hardware

All product is from Rubbernecker Stamp Company and before I forget, I do have the first clue in the Treasure Hunt today! You’ll want to start your search in the Brush Florals section of Rubbernecker.

© 2015 Suffusion theme by Sayontan Sinha