
Happy Tuesday to you! After a great weekend, it’s time to get busy . . . as if we weren’t over the long weekend. I had a great time working in the yard, grilling for the girls and getting some time in the studio. I even got to puppy sit Kate and Will’s new lab . . . I call him moose for Chocolate “mousse”, they call him Peyton.
Yesterday when I posted about my Graphic 45 Steampunk Frame I mentioned that the instructions weren’t on their blog . . . I was wrong. They were there! 
I’m still going to repeat them here for anyone that missed the Graphic 45 Blog post.

The frame was painted black and then covered with Steampunk Debutante paper. The paper was glued down with Multi-Medium matte and the excess was removed by sanding away at the edges. Vintage Photo Distress Ink was then sponged on the edges of the frame. The middle image was centered and the wings were painted with Black Soot Distress Stickles. An extra hat and dress were cut out, the edges sponged with Vintage Photo and raised over the image with foam mounting tape. The hat was also painted with Black Soot Distress Stickles.
Craft Foil was die cut with Sprightly Sprockets and then covered with Black Soot Alcohol Inks with a drop of Copper Mixative added.
The flowers were made by die cutting/embossing Steampunk Debutante paper with Rose Creations and Carnation Creations. The flowers were shaped with a petal roller and a foam pad (Video Tutorial here). All the leaves were die cut with the Foliage Die Template and then colored different hues of greens.
The butterfly in the top right corner was glued to a piece of Clearly for Art, heated with a heat tool and the wings were shaped with the Clearly for Art was still warm.
I guess that’s all I have for today. I need to go and run some errands for a meeting tonight and then get to work in the studio.
Thanks for stopping by and remember . . . life is short, the adventures of the day!

Supplies/Product:
|
|
|
|
|
|
|
|
|
|
|
|
|
|
|
|
|
|
|
|
|
|
|
|
|
|
|
|
|
|
|
|
|
|
|
Happy Friday! I hope y’all have had a good week. I started physical therapy for my wrist and have continued to be smoke-free . . . . the count is now 6 days! Thank you all so much for your support and comments. I’ve also had some pulmonary tests done this week . . . thus the reason for going smoke-free. More on all that later when I know more.
I don’t know when it was or even how long ago, but I purchased a couple of little wood boxes from the $1 bin at Michael’s.
I decided yesterday that it might be fun to try and alter one. I painted the box black inside and out, made my flowers with GrungePaper, looked at it all together and decided it was pretty damn boring. After some additions and modifications, this is what I came up with.
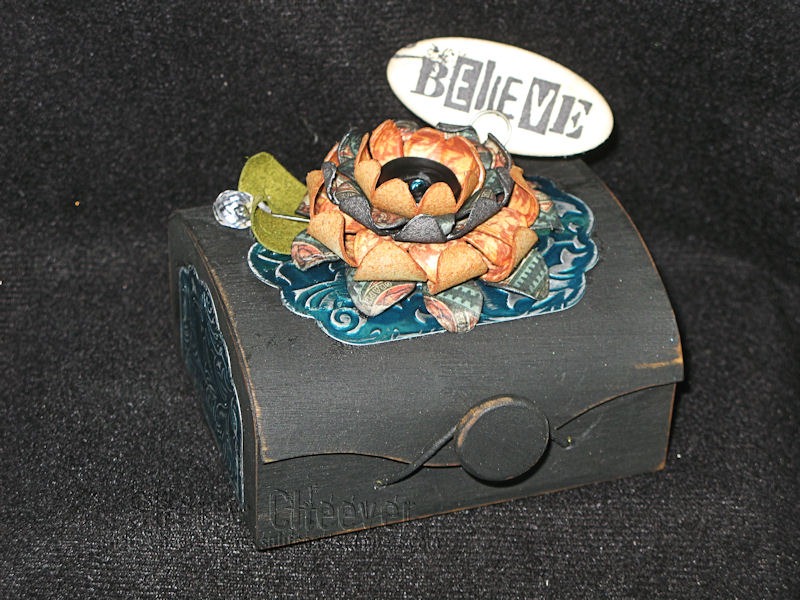
Out of the clear blue one day I received from Spellbinders™ craft foil. I decided that I really did need to try this as I’ve been wanting to get into the metal craze as it is. I just haven’t tried it yet. Well, I can now say that I’ve at least dipped my little finger into the mix and given it a whirl. So far, so good . . . . I like it!
I decided on a piece of teal foil, embossed it with the Flourish Embossabilities, die cut with Labels Eleven, sanded the highlights and then covered the entire thing in Black Soot Distress Ink. The flower is GrungePaper covered with Graphic45 Steampunk designer paper, and then die cut with Daisy Heads . . . twice.
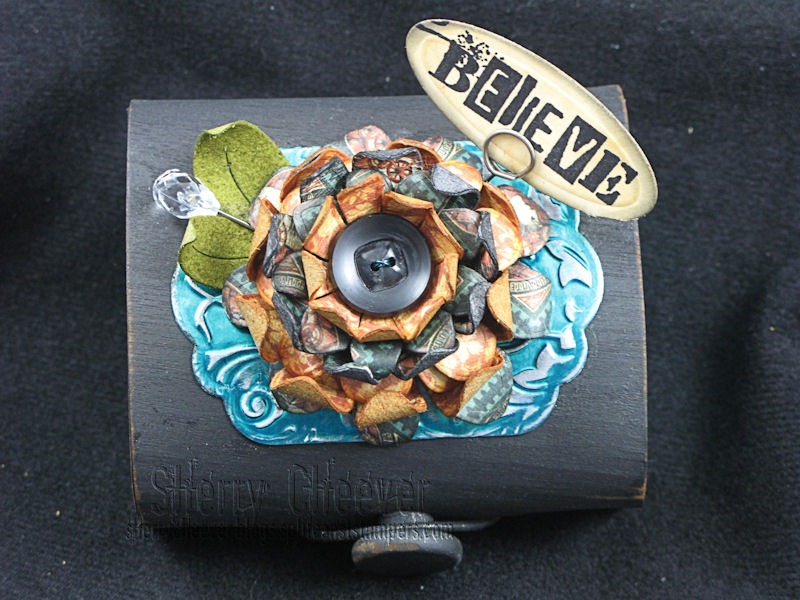
In essence, I guess I’ve come up with a little no nonsense type of box, but it was sure fun to experiment.
- Stamps: Studio 490 It’s Face Art by Stampers Anonymous from eclectic Paperie
- Paper: Graphic45 Steampunk Debutante Collection; Manila Shipping Tag
- Ink: Ranger Black Soot, Vintage Photo, Peeled Paint, Rusty Hinge Distress Inks and Archival Jet Black
- Accessories: Spellbinders™ I2-1009 Flourish Impressabilities, S4-140 Petite Ovals – Small, S4-246 Labels Eleven, S4-058 Daisy Heads, and F-012 Precious Metals Premium Craft Foils Assortment; Tim Holtz idea-ology GrungePaper and Memo Pins; Sanding Block; Maya Road Trinket Pin; Vintage Button; Wire; Wooded Box
I hope you have a great weekend! Mallory is home on break this weekend and we’ve got some girl things planned, but I’m still hoping I can find some more studio time here and there. Thanks for stopping by and remember . . . . life is short, take advantage of the adventures that come your way!


