Smiley from millan.net  Happy Thursday!  A few months ago, Beate from Splitcoaststampers asked me to write a tutorial on that “inky thing I do.”  It was published yesterday on Splitcoaststampers and can be found under the Resources section as “Wrinkle-Free Distress.”  I contacted Tim Holtz and asked his permission to recreate the tutorial for SCS, and what he actually called this technique . . . I didn’t want to get it wrong!

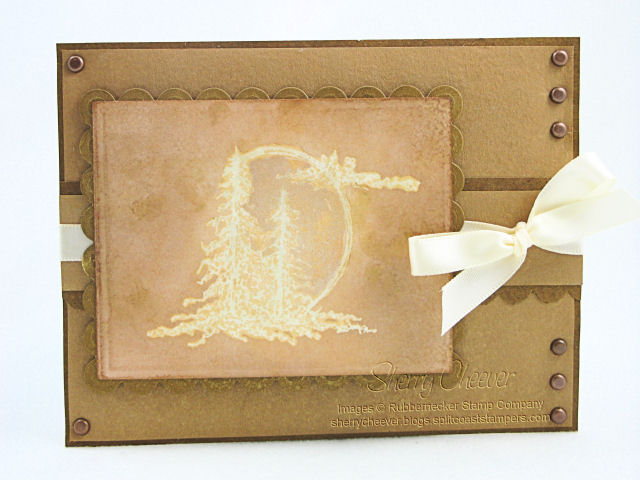
Here’s the card I created as my sample for the tutorial.

wringle-free-distress-finished-card.jpg

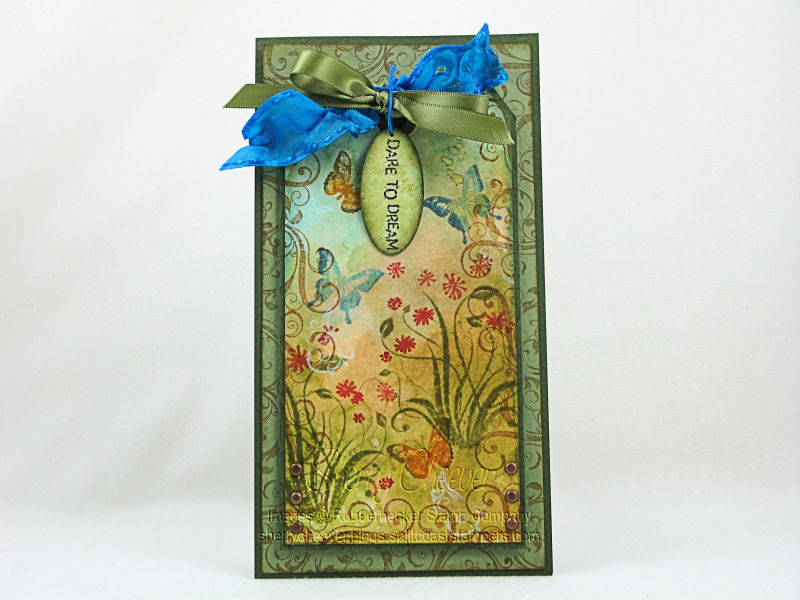
Instead of letting the tag stand alone, I decided to incorporate it into a card.  Once I had finished the tag, and had the layout for the card, I stamped the flourish images on both the card front and the tag.  I lined the flourishes up, and raised the tag with mounting tape.  Some of the images on the card, i.e., the butterflies and small flourishes are a sneak peek of what’s coming next from Rubbernecker Stamps.

  • Stamps: 427 Butterfly Inchies, 467 Floral Silhouette, 461 Scraps & Scuffs, 436 Flourish and 423 Flourish Inchies from Rubbernecker Stamps
    Paper: Manila Shipping Tag and Prism Herbal Garden Dark and Medium
    Ink:
    Ranger Archival Jet Black, Adirondack Snow Cap Pigment, and Broken China, Vintage Photo, Peeled Paint, Antique Linen, Spiced Marmalade, Black Soot and Faded Jeans Distress
    Accessories:
    Ranger Non-Stick Craft Sheet, Glossy Accents, Mini Mister, Cut-n-Dry Stamp Pad Felt; Venture Foam Tape; May Arts Ribbon; Copic At You Red Spica; DMC Embroidery Floss; Brads; Oval Punch; Candle Lighter
    All product and images from
    Rubbernecker Stamps

I hope you try this technique and have as much fun with it as I do!  Have a great day and thanks for stopping by!

Good morning!  Smiley from millan.net This was going to be the day that I would being the videos.  What I’m thinking is actually babbling in a video.  Then I will have my card and the necessary deets.  That way for people who truly aren’t interested they can skip the video.  This has been in the works for a month or so now but I have yet to get it done.  I didn’t write about this project last night when I finished, well because  . . . I wanted to do the video.  Alas, I got out of bed this morning with a headache and today is probably not the day to start.  I did promise a reader however, that I would do a video tutorial on the fragment tag I used on my Wacky Wednesday card.  It will be coming real soon!

A number of months ago, I truly can’t remember how long . . . maybe 4 or 5, I was at Target shopping.  I found in the Dollar Spot a package of 3 unfinished wood frames that some how jumped into my cart.  I had an idea of what I wanted to do with them, but unfortunately time has not been on my side.

You know that project I was talking about yesterday?  The one I had to let dry, blah blah blah?  Well, it is one of these frames.  It’s funny how I was working on a frame and then yesterday’s Splitcoast Ways to Use It Challenge was for frames.  Smiley from millan.net I just had to finish the frame last night.

The frame is fairly close to what I had imagined.  This one is a practice piece, as I have an idea for my mother and her colors are definitely NOT green, orange and blue.  This one will hang in my studio which does have blue and green accents.  Now that I have general premise down, I can move on to the one for my mother.

WT214Hope

The unfinished frame was painted with acrylic paint and once that was dry, a layer of Distress Crackle Paint was applied over the acrylic paint.  After the Crackle Paint had dried, the edges and various places on the frame were sanded to appear worm and handled.  The flower embellishment is made with Grunge Paper.  The leaves were stamped, inked and then cut out.  The layers for the flower were die cut with Spellbinders Daisy Heads Shapeabilities, inked and then over stamped with Rubbernecker’s Loose Weave Background.  For the panel inside the frame, that “Inky Thing I Do” was done with Antique Linen, Spiced Marmalade and Broken China.  Those colors were used because the flowers were inked with Spiced Marmalade and Broken China.  The sentiment was stamped in Ranger Archival Coffee.

If the photo looks funny, I took the picture with the frame upside down (didn’t want to mess up those grunge paper leaves and flower) and then rotated it in Paint Shop.

I hope each of you have a great day and thanks for stopping by!

I must leave you with this:  Smiley from millan.net I just saw it and it made me giggle. I just can’t help myself some times!

Happy Smiley from millan.net.  I hope y’all had a great day yesterday and it wasn’t gloomy and rainy where you are.  I am soooooooooo ready for warm weather and sun . . . I just can’t stand it!  I want golfing and gardening weather . . . .   Hopefully soon.  The Kentucky Derby Festivities start this weekend with Thunder Over Louisville, and I for one know that I will be watching on television.  Not gonna trust the Ohio Valley weather right now.  Actually, I get somewhat tired of the Derby coverage and by the second week in, I’m ready to leave town.  Maybe somewhere warm and sunny . . . . Smiley from millan.net

So we know that it’s Wednesday and time for another Rubbernecker Stamps  WACKY WEDNESDAY Challenge.  I must confess that when I saw what Jules had for us this week, I was taken aback.  It’s an inspiration challenge and this is what she has given us.

contemporary-abstract-textile-art-kiss-kiss -in-situ

Now I’ve thought about this for a few days now.  I can see fragments, UTEE squares, some of my favorite colors and of course, those X’s.  Since I’m not taken by the X’s, and I just did an inchie card last week, I decided to go for my favorite colors . . . purple, green and blues.

WW6FloralSilhouettes  Of course, I did that “Inky Thing I Do” for the background, using Broken China, Dusty Concord and Peeled Paint Distress Inks.  The image tag was done the same way, but with Broken China and Antique Linen. The image stamp was colored with markers, misted lightly with water and then stamped on the tag (one of my favorite techniques).  The purple background was run through the Wizard with the Spellbinders Petite 5 1/2” Scalloped Borderabilities, embossed and then sponged.  Since I had originally thought of fragments, I had to add one to the card.  Using alcohol inks, I inked up the fragment.  Instead of stamping in black ink and wiping off the image, I decided to stamp with Alcohol Blending Solution.  You have to be careful not to move or shake the stamp . . . ask me why I know this!  Even though it took me like FOREVER to get this card done, I must say it was really a fun one to make!

I hope you decide to join us for this week’s WACKY WEDNESDAY Challenge.  The prize this week is one Discount Coupon good for 40% off your entire Rubbernecker order.  You also get to take advantage of all other specials and discounts on the Rubbernecker Stamps home page.

Thanks for stopping by the BAD SIDE! and I hope you have a fabulous day!

Hey, Smiley from millan.net.  I hope you had a great day yesterday!  I was just a bit lazy . . . lying on the couch, napping, lying on the couch, napping, blah blah blah.  I sure as hell didn’t get much done, but oh what a great day!

Today is another Rubbernecker Blogger Challenge.  Tami gave us an excellent sketch, which you can check out on the Rubbernecker Stamps Blog.  I hope that you join us and play along this week!

I used a new stamp on my card today.  I actually didn’t have this one, BUT while I was at Bev’s it was lying on the table with a few stamped images.  I started to take the stamped images, but the stamp actually made it into my bag instead.  Anyhoo, I wanted to follow the sketch (since it’s such a great one), and left my second panel plain.  I’m not sure about this and almost put a grunge flourish on it before I took the pic.  I wasn’t too sure about that either, and decided to continue to look at the card for a few days.  I’ll make up my mind later on if I should add something or not.

RNBC7

The image panel started as white paper and then color was added by swiping the ink pads on my craft sheet, misting with water and adding layers of color, ironing in between the layers.  The edges of the image panel were distressed using scissors.  I tell you this so that you can see the difference between the results of the scissors and that of the distressing tool.  The panel behind the image was distressed with the tool.  Big difference!  When I want a more aged distressed look, I go for the scissors!  The images were colored with distress reinkers and a paint brush.  I decided to use up some of the letters in my mini Grunge collection for the sentiment.  They were first covered with Distress Crackle Paint, leaving space in between the paint.  When the letters dried, I went back over them with distress ink.  The sentiment is adhered to a Spellbinders die cut with glossy accents.  Fun card to work on!!!

  • Stamps:  Stamp Oasis Holiday Collection:  Pine Cone Montage from Rubbernecker Stamp Company
  • Paper: Neenah Classic Crest Solar White, BasicGrey Figgy; SU Chocolate Chip and Baja Breeze
  • Ink: Ranger Broken China, Vintage Photo Brushed Corduroy and Pine Needles Distress; and Archival Jet Black
  • Accessories: Clover Craft Iron; Sewing Machine; Ranger Craft Sheet, Peeled Paint Distress Crackle Paint, Ink Blending Tool, Mini Mister, Glossy Accents; Tonic Tim Holtz Scissors and Distress Tool; Tim Holtz idea-ology Mini Grunge Board; Spellbinders Shapeabilities Ribbon Tags Trio; Tsukineko Sponge Dauber; Brads; Cotton Twill; Venture Foam Mounting Tape

Have a great day and I look forward to seeing what you do with this sketch!

I rarely do more than one post in a day, but I decided to stamp a little this morning and do today’s Color Challenge on Splitcoast.  The challenge today is monochromatic stamping.  How could I resist that challenge?  Of course, I’m still playing and if you can’t guess, I’m lovin’ this faux bleach technique!

CC182

The image was stamped and embossed, and then background was misted with different combinations of distress pearlized mists.  I even sprayed the background panels with the mists, but it’s a little hard to see in the photo.  It’s really glittery in real life . . . as are my fingers!  I even added a little Pearl Perfect Pearls on the sun to turn it into a moon!

  • Stamps: KK Originals Trees Collection Serene Sunrise SKU:42-06 KK from Rubbernecker Stamp Company
  • Paper: White Shipping Tag; Prism Tawny Medium and Dark
  • Ink: Tsukineko VersaMark; Ranger Scattered Straw, Dried Marigold and Vintage Photo Distress
  • Accessories: Ranger Mini Misters, Pearl and Gold Perfect Pearls, Perfect Medium, Super Fine Detail Clear EP, Inkssentials Blending Tool; Spellbinders Plain and Scalloped Rectangle Nestabilities; Iron; Brads; Ribbon

Don’t forget to check out the Treasure Hunt at Rubbernecker today.  I’m also offering a chance to win some Rubbernecker Gift Certificates in my earlier post today.

© 2015 Suffusion theme by Sayontan Sinha