I’m tellin’ ya. This week has just been a blur for me. Once again the pups woke me up at 6:30, and I wasn’t ready to get up. Here’s the thing. They are crated at night in the family room. Lance gets up early, really early – like 5:00 a.m., and takes the dogs out in the morning. After they’ve come in from their morning walk, they get a treat, and then they come barreling into my bedroom and jump up on the bed. My bedroom door doesn’t latch tight, and all they have to do is nudge the door and in they come. It would be nice if they could just lay there, but NO – they have to lick my face, my ears, walk all over me and whine a little. The last two mornings there was nothing I could do but get up with them. Of course, I’m still so tired that I’ve sacked out on the couch and taken a nap within an hour of getting up. Of course, if I could make myself go to bed at a decent hour every night, that might help. Don’t ya think? I think I need to work on adjusting my internal clock!

Last night I was up working on projects for my Saturday morning Stamp Club Meeting. I’ve been torn on what projects to give the girls to do, and still haven’t worked them all up yet. I like to give them four, one being an altered item, but this month I’m really at a loss. I’ve pulled some Stampin’ UP! Sets out that I think might be fun, but nothing is coming to mind for them.

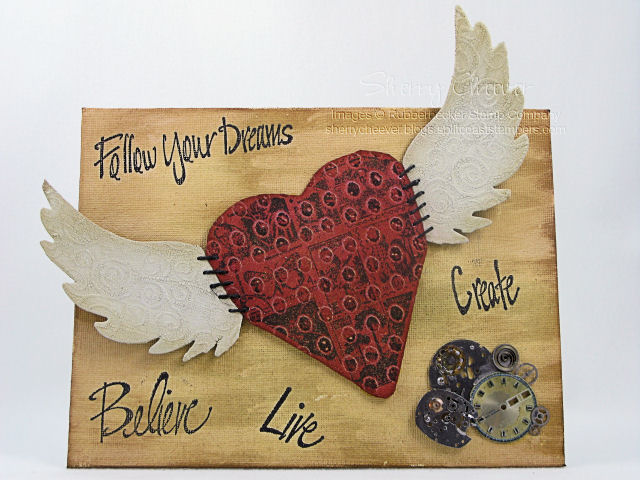
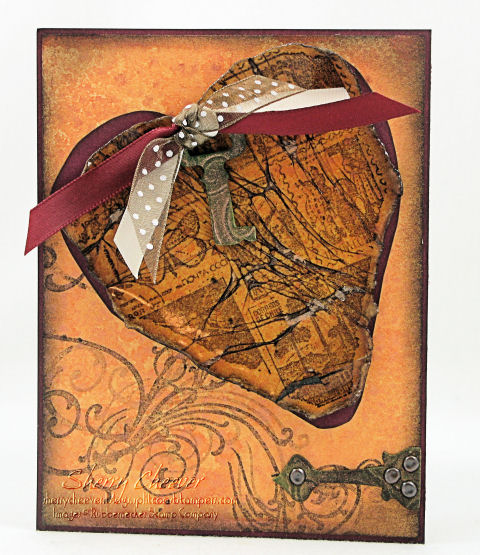
One idea I got last night, was to make a tag with them, one that I would demo at a show, only using SU images. This was my second attempt, the first being tossed into the garbage because it was too dark.

Tres Chic Tag

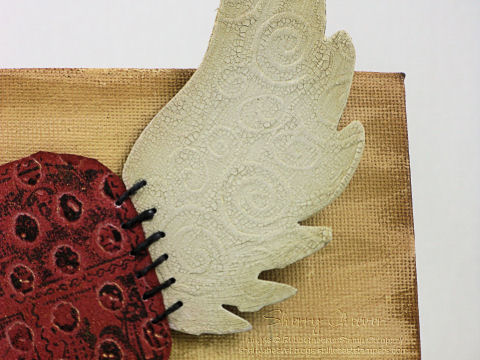
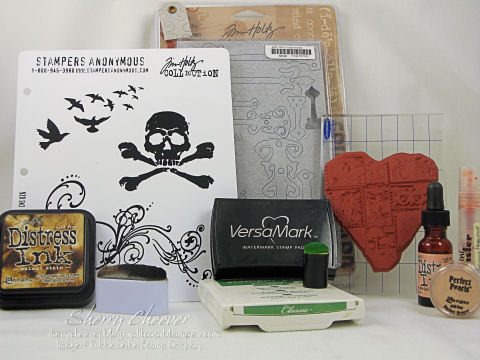
From the Garden was painted with a Copper Acrylic Paint Dabber, and stamped directly onto the tag. After it had dried, and using pad to paper, the remaining tag was colored with Soft Sky, River Rock and Groovy Guava. Because the acrylic paint works as a resist, the ink comes right off leaving color onto the tag only. The background Tres Chic was stamped in Walnut Stain Distress Ink and then the butterflies and flairs were stamped in Ruby Red. A Shimmer Mist of River Rock and Copper Perfect Pearls was misted over the tag and then the edges were distressed and sponged in Vintage Photo Distress Ink. I inked the Grunge Board heart with Ruby Red and the Grunge Board Wings were painted with Old Paper Crackle Paint and glued them together using Ranger Glossy Accents. Before placing them on the tag, I misted the heart and wings with the Shimmer Mist. For added embellishment, I found this old earing in my jewelry stash, removed the post end and tied it on the tag with the ribbon.

TRES CHIC TAG PRODUCT

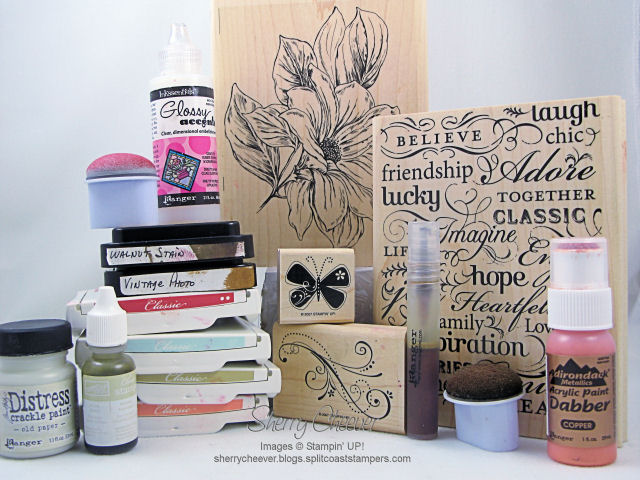
Stamps: Tres Chic, From the Garden and Priceless from Stampin’ UP!

 Paper: Manilla Shipping Tag

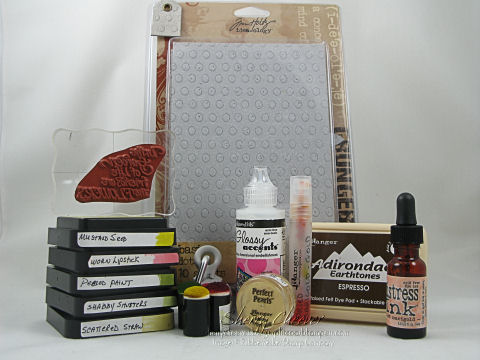
 Ink: Stampin’ UP! Ruby Red, Soft Sky, River Rock and Groovy Guava; Ranger Tim Holtz Walnut Stain and Vintage Photo Distress Inks

Accessories: Ranger Adirondack Copper Acrylic Paint Dabber, Glossy Accents, Copper Perfect Pearls, Mini Mister and Old Paper Distress Crackle Paint; Stampin’ UP River Rock Reinker; Tsukineko Sponge Daubers; Tim Holtz Idea-ology Grunge Board Elements; Ribbon; Old Earring


Have a great day everyone and hopefully I’ll have some other Stamp Club Projects to show you later.

NEW SIG

You know how sometimes you start a project and it ends up something entirely different. This has happened quite often with me lately. I have one half assembled card and one colored image on my desk now that was supposed to be one card. I colored the image taking my colors with the designer paper I was going to use. I got my layout together, assembled the backgrounds, worked on my embellishments, and then when I laid the image on top – well, it really doesn’t work. I haven’t decided what I’m going to do yet. Replace the image with a sentiment or try the image anyway. There actually is a twist with the image and designer paper, which is why I chose it. Maybe it’s the embellishments I worked up that don’t work. I’ll keep looking at it for a day or so and try a few other things.


This same thing happened to me a few weeks ago. There was an inspiration challenge to make a card based on something in your home. I picked the framed quilt pieces in my stamp room. I had this idea that it would be cool to stamp out a heart, cut it up into 1″ squares and do an inchie heart. So that is exactly what I did. Then the heart was too big and overpowering for a card front. So I switched to a canvas. As I was standing there studying the canvas, the heart was too small. I needed to add more to it! I had just gotten some new sentiments that I pulled out, studied them and it hit me. I knew what to do! I stamped the same heart image on the grunge board and cut it out. Wings were added to the heart, sentiments were inked and stamped, and an old watch was torn apart. I think the watch may have been my dad’s or my grandfather’s. It was in a bag of old jewelry that my mother gave me some time back. The watch = TIME. Take TIME to

Take Time To Canvas

The canvas painted with a Ranger Lemonade Acrylic Paint Dauber and inked with Old Paper and Vintage Photo Distress Ink. The heart image was stamped in Vintage Photo on the Grunge Board and then cut out. The heart was then inked with Fired Brick Distress Ink and misted with Fired Brick – Gold Shimmer Mist. The Grunge Board wings were painted with a Snow Cap Acrylic Paint Dauber and then covered with Old Paper Crackle Paint.

Take Time To Wings

Once they were dry and cracked, the wings were then misted with Old Paper – Gold Shimmer Mist. To attach the wings to the heart, I punched holes on either side and stitched them together with black hemp twine.

Take Time to watch

The sentiments were stamped in Archival Jet Black in and the heart and watch parts were attached with Matte Accents.


Stamps: KK Originals Sentiment Collection Believe SKU:69-09 KK, Create SKU:69-07 KK, Follow Your Dreams SKU:69-10 KK, and Live SKU:69-17 KK; Stamp Oasis Graphics Collection Postage Heart SKU:1679 SO from Rubbernecker Stamp Company

Ink: Ranger Archival Jet Black, Tim Holtz Old Paper, Vintage Photo, Fired Brick and Worn Lipstick Distress Ink

Accessories: 6×8 Artist Canvas; Tim Holtz Grunge Board Basics and Elements; Ranger Snow Cap and Lemonade Acrylic Paint Daubers, Mini Mister, Gold Perfect Pearls, Matte Accents; Hole Punch; Black Hemp Twine; Old Timex Watch; Tsukineko Sponge Dauber

I hope you have a terrific day today! I’m heading out to spend some time with Mallory.

NEW SIG

As promised earlier, I’m back with my Sketch Challenge card. I so adore the sketch today and see that it will be used a lot! As a matter of fact, my Stamp Club meets this Saturday and they have asked to work with chipboard. I think I’ll work up another card for them based on my Sketch Challenge card today! I might even let this sew this time – they are such a rowdy bunch that keeping them focused is rather difficult! I’ve been afraid that one of them might sew their fingers to the cardstock –

Before I show you my card however, I promised Robbi I would show pictures of my puppies today.

Here’s Miss Ellie trying to stay out of trouble;

Ellie

and here’s Sydney.

Syd

Now, for my card.

SC166

The background paper is BasicGrey Two Scoops, which I sewed to a basic card panel of yellow cardstock. Before I stitched the paper, I distressed all the outer edges and then sanded away the rough spots. The sentiment is stamped in Adirondack Espresso and then sponged with Scattered Straw Distress Ink. The flower was made by running Basic Grunge Board through my Cuttlebug with the 2×2 flower dies. I sponged the different layers with Mustard Seed Distress Ink and then lightly tapped the Dried Marigold on the top to highlight the spots. The edges were then sponged with the Dried Marigold and I lightly misted them with Dried Marigold/Gold Shimmer Mist. I found an old iridescent button in my button jar, and knew that it had to be the flower center. To assemble the flower, I used Ranger Glossy Accents and glued each layer down. Once I had them layered, I punched a hole in the center with my Crop-o-Dile, added some more Glossy Accents to the base of the button and pushed the end of the button through the hole. The leaves were hand cut, sponged with Shabby Shutters Distress Ink and then highlighted with Peeled Paint Distress Ink. The petals were glued to the sentiment panel using Glossy Accents and the flower is raised on mounting tape.

Stamps: Sentiment from Rubbernecker Stamp Company

Paper: Georgia Pacific White, Prism Frosted Yellow, BasicGrey Two Scoops

Ink: Ranger Adirondack Espresso; Tim Holtz Mustard Seed, Worn Lipstick, Peeled Paint, Shabby Shutters, and Scattered Straw Distress Ink

Accessories: Sewing Machine; Tim Holtz idea-ology Basic Grunge Board; Ranger Glossy Accents, Tim Holtz Distressing Tool, Mini Mister, Gold Perfect Pearls, Dried Marigold Distress Reinker; Tsukineko Daubers; Cuttlebug and 2×2 Flower Cutting Dies; Crop-o-Dile; Ribbon; Old Button

All products shown below can be found on My Favorite Product page.

SC166 Product

It’s TREASURE HUNT TUESDAY @ RUBBERNECKER. The Treasure if you find it, will be a free image. However, to receive the Treasure a purchase of any size is required, and your treasure must be claimed between 4:00 am PST until 9:00 pm PST today (7:00 am EST – 12:00 am EST). Not only is today Treasure Hunt Day, but for every $50 in stamps purchased, you will receive one FREE stamp. You can check out more information on the Rubbernecker Home Page.

While you are on the Rubbernecker Homepage make sure and read about the Rubbernecker Bucks Monthly Drawing AND the FREE stamp offer:

Each month you can qualify to win $100 coupon good for Rubbernecker or Stamp Oasis stamps! For every $20 you spend, your name is entered once into a drawing.

For every $50 you spend on Rubbernecker, Stamp Oasis or KK Originals stamps, you get to choose a FREE stamp!

I’ve got some Tawdry Treats for you today! As well as receiving the Rubbernecker Bucks show below, I’m gonna throw in some other Tawdry Treats.

RN 10 Buck

What, you ask? Well I don’t know yet. Maybe today’s Color Challenge Card (that I still have to complete – but only if I like the colors), maybe some ribbon, maybe some extra rubber I’ve got tucked away! All I know is, I’m gonna add a little something to the package this week.

How do you win? Leave me a comment and tell me what your most dreaded household chore is! I spent the day Monday doing mine — paying the bills! If it were as simple as writing out checks, I might be okay with it. But, I balance all the receipts with the ledgers, blah blah blah. I’ll announce the winner tomorrow morning.

Not only do I have Tawdry Treats, but some of the other members of the Rubbernecker Design Team, are also offering up Blog Candy. If you don’t want to you need to sail on over to:

Jeanne’s Blog, Inky Paws

Shelly’s Blog, Stamp with Shelly

or

Candy’s Blog, Candy’s Land (and by the way, Candy has the first clue in today’s Treasure Hunt too)

where they’ll be waiting to give you a great big

So anyhoo, I’ll be back a little later with my Color Challenge Card, that is if I like the colors, and if not a Challenge Card, I have an idea in mind that I must try!

As promised, here is my Color Challenge Card for today. The colors are SU So Saffron, Wild Wasabi and Purely Pomegranate. I don’t know what got into me, but I quickly scanned the other uploads, and decided that I really didn’t want to do a cutesy card today. What I did want to show you however, was how to use the same colors, but make them look different.

CC156 Product

I’m going to show you the products used first, so you know where I am coming from. If you figure it out, let me know too! With the exception of the SU products, you can find everything at My Favorite Products.

CC156 Remake

I started this card with two 5.5 x 4.25 sheets of So Saffron paper. I misted them both with Dried Marigold/Copper Shimmer Mist, and let them dry. On one sheet, I stamped the heart image in Walnut Stain Distress Ink and tore out the image leaving frayed edges. Using a sponge dauber I began to work the same distress ink in toward the center of the heart, causing the edges to curl and give them some dimension. On the other sheet of So Saffron, I stamped the flair image in Walnut Stain and then sponged the edges with the same ink. Using VersaMark and Ranger UTEE, I covered the heart with three layers of the UTEE, heat setting between each layer. Once it was cool to touch, I placed the heart image in the freezer for a few minutes to harden the UTEE. Once I took it out of the freezer, and bent the image, it cracked so nicely. At this point I tried misting the Cracked Glass with the Shimmer Mist thinking it might go into the cracks, but that was a worthless step. I ended up wiping it all off and rubbing the Walnut Stain Distress Ink directly onto the image, concentrating on the deeper cracks, and then wiped off the excess.

I’m sure you are asking by now, where is the Wild Wasabi? Well, it is on the Grunge Board key and hinge. I inked both pieces with Wild Wasabi, highlighted the swirls in the Grunge with Walnut Stain Distress Ink, and then misted them both with the same Shimmer Mist that I used on the So Saffron paper. I brought in the Purely Pomegranate as my background piece for the heart and for the card base itself. All these edges were also sponged with Walnut Stain. Once I had attached the hinge using brads, I used a small hammer to pound them a little for dents and distressing.

These colors are not what I would have chosen for this card. I’m sure I will remake it with the colors I first had in mind when I initially thought of this idea.

Stamps: Stampers Anonymous Tim Holtz Anthology and Stamp Oasis Graphics Collection 1679 SO Postage Heart from Rubbernecker Stamp Company

Paper: SU So Saffron and Purely Pomegranate

Ink: SU Wild Wasabi, Tsukineko VersaMark, Ranger Tim Holtz Walnut Stain Distress Ink

Accessories: Tim Holtz Idea-ology Elements Grunge Board; Ranger Mini Misters, Copper Perfect Pearls, UTEE, and Tim Holtz Dried Marigold Distress Reinker; Brads; Hammer; Piercing Tool; Crop-o-dile; Ribbon

I got a second wind this evening, plus a brain storm. Yes, it hurt! I actually took another 2 hour nap this afternoon and after dinner couldn’t help but head down to the rubber room. While at CHA, I was so taken with the Tim Holtz Idea-ology Booth — actually, I was mesmerized. There were flowers, grunge board flowers.

CHA Flowers

Ever since I saw them, I knew I had to try my hand at them. I went to Archivers last weekend and they actually had the Grunge Basics. I failed to pick some up in California to bring home. In the dollar bin, they also had a sheet of chipboard flower shapes that I knew I could use as a template. Here’s what I came up with tonight.

Art Journal

The journal is covered with BasicGrey Two Scoops designer paper that I sponged the edges with Vintage Photo Distress Ink. The flowers were cut from Basic Grunge Board. I used some chipboard flowers to trace around and then cut out. The flowers were sponged with Worn Lipstick and then highlighted pad to grunge with Fired Brick. To add some simmer to the flowers, I misted them with Dried Marigold-Gold Shimmer Mist. The leaves were just cut out of the Basic Grunge, sponged with Shabby Shutters, highlighted with Peeled Paint and then misted with Scattered Straw-Gold Shimmer Mist. The bottom grunge piece is from the Elements collection, was sponged with Worn Lipstick, highlighted with Vintage Photo and then misted with the Dried Marigold-Gold Shimmer Mist. The sentiment panel is also BasicGrey Two Scoops. I distressed the bottom layer and then sponged the edges with Vintage Photo. For the top layer, the sentiment was stamped and then the edges were sponged. When I got ready to assemble the layers of the flowers, I placed them how I wanted, and pierced down threw the button into and threw the layers of the Grunge. The ribbon was threaded through a needle and pulled through to tie the layers together with the button.

Stamps: Life Without Art Sentiment from Rubbernecker Stamp Company

Paper: BasicGrey Two Scoops

Ink: Tim Holtz Worn Lipstick, Fired Brick, Peeled Paint, Shabby Shutters and Vintage Photo Distress Inks

Accessories: Tim Holtz Scattered Straw and Dried Marigold Distress Reinkers, Basics and Elements Idea-ology Grunge Board, Distress Tool; Ranger Mini Mister, Gold Perfect Pearls, and Glossy Accents; Tsukineko Sponge Dauber; BasicGrey Two Scoops Button, Pink Ribbon, Piercing Tool

© 2015 Suffusion theme by Sayontan Sinha