SPELLBINDERS INTRODUCES:
SNEAK PEEKS ON CHA SUMMER TRADE SHOW RELEASE DIES!
JULY 9 – JULY 22, 2009
PLEASE NOTE: Commenting on this post is welcome but does not enter you into the contest. This contest is sponsored directly by Spellbinders Paper Arts. Please read the post to find directions for entering. If you have any questions, please e-mail: [email protected].
Welcome to the ninth day of Spellbinders CHA Sneak Peek Blog Frenzy!
Spellbinders is revealing 17 new die templates to be released at the Craft and Hobby Trade Show on July 28, 2009, with some of their greatest fans…YOU! From July 9 – 22, 2009, you will have the opportunity to be a part of these world wide sneak peeks through visiting the Spellbinders designer blogs listed below and trying your luck at winning spectacular die templates! You will have a chance to win the die I’m introducing AND the dies previously revealed in this CHA Blog Frenzy by entering the contest at the end of this post. This is a progressive prize, each day the daily prize grows! Be sure to read all the rules before entering! You still have until July 17th, 11:59 pm EST to enter Julie Overby’s blog at Mini Moments and until July 18th, 11:59 pm EST to enter mine.
To see previous reveals, or to go to any of the blogs of future reveals, feel free to visit the following:
7/9 Debbie Olson
7/10 Michelle Wooderson
7/11 Karen Hunsaker
7//12 Kazan Clark
7/13 Linda Duke
7/14 Heidi Blankenship
7/15 Kimberly Crawford
7/16 Julie Overby
7/17 Sherry Cheever
7/18 Debbie Seyer
7/19 Lesa Rapp
7/20 Becca Feeken
7/21 Jennifer Davis
7/22 Keri Lee Sereika
After the entry deadline is reached, Spellbinders will randomly pick one entry from each Blog Frenzy reveal as stated in the “Rules”. Winner will be contacted by e-mail within 24 hours of the contest deadline. Winner will have 72 hours to reply to that e-mail to claim the prize. If Winner fails to respond within 72 hours, a new name will be drawn for said prize. Winner will receive the new die templates being revealed on the specific daily blog post they are entering.
Entrants visiting all 14 Spellbinders CHA Blog Frenzy Reveals and correctly entering their information into the separate drawings, as described below, will automatically be entered into a GRAND PRIZE give away of a full set of the CHA Summer 2009 die templates and Impressabilities releases, 29 products, with a retail value of $561.71.
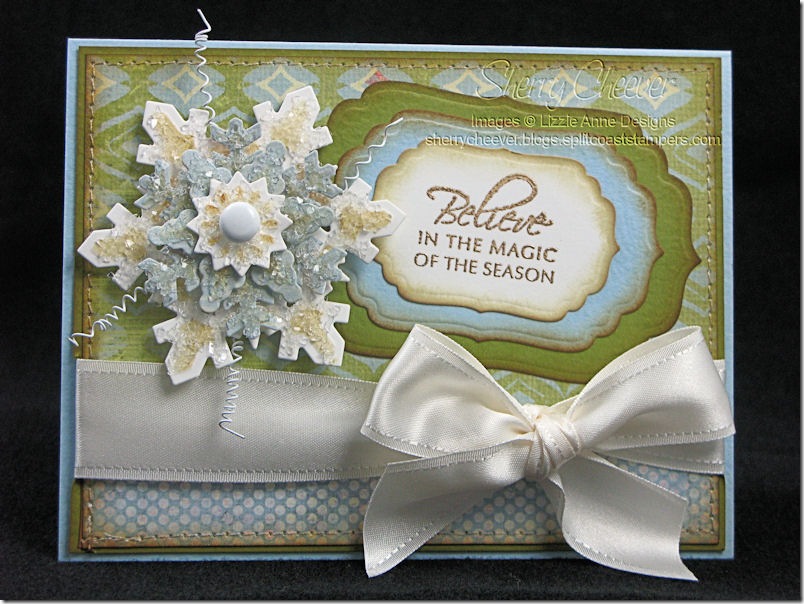
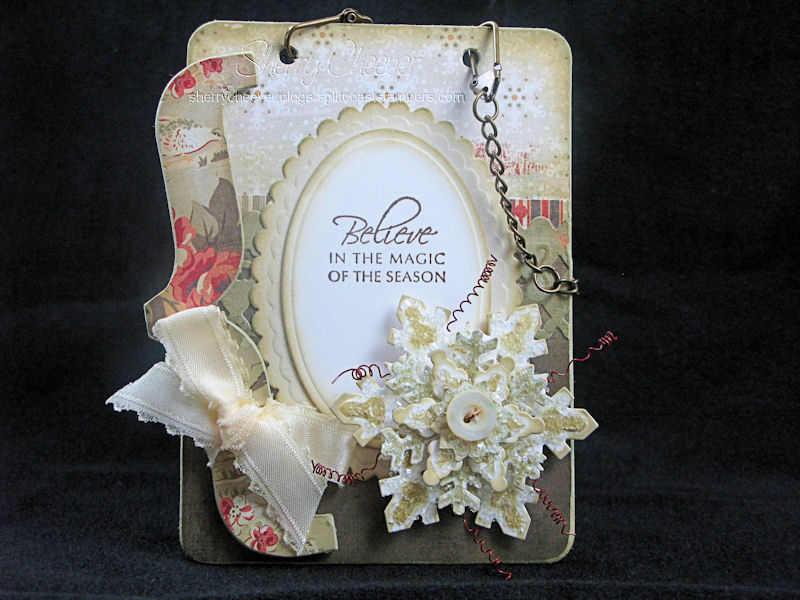
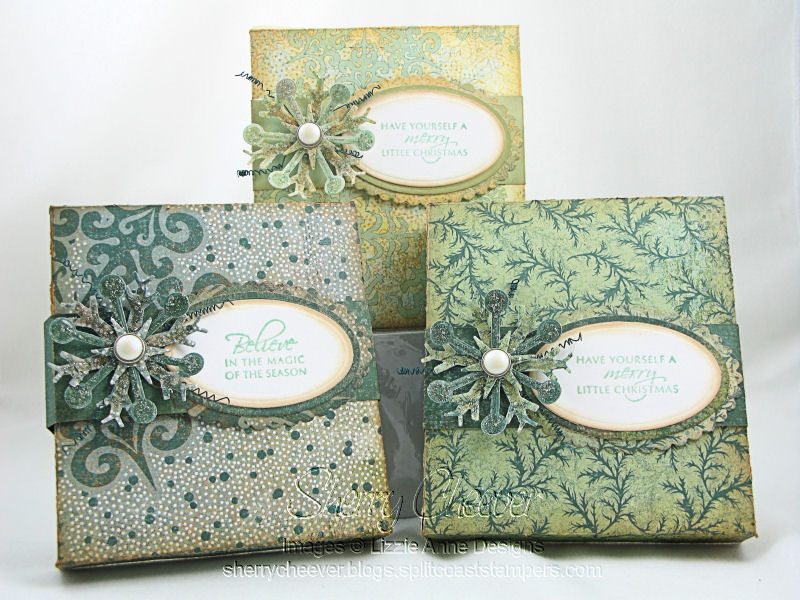
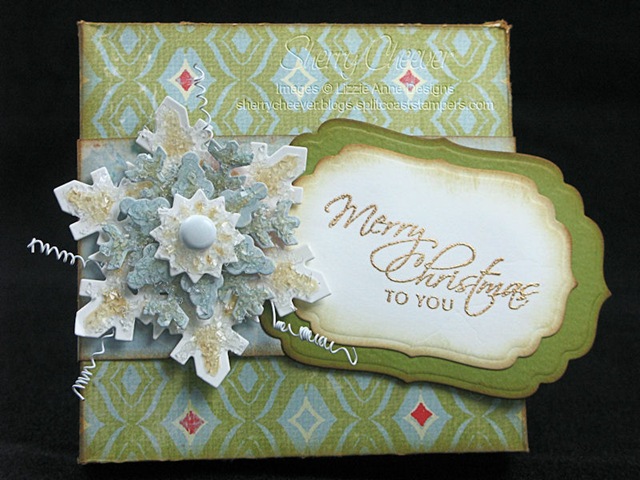
The projects I have made to share with you today are a Christmas card and a matching wall hanging. We’ll talk about the card first!

The border at the top of the card was made by using the largest of the S4-224 Snowflake Borderabilities Petite. Starting at the edge of the paper, I cut/embossed the border. Before removing the paper from the S4-224 Snowflake Borderabilities Petite die template, the embossed areas were sponged with Old Paper Distress Ink. The snowflake areas of the S4-224 Snowflake Borderabilities Petite die template were then removed and set aside for later use. The edges of the background papers were also sponged with Old Paper Distress Ink and then sewn to a layer of white paper. The sentiment was stamped on white paper and then cut/embossed with Spellbinders S4-138 Petite Ovals, Large. The scalloped background layer was cut/embossed with Spellbinders S4-139 Petite Scalloped Ovals, Large. The small snowflakes that I set aside were embellished (shown below) and then applied back in the border with foam mounting tape. The snowflake was made using the S4-222 Create A Flake 1. Later in this post, I give step-by-step instructions on how to create the snowflake.
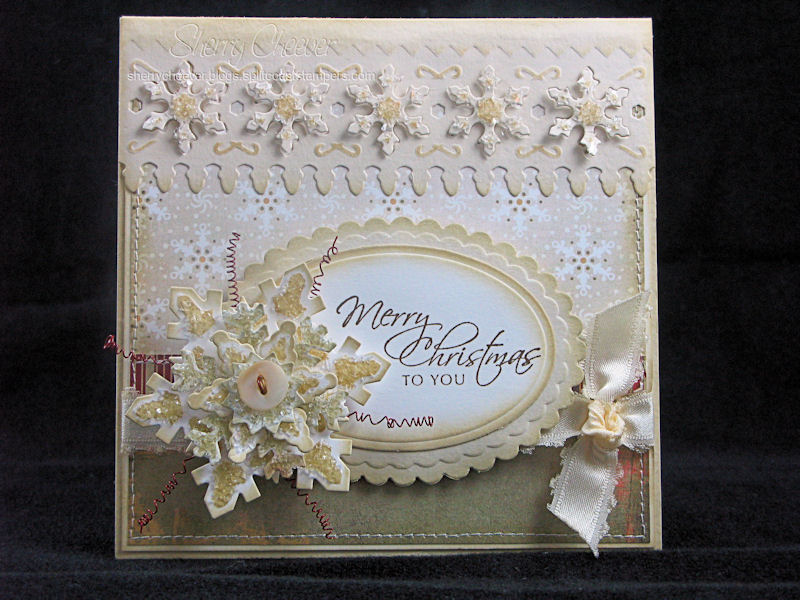
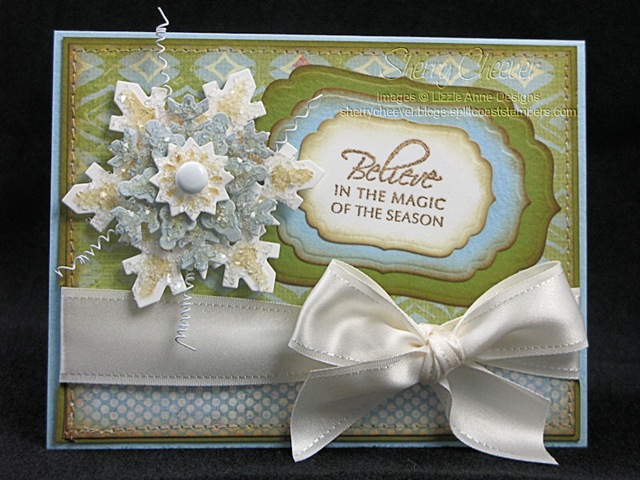
Now, here’s the wall hanging!

I used the same paper, die templates and ink for this project as I did for the card. I did however start with a rectangle chipboard coaster that the background paper was glued down on. I sanded the excess paper from the edges and then sponged them with Old Paper Distress Ink. The sentiment was made the same as the card. Behind the sentiment I used the smaller of the S4-224 Snowflake Borderabilities Petite. Once again, the embossed areas were sponged with ink prior to taking them out of the die template.
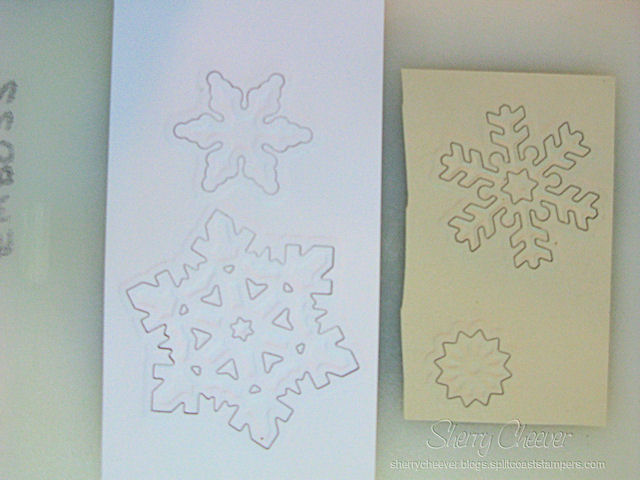
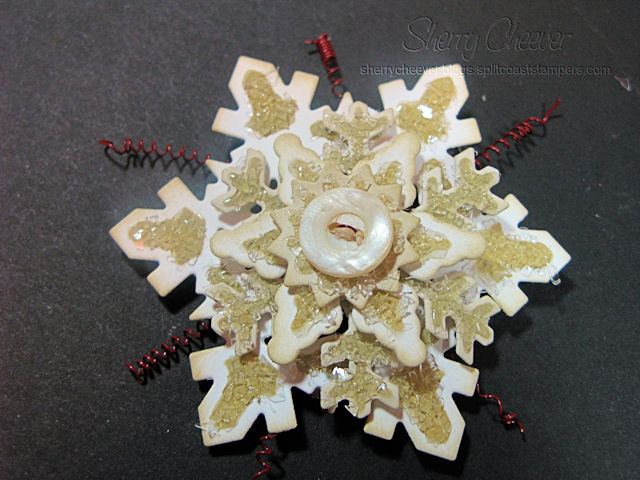
I’ve saved the best for last . . . the snowflakes! I love making these layered snowflakes and want to show you with step-by-step instructions how I make them!
I prefer to layer two different colors of paper
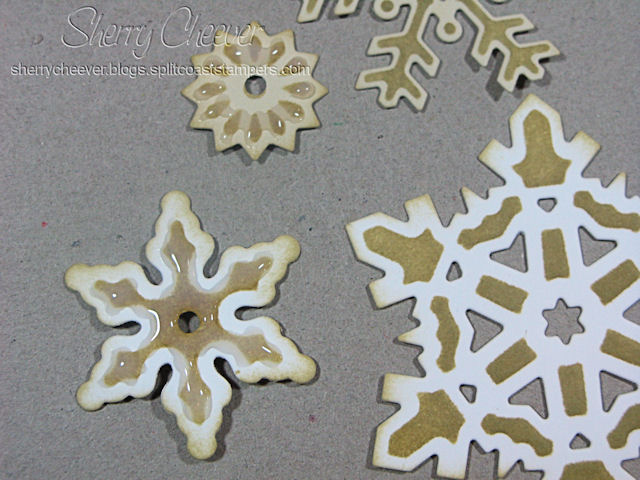
The S4-222 Create A Flake 1 die templates are cut and embossed.

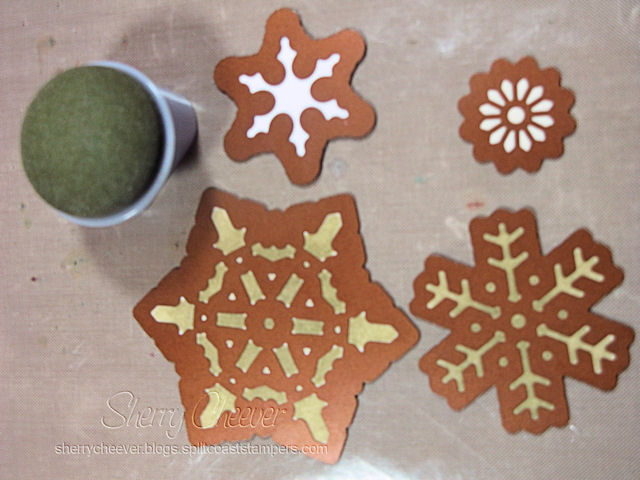
While the paper is still in the S4-222 Create A Flake 1 die template, the exposed areas are sponged with ink.

This is how the snowflakes will look when removed from the S4-222 Create A Flake 1 die templates.

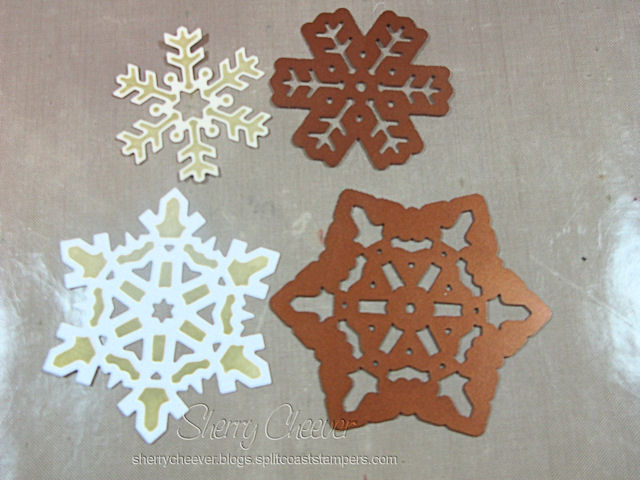
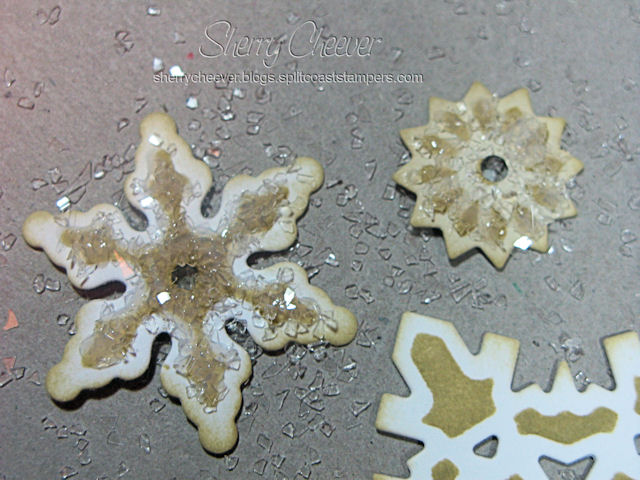
A layer of Ranger Glossy Accents is applied to the sponged areas.

Then Art Institute Vintage Shards Glass Glitter is sprinkled over the Glossy Accents. The snowflakes are set aside to dry.

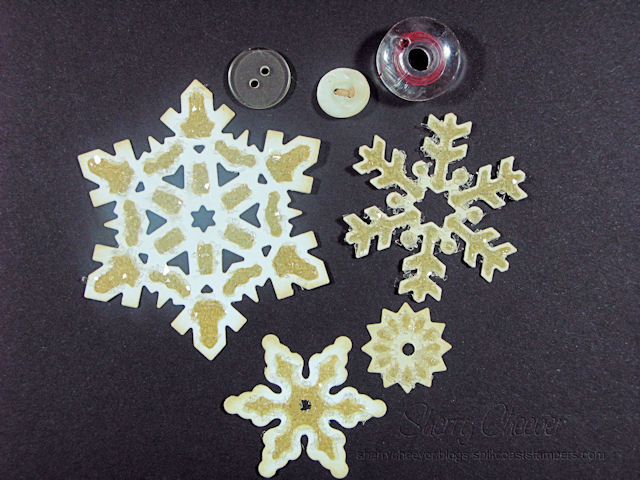
When the Glossy Accents have dried, excess glitter is removed and assembly begins.

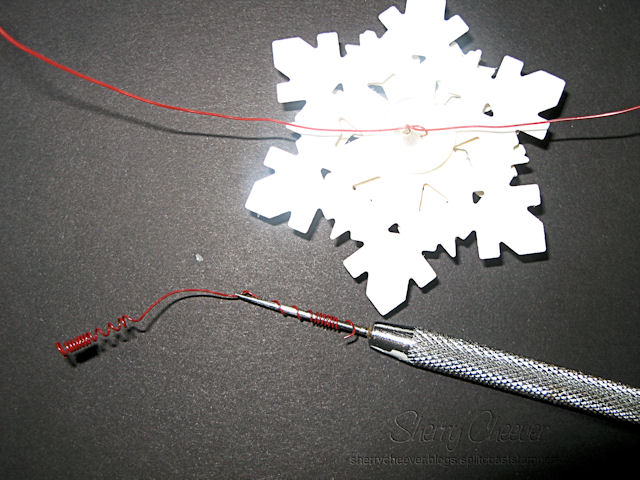
Using a vintage button (with the thread still attached), wire is inserted through the button holes and down through each layer of the snowflake.
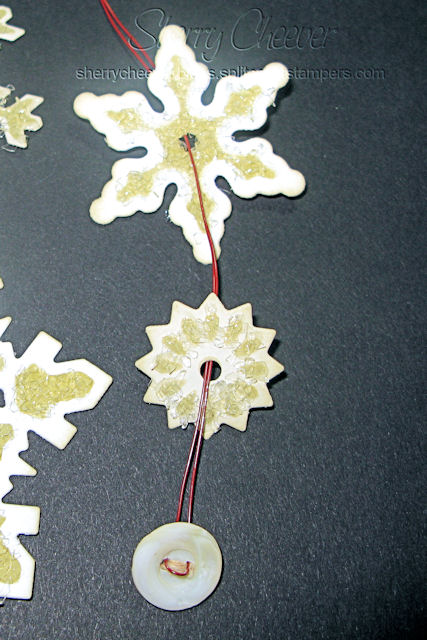
A button is used on the back to hold the layers in place and to tie off the wire.

The curly cues are made by wrapping the wire around the point of a piercing tool

The wire is then wrapped around the button on the back to secure the wire.

The finished snowflake is now ready to be used as an embellishment.

- Stamps: Holiday Script from Lizzie Anne Designs
- Paper: BasicGrey Wassail; Neenah Classic Crest Solar White; Prism Vanilla Cream
- Ink: Ranger Archival Coffee and Old Paper Distress Ink
- Accessories: Spellbinders S4-222 Create A Flake 1, S4-224 Snowflake Borderabilities Petite, S4-138 Petite Ovals, Large, and S4-139 Petite Scalloped Ovals, Large; May Arts Ribbon; Sanding Tools; Ranger Matte and Glossy Accents; Tsukineko Sponge Dauber; Venture Foam Tape; Clear and Vintage Buttons; Chipboard Rectangle Coaster and Accent Piece; Making Memories Wire; Sewing Machine; Art Institute Vintage Shards Glass Glitter #901 Krystallos
Don’t forget to read the rules below and click on the link to enter the contest. Photos of the die templates I have used in today’s post are:
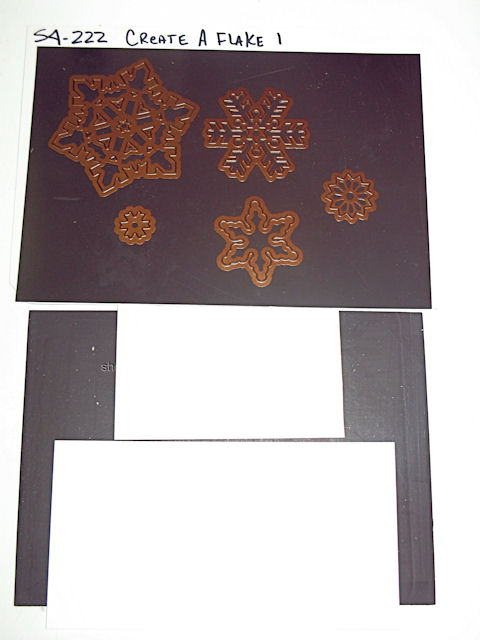
S4-222 Create A Flake 1
MSRP – $19.99
Dimensions: Largest Flake 2-5/8ths; Smallest Flake 1/2”

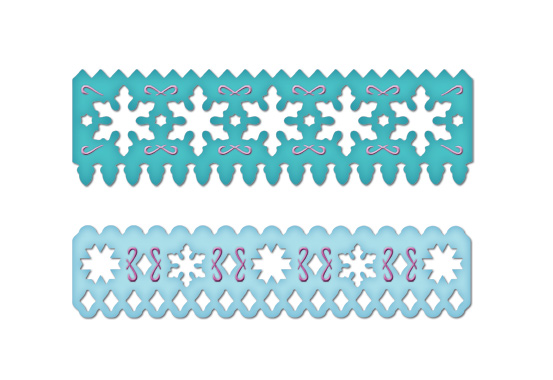
S4-224 Snowflake Borderabilities Petite
MSRP – $19.99
Dimensions: Smallest Border 5-1/2”x1-1/4”; Largest Border 5-1/2”x1-1/2”
Rules
Any participant wishing to be included in the daily drawing for the Spellbinders CHA Blog Frenzy give-away must adhere to all of the following rules. We are happy to welcome US and international blog guests for this Frenzy.
To enter each drawing on sneak peeks between July 9 and July 22, visit the reveal blog and click on the contest link to reveal an e-mail window. In the subject line of the e-mail, enter the die template name being revealed. Each blog reveal will remain open for 48 hours. Only 1 entry per blog is allowed and participant must use the same email address daily to be considered for grand prize entry, no exceptions. Please consider whether you will have access to the same e-mail address from July 9th through July 22nd and plan accordingly.
Spellbinders Design Team members and employees are not eligible for drawings.
Any participant wishing to be automatically entered into the drawing for the CHA Blog Frenzy Grand Prize must enter all 17 blog reveals and follow all the above rules.
Please note:
*Spellbinders will only use email information to contact the winner.
*Spellbinders will not share this email address with any other parties.
*Spellbinders will not use this email information for advertisements or communications other than to contact the winner.
*If you wish to be included in further communications from Spellbinders, please go to their homepage SpellbindersPaperArts.com and sign up for their newsletter.
Spellbinders CHA Blog Frenzy drawing
CLICK HERE TO ENTER
(If you use an e-mail client that does not work with this pop-up box, you may copy and paste this address to send your entry to: [email protected])
For more Spellbinders new product release information go to: https://www.spellbinderspaperarts.com/new
If you have any questions regarding the contest, send an e-mail to: [email protected]
I hope you’ve been enjoying the Spellbinders CHA Blog Frenzy over the last few weeks and that you’ve entered at all the blogs for the Grand Prize. Don’t forget to enter mine today in order to win the template dies that I’ve previewed today.
Thanks for stopping by and I hope you have a wonderful day!


 Good Monday morning! I hope y’all had a fabulous weekend. I know I did – – – Didn’t get out of my pj’s and spent many hours in the studio . . . it was marvelous! Tonight is my first class at Lavender Sentiments and I’m super excited. Hopefully it will go well and I’ll have a few more in the upcoming months.
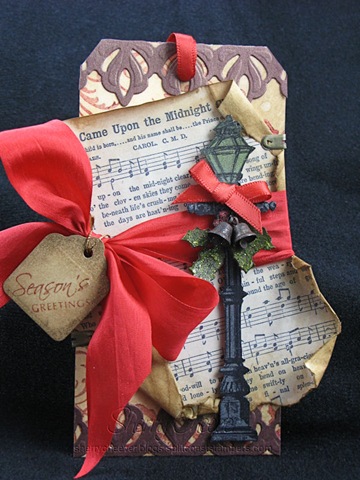
 12 Tags of Christmas. I’ve had so much fun creating and working on these tags. It’s been a great way to get the old mojo going! Today I have Tag 11 for you. Here’s T!m’s


