Happy Thursday!  I hope you’ve had a great week so far.  I finally snuck into the studio this morning BECAUSE I’ve been watching what T!m Smiley from millan.net is doing everyday and I’m falling behind.  He’s up to Tag 3 and I just finished Tag 1.  Since T!m Smiley from millan.net started doing the 12 Tags of Christmas, I’ve never played along.  I made up my mind a few weeks ago to also do the tags, but put my own personal spin on them.
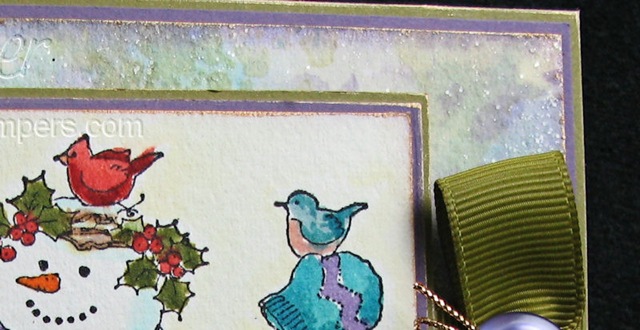
Here is T!m’s Smiley from millan.net Tag 1 and below is mine!

Tag!

I followed along with T!m’s Smiley from millan.net tutorial, but added my own personal touches.  Way too much fun!  I didn’t want a black snowman, so I made him purple by stamping in Eggplant.  But first, I painted a section of the Grunge Board white, so that I could stamp over it and not do a resist.

  • Stamps:  Tim Holtz Collection – Retro Holiday and Mini Holidays from Stampers Anonymous; Sentiment – Believe from Papertrey Ink; Flourish – Pollen Dust from Fancy Pants Designs
  • Paper:  Manila Tag from eclectic Paperie; Small Mini White Tag
  • Ink:  Ranger Broken China, Faded Jeans and Dusty Concord Distress
  • Accessories:  Ranger Snow Cap and Eggplant Acrylic Paint Dabbers, Rock Candy Distress Stickles and Distress Crackle Paint, Matte Accents, Mini Mister, Ink Blending Tool; Tim Holtz idea-ology Plain and Elements Grunge Board; May Arts Ribbon; Oval Punch; Blue Stitched Ribbon; Foam Mounting Tape; Craft Wire

I hope you have a fabulous day and thanks for stopping by!  I’m off to work on Tags 2 and 3 Smiley from millan.net WOO HOO!

Happy Tuesday!  I meant to have this post ready for early this morning, BUT last night I wasn’t happy with the photo and decided to redo everything.  I had worked on this card all day yesterday (and the day before), and decided I needed to wait until this morning after my pot of coffee to finish it. 

I have so many snowman images and last year wasn’t able to find the time to work with them.  I’ve decided this year, that I will make the time and color each and every one.  It’s been a long time since I worked with some of these images and for the fun of it all, want to revisit them.

I just went rooting through my gallery on Splitcoaststampers and found the last card I made with today’s image and it was on November 21, 2006.  Wow that’s been a few years!

Snowman and Friends

I water colored the image with Ranger Distress Re-Inkers, and had paper all picked out for the image.  The only problem was I couldn’t find the right ribbon, etc., to go with it so I spent most of the day trying to come up with a layout and paper.  I finally decided to hang it up and try the Wrinkle Free Distress technique for the background.  Using the three dominate colors (blue, purple and green) and watercolor paper, I made my background.  To add some glitter to the background, I covered the entire piece of paper with Ranger Rock Candy Distress Stickles.  I’ve tried to get a close-up so that you can see how it looks  . . . and don’t you dare look at my out of the line coloring! 

Snowman and Friends closeup

I ended up adding the snowflake as an embellishment.  To color the watercolor paper, I misted some extra ink with more water and while the paper was still in the die, I ran it through the inky water.  It was a nice effect but it was just a little too light, so I added more ink to the edges and covered the snowflakes with Rock Candy Stickles.

All said and done, not bad for taking so much time.

  • Stamps:  Snowman and Friends from Penny Black; Believe from Papertrey 
  • Paper:  Arches Watercolor; Papertrey Plum Pudding and Ripe Avocado
  • Ink:  Ranger Mustard Seed, Broken China, Fired Brick, Shabby Shutters, Peeled Paint, Vintage Photo, Frayed Burlap, Tattered Rose, Black Soot and Dusty Concord Distress
  • Accessories:  Spellbinders™ S4-222 Create A Flake 1 and S3-030 Tag Shape 3; Papertrey Buttons and Ripe Avocado Ribbon; Watercolor Brushes; Gold Cord; Ranger Rock Candy Stickles, Non-Stick Craft Sheet and Mini Mister

I hope you have a fabulous day and thanks for stopping by!

Happy Monday to ya!  I meant to write this post earlier today, but one thing led to another and before I knew it . . . . I was asleep in the recliner.  Of course, that was at 3:00 in the afternoon.  I spent the morning going to the doctor Smiley from millan.net, drugstore, dollar store . . . just the typical errands we must run sometimes.  I still need to go back to the drugstore, but I’m waiting for the after work traffic to die down a little first.

I spent the weekend literally cleaning and once again moving my studio around.  This time I think I like it just the way it is.  There was much to be boxed up and moved out, some stuff to recycle and once I got it all out there was plenty of room.  I’ll take you on a tour a little later.   In the meantime, let me show you the card I’ve been working on for like . . . . well, forever!

I started this card over 2 weeks ago and finally finished it up on Sunday.  I’m not quite sure that it’s 100% complete, it’s a little short on embellishments for me!

TrueFriendSept14

I didn’t do a very good job of getting this photo now that I’m looking at it.  There are actually 3 layers to the flower, each one colored with Tombow Markers and then separated with mounting tape.  I guess if you look closely you can see all the little extra petals behind the top ones.  Gold Liquid Pearls was used for the center of the flower, with just a bit of glitter sprinkled on top.

  • Stamps:  Friends ‘til the End and In Bloom from Papertrey Ink
  • Paper:  7 Gypsies Savannah; Prism Wizard Medium and Dark; Vanilla; Arches Watercolor
  • Ink:  Ranger Archival Jet Black and Coffee, Vintage Photo Distress
  • Accessories:  Spellbinders S4-230 Labels Six; May Arts Ribbon; Tsukineko Sponge Daubers; Ranger Gold Liquid Pearls and Matte Accents; Glitter; Foam Tape; Sewing Machine; Tombow Markers; Koi Water Brushes

I’m not feeling too wordy at the moment, so I probably need to end here.  I have some sinus stuff with a sore throat going on that needs medicating. Smiley from millan.net

Enjoy the rest of your day and thanks for stopping by!

Good morning!  Before I head out to Utica Days and the car show, I want to take a moment and thank all of you who left comments and/or emailed yesterday!  You can’t even begin to know how much all of your well wishes and encouragement has meant to me.  I feel so blessed!! 

I won’t let this get me down, as I have many more things I want to create and ideas to put to paper.  As some of you have said, “when one door closes, another opens.”  I have told myself that all week and realize that sometimes one has to take risks to see the greater rewards.  I’ve never been one to take the path well trod . . . I like to veer off and have as many adventures as possible.  I know there’s one hell of an adventure in my future!

Last night was the first time all week that I have felt the least bit creative, so I headed down to the studio.  The first thing I needed to do was clean up after myself from stamp club and put things away that had accumulated around.  I felt good then and decided to do some water coloring.  This is one of those cards that I became totally immersed and lost all track of time . . . but by golly, I really like it!

InBloomBirthdaySept5

The flowers and leaves from Papertrey’s In Bloom were stamped individually, embossed with gold EP, and then water colored with Tombow Markers.  I patiently cut them all out and arranged them around a panel made from Spellbinders Labels 7.  The sentiment is from the Papertrey set Floral Fusion (the Limited Edition from Summer CHA 2009).  Yes, I spent enough money to get that set . . . not surprised are you?  Oh one more thing, the sentiment panel and the one it’s mounted on was made with the Wrinkle Free Distress technique on watercolor paper  . . . absolutely LOVE the look of this technique with watercolor paper.  If you haven’t tried it, you need to!  Can you tell from the photo that each flower was raised above the other with mounting tape?  It truly does add to the dimension of the card.

  • Stamps:  In Bloom and Floral Fusion from Papertrey
  • Paper:  Papertrey Craft; Prism Majestic Purple Light; Vanilla; BasicGrey Wisteria; Arches Watercolor
  • Ink:  Ranger Distress Embossing, Old Paper and Dusty Concord
  • Accessories:  Spellbinders S4-231 Labels 7, S4-138 Petite Oval Nestabilities Large, and S4-139 Petite Scalloped Oval Nestabilities Large; Ranger Queen’s Gold Embossing Powder, Mini Mister, Gold Perfect Pearls, Non-Stick Craft Sheet; Papertrey Vintage Cream Satin Ribbon; Tombow Markers; Venture Foam Tape; Tsukineko Sponge Dauber; Sewing Machine

I suppose that’s all I have for the time being, except to tell you all that I’m so thankful for you!!  Have a great weekend and thanks for stopping by!  I’m off to yard sale and hopefully find some great bargains.

Good Saturday morning!  I can’t believe that I had the entire day yesterday to spend in the studio and play!  It was so nice.  Remember I told you that I bought arms full of stuff from Papertrey at CHA?  I finally had some time to play with In Bloom yesterday.  I actually have pulled the set out a few times, tried to color it, became discouraged and put it away.  Yesterday everything came together just as I had envisioned.  Trust me  . . .  that never ever happens to me!  Not only that, but my goal was to use these images not in the Papertrey classic style.  You see, I don’t do that style, it’s hard for me and I always struggle with something clean and simple (which is what I consider Papertrey to be).  So my challenge to myself was to incorporate these images into my style.

inbloomaugust21.jpg

The flower was stamped three times, embossed with Queen’s Gold EP, and then water colored with Tombow Markers.  I trimmed each layer out, leaving off a section of each as I went so that they could be layered.  I used the new Spellbinders S4-230 Labels Six for the sentiment and for an extra piece on the bottom right-hand corner.  I also finished the inside so that a personal note could be written.

InBloomAugust21INSIDE

The sentiment is from the Papertrey set, Friends ‘til the End, and I melted the ribbon to make it look more vintage and worn. 

  • Stamps:  In Bloom and Friends ‘til the End from Papertrey
  • Paper:  SU Black; Prism Butter cream; 7 Gypsies Classic Paperie; Arches Watercolor
  • Ink:  Ranger Archival Jet Black, and Distress Embossing, Vintage Photo and Old Paper
  • Accessories:  Spellbinders S4-230 Labels Six; Ranger Queen’s Gold Embossing Powder, Matte and Glossy Accents, Gold Acrylic Paint Dabber; 7 Gypsies Paper Fasteners; Venture Foam Tape; Tsukineko Sponge Daubers; May Arts Ribbon; Papertrey Vintage Buttons; Candle Lighter; Sewing Machine; Tim Holtz Tonic Paper Distressing Tool

I hope you have a wonderful weekend and thanks for stopping by today!

© 2015 Suffusion theme by Sayontan Sinha