Good morning!  Hope everyone is staying warm and you’re not buried under feet of snow.  We’ve had our first major snowstorm for the year and it’s been bitterly cold . . . let’s hope it warms up for all of us soon!

During the last month, I’ve been working on some favors for my sorority province meeting . . .  wish I had gotten a picture of the completed box.  I die cut and made some fabric flowers that were attached to the front of a take-out box which we put a few treats in.

I’ve also taken the time to organize and clean my work space.  I’m so glad I did . . . I finally feel that I have a room that suits me and that I actually like working in.  (If you follow me on Facebook, you can see all the photos there!)

I have a few projects in the beginning stages for Ken Oliver using his new products.  Love his new Color Burst!  These will be hopefully finished over the upcoming weekend and I’ll have a few things to share next week.

The last few days I’ve been working on a project for Quietfire Design.

ArtisanFrameRTscs

I used lots of old product that I’ve had in my stash for some time:  An old Darcie’s Offset Square Shadowbox Frame, GrungePaper, Tattered Floral die (I know . . . don’t faint).  I also used some new Graphic 45 paper I picked up at CHA, Artisan Style, and a Quietfire stamp.  Please hop over to the Quietfire Creations Blog, check out all the details and more photos.  I would love it if you could leave me a comment over there and let Suzanne know you visited!

Thanks for stopping by today!

SHERRY SIGNATURE


Project Supplies:

Good morning and Happy New Year!  I can’t even begin to tell you how excited I am to put one year to bed and start another new and fresh.  The last year has been full of adversities for our family . . . the best things were Mallory graduating from college and the birth of Hadlee!  Apart from that, we’ve had a number of trials and tribulations that have made some days more trying than others.

I have a tendency to shut down when feeling stressed and depressed.  I’m afraid that I’ve spent the better part of last year simply trying to get through each day the best I could.

On the upside of things, you all know my sister fell and broke her leg.  Six months have passed and she is now walking with a cane and has actually found herself walking from room-to-room without it.    She drove for the first time in six months on December 30 . . . WOO HOO for Carrie!  I’m so proud of her for overcoming such a debilitating injury!

Mallory is still sick and has been for one year now.  The doctors are continuing to run tests and I’m feeling confident that we will find out what is going on before this new year is done and over.

Hadlee . . . what can I say!  I’m truly blessed that Katie allows me to share with Hadlee on a daily basis and hasn’t grown tired of her old mom doing things she isn’t happy with . . . like giving Hadlee a lick of the chocolate “Frosty” spoon!  You know, just a touch of the spoon to the lips really . . . but boy were those lips working . . .

Now there is a reason why I have shared so much with you at the beginning today . . .

Those of you who follow me on a regular basis, know that I have had my spurts of posting and then not posting this year.  I’ve often blown my lack of posting off to being too busy, etc., but quite frankly . . . I’ve had a hard time getting myself up and ready to work in the studio with all the other things going on in my life.  On those days when I finally had a day at home to myself and could work, I couldn’t quite bring myself to move from the couch.  I spent a lot of time the last year sitting in a comatose state, wasting what valuable time I did have for myself.

I’ve had enough!  I’ve decided it’s time for me to pick myself up and get going with life again.  This not only includes spending more time in the studio, but it also includes loosing some of the extra weight I’ve put on and most importantly, to dwell on the positive in my life over the negative.

This now brings me to my project for today.

MixedMediaCanvas FlyAboveIt

This is a Mixed Media Canvas that I’ve created for the eP Get Altered Challenge today (that you can find on the eP Blog), but more importantly, it’s a canvas that I’ve made for myself to help remind me to rise up and “Soar/Fly” over any adversities that may come my way this year.    The colors used coordinate with my living room and dining room and my intent is to hang it where I will see it every minute of every day!

It is a 6×6 canvas that already had the gesso applied when I purchased it.  I painted the canvas with a base coat of DecoArt Americana Acrylic Paints in Hauser Light Green, Light Buttermilk and Bahama Blue.  Eventually mists made with Distress Ink Refills (Dusty Concord, Crushed Olive and Broken China) and Heirloom Gold Perfect Pearls was applied over the paint.

MixedMediaCanvas FlyAboveIt CLOSEUP Flowers

The flowers were all made from watercolor paper, and I have to tell you . . . I LOVE how they turned out!  The large red flower was made with Spellbinders™ Blossom Five and Fired Brick Distress Stain.  The yellow flowers were made with Grand Peony Creations and combinations of Mustard Seed, Wild Honey and Fired Brick Distress Stains.

MixedMediaCanvas FlyAboveIt CLOSEUP HEART

The heart was drawn free hand and cut out from watercolor paper.  It was colored with Aged Mahogany Distress Stain, misted with water and Heirloom Gold Perfect Pearls and then covered with Rock Candy Distress Crackle Paint.

MixedMediaCanvas FlyAboveIt FLATSIDE

The letters were made with Maya Road alphabets that were colored with Black Soot Distress Stain.   The only item not made with watercolor paper are the foliage leaves that  were die cut from GrungePaper and then colored with Forest Moss Distress Stain.

After all the embellishments had been adhered to the canvas, I used ink spritzer to add some flecks of Krylon 18kt Gold Leafing Pen to the canvas.

MixedMediaCanvas FlyAboveIt ANGLE VIEW

That’s all for me today, except to say . . .

Thanks for stopping by today and more importantly, thanks for sticking with me over this last year.  I promise to be a better blogger and online friend in 2013!  I truly appreciate each and every one of you and always look forward to your comments and emails!  Thanks for not giving up on me . . . I did enough of that for all of us combined!

SHERRY SIGNATURE

Project Supplies:

makeartbutton.jpg

Hi everyone and welcome to our Make Art blog hop featuring art from the eTeam and special guest, Wendy Vecchi! We’re delighted to have Wendy joining us today, to not only share her products but also to share in her unique artistic style and to be inspired by each of the hop participants.

During the hop the team is going to be sharing the projects that they created with Studio 490 products but maybe more importantly we’ll be sharing our experience of working with the products, how we created our projects, and what inspired us to create our piece.

The eTeam is a wonderful group of talented women, each with their own style. Some of us are clean and simple card makers, others love scrapbooking, and still others are drawn to altered art and mixed media projects. The goal of our hop is to bring each of these designers and their favorite mediums together and to share how we’ve used these products to express our own individual styles through our work.

But…that’s not all…eclectic Paperie is also offering a few specials during our hop.

  • This week only save 25% on all Studio 490 products, this includes Wendy’s stamps, stencils, Art Parts, Book VII, and Blossom Bucket embellishments. Use code WENDY25 when checking out.
  • During the hop, comment on each blog and you’ll be entered into a drawing for a prize package worth $50! Your package will include a collection of Studio 490 products as well as paper and embellishments from the store.

Wait…there’s more!

  • We want to hear about what inspires you! Share your thoughts about why you create, what styles you’re drawn to, even share a favorite project on our Facebook page. Next week I’ll randomly select a winner from those who have commented on our Make Art Facebook posts and give away a $25 gift certificate to eP! Now…are you ready for some crafty goodness?

Let’s get hopping!

Thank you so much for joining us and make some time this week to create art and craft your story…

and now here’s my story!

A few years ago I was lucky enough to take a class with Wendy.  She was teaching classes in Indianapolis and it was the first time she was actually somewhat local to where I am.  Daisy flew in from California, Jen Buck drove across town to join us and a few others had signed up but due to weather weren’t able to make it in.  Needless to say, I had been a huge fan of Wendy’s since seeing her stamps and samples at CHA that very first year and was even lucky enough to meet her in the Maya Road booth that CHA.   But to take a class with her . . . . oh my BADness!  It was too good to be true and as time and schedules has allowed, it has been the only class I’ve ever been lucky enough to take.  Maybe some day I’ll be able to join in another.

A few months after taking that class, I realized that my creative style had changed and I loved making wall hangings!  Even though I incorporated designer paper in my work, I still had that put it all together and make it work thing going on when I made only cards.  I was hooked on what has become my own way to “Make Art” Bad Sherry Style!  I emailed Wendy and thanked her for her inspiration and for introducing me to her wonderful work and style that allowed me to incorporate it all together, finally come up with my own style.

It hasn’t been often when I’ve had the chance to simply play with Wendy’s Art Parts and stamps without it being a special project that I had to use certain product on . . . so today, I’ve been able to create with just that . . . Studio 490 Stamps and Art Parts.

Imagine

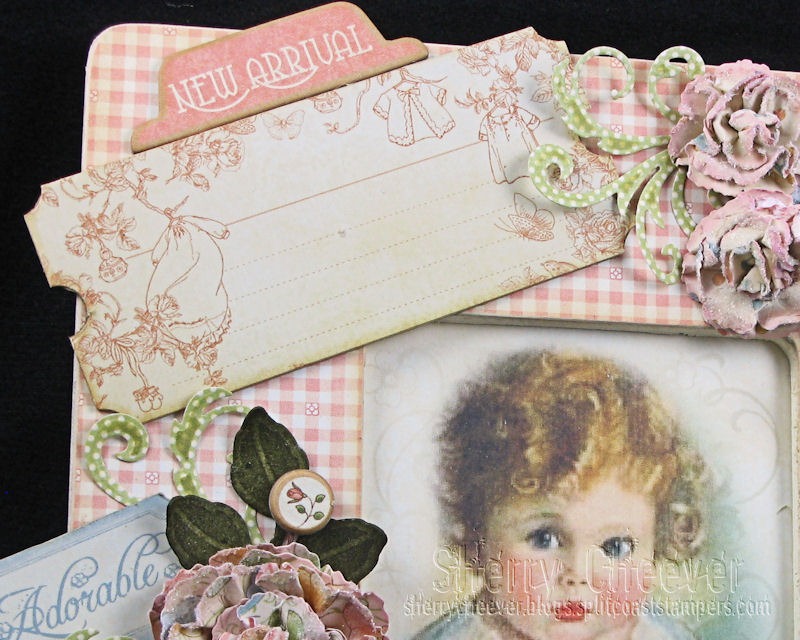
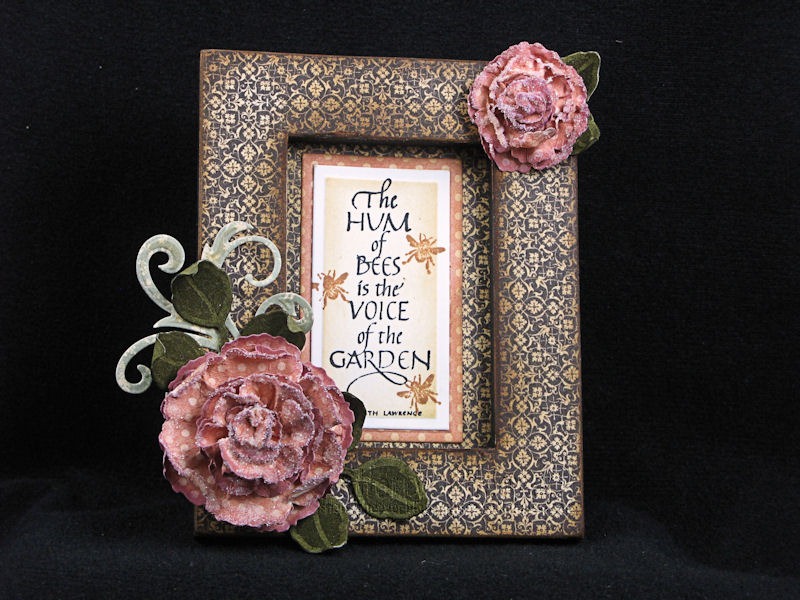
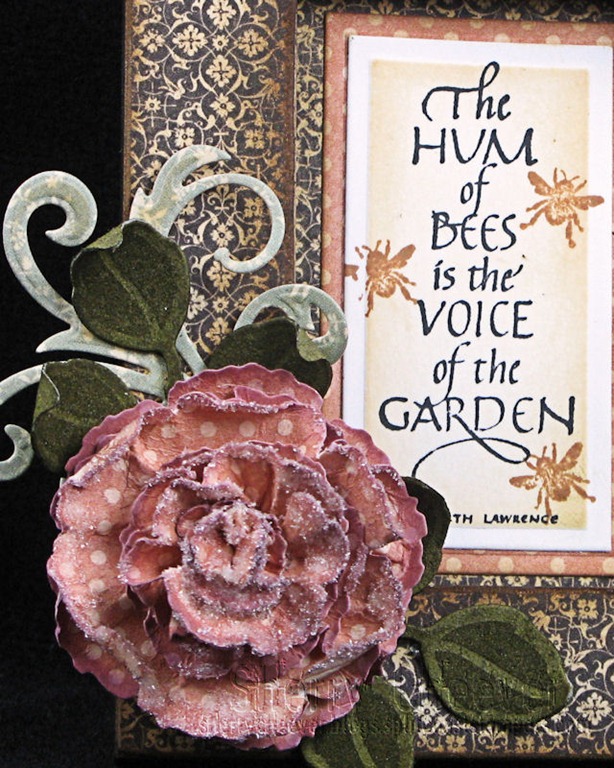
I began by pulling out all of my Art Part packages, laying them out on the floor and deciding what I wanted the project to look like.  I finally decided on the long rectangle and frame, along with the smaller scallop trim from Sample Pack.  I knew that I would be using her new Wildflowers Stamp Set (because that is the set I won when they were sneak peeked on Wendy’s blog) along with the matching Wildflowers Art Parts.

The middle of the frame is a manila tag that was colored (using Wrinkle-Free Distress Technique) with Tumbled Glass, Shaded Lilac and Wild Hone Distress Stains.  The background stamp from Optical Art was stamped in Antique Linen, and the August Flower image from Art is Therapeutic was also stamped in the Antique Linen.  The background from Sketch Art was randomly stamped around in Archival Sepia.

ImagineInsideStamping

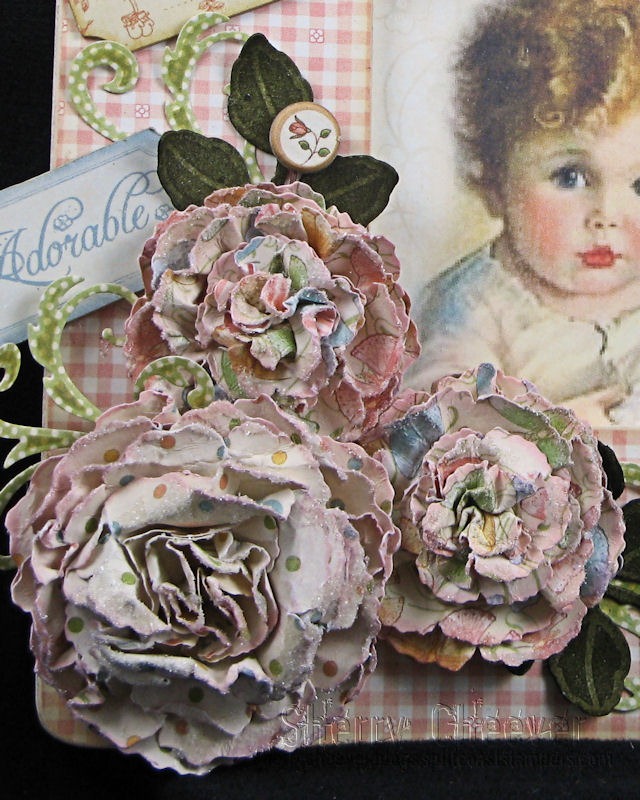
The sentiment “Imagine” from Just Word Art was stamped in Adirondack Pitch Black Pigment and embossed with clear embossing powder.  The coneflower from Wildflower Art was also stamped in the Pitch Black Pigment, embossed with clear embossing powder, then water colored with Peeled Paint, Brushed Corduroy and Dusty Concord Distress Markers.

ImagineRightAngle

The coneflower was then stamped on the matching Art Part in Pitch Black Pigment, embossed with clear embossing powder, then colored with the same markers.

The Art Parts Frame and Scallop Trim were covered with Wild Honey Distress Ink.  The outer frame was then covered with DecoArt One Step Crackle.  Much to my dismay, it didn’t crackle on the Art Part.  Instead of flipping it over, I decided to sand down some of the glossiness of the Crackle and when I did . . . . I LOVED the results, so I kept it like it was and covered it with a bit more of the Wild Honey Distress Ink.   I wanted a different feel for the scalloped pieces, so I left them plain.  I think I was after that old-time frame look when the wood was different colors . . .  or even different types of wood in a lot of cases.

ImagineLeftAngle

I love the depth created with all the different layers and adding the Coneflower Art Part to the outside of the frame gave me even more depth.

The butterfly is from the stamp set Botanical Art.  It was stamped in Archival Jet Black on GrungeBoard and then covered with Tumbled Glass Distress Ink.  The antenna were made by winding black craft wire about the end of a pick and glued to the back.

I attached a self-adhesive picture hanger on the back and believe I will hang this in my newly moved and reworked upstairs crafty room.

I do believe that’s all for me today . . . except one special note.  You all know that I list my product at the end of each post.  I’ve used product for this project that was once carried at eclectic Paperie but is now out of stock.  Kim said to let you know what she will special order any of the product used on our projects  . . . you just need to let her know!  So if I’ve referenced something that you absolutely need to have, just send Kim an email at [email protected] and she’ll be happy to order any product!

Thanks for stopping by and I hope you enjoy the rest of our Make Art Hop with Wendy Vecchi!

SHERRY SIGNATURE

Project Supplies:

Happy Thursday morning!  I have one more CHA project for the Spellbinders™ Booth to show you.

This one started out as a 69 cent frame that I found at Olde Time Pottery and was plain in a light oak color.

GardenFrame

The paper is Graphic 45 A Ladies’ Diary Collection and the sentiment is from Quietfire Design – Garden Delights.

The flowers were made with the new Blossom Five die template.  After they were die cut, the edges were inked with Wisteria Mix’d Media Inx (have I told you how much I LOVE this ink), misted with water and then shaped while damp.  Once they were dried and assembled, the edges were dabbed with Glossy Accents and sprinkled with Fine Diamond Dust Vintage Glass Glitter.

GardenFrameCloseupLowerFlower

I think I may have used the glitter to cover some tears in the edges of the blossom . . . pretty cool idea if I must say so myself!

GardenFrameCloseupRightFlower

The sentiment was stamped in Archival Jet Black and the bees in Sepia Archival.  The sentiment and the panel behind it were die cut/embossed with the new Card Creators A2 Matting Basics, then stenciled with Antique Linen.

GardenFrameLowerLeft

The flourish is from the new Venetian Motif, which was stenciled with Antique Linen as well.  The Foliage leaves were inked with Forest Moss Distress Stain.

Oh and the frame’s edges were inked in Vintage Photo after the excess paper was sanded away.

That’s it for me today.  Hopefully tomorrow I will have photos of something new I’m working on . . . a new twist with Faux Porcelain . . . you’re gonna love it!  The post hinges on a couple of things . . . the flowers dry and I’m alert when I return home after taking Mallory to the hospital for a 6:00 am test.  Cross your fingers on this one . . . they are finally going to do some tests to see if her gallbladder has been the problem all along!

Thanks for stopping by today!

SHERRY SIGNATURE

Project Supplies:

Good morning!   Now that CHA has started and the first day is over, I’m free to show you some of the projects I’ve done for the Spellbinders™ booth.  The one I’m going to show you today has a special place in my heart.

I know I’ve told you that my daughter, Kate, is pregnant with our first grandchild.  What I’ve not been free to say too much about, is that it’s A GIRL!!!!!!!  (Well at least that’s what the ultrasound tech said . . . I’m gonna believe her.  Plus the day I went to the doctor with her, the baby’s heart rate was fast – 140+.  Now it has been my experience with my girls that their heart rates were fast and everyone I knew that had boys the heart rates were 130- . . . SO I’m going with the IT’S A GIRL thing!)

So in honor of my granddaughter, this is one of my projects (and hopefully I’ll get it back one day and it still looks in pretty good shape).

BabyFrameSummerCHA2012

I altered one of the $1 Michael frames by painting it Antique White and then covering it in Graphic 45’s Little Darling Collection.  The new baby’s picture can easily be inserted in the frame and the tag at the top of the frame will be perfect to record all the vital information . . . name, date, weight, height . . .

BabyFrameCloseUpUpperLeft

The flowers were made with the new Blossoms Five, the flourishes are from the new Venetian Motifs and the butterfly from Jewel Flowers and Flourishes.

BabyFrameCloseupLowerLeftFlowers

The edges of the flowers were sponged with Chiffon Mix’d Media Inx, misted with water, shaped and then dried with the heat gun.  Once they were assembled, a little Glossy Accents was added to the edges and sprinkled with Diamond Dust Fine Vintage Glass Glitter.

BabyFrameCloseUpFlowersTopRight

All of a sudden I have a reason to love this Graphic 45 collection . . . who would have thunk!

That’s it for today . . .  I’ve got one more to show you tomorrow.  Thanks for stopping by and remember . . .  life is short, enjoy the adventures that come your way today!

SHERRY SIGNATURE

Project Supplies:

© 2015 Suffusion theme by Sayontan Sinha