Happy Tuesday to you! After a great weekend, it’s time to get busy . . . as if we weren’t over the long weekend. I had a great time working in the yard, grilling for the girls and getting some time in the studio. I even got to puppy sit Kate and Will’s new lab . . . I call him moose for Chocolate “mousse”, they call him Peyton.
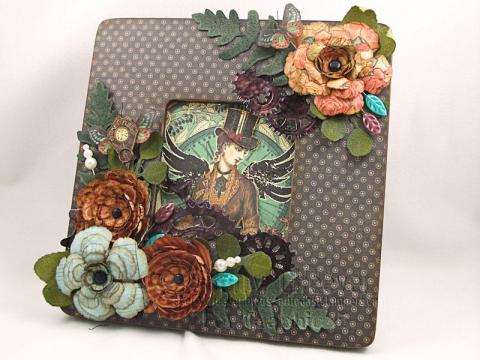
Yesterday when I posted about my Graphic 45 Steampunk Frame I mentioned that the instructions weren’t on their blog . . . I was wrong. They were there! 
I’m still going to repeat them here for anyone that missed the Graphic 45 Blog post.

The frame was painted black and then covered with Steampunk Debutante paper. The paper was glued down with Multi-Medium matte and the excess was removed by sanding away at the edges. Vintage Photo Distress Ink was then sponged on the edges of the frame. The middle image was centered and the wings were painted with Black Soot Distress Stickles. An extra hat and dress were cut out, the edges sponged with Vintage Photo and raised over the image with foam mounting tape. The hat was also painted with Black Soot Distress Stickles.
Craft Foil was die cut with Sprightly Sprockets and then covered with Black Soot Alcohol Inks with a drop of Copper Mixative added.
The flowers were made by die cutting/embossing Steampunk Debutante paper with Rose Creations and Carnation Creations. The flowers were shaped with a petal roller and a foam pad (Video Tutorial here). All the leaves were die cut with the Foliage Die Template and then colored different hues of greens.
The butterfly in the top right corner was glued to a piece of Clearly for Art, heated with a heat tool and the wings were shaped with the Clearly for Art was still warm.
I guess that’s all I have for today. I need to go and run some errands for a meeting tonight and then get to work in the studio.
Thanks for stopping by and remember . . . life is short, the adventures of the day!

Supplies/Product:


