Good Tuesday morning!  Oh what a day I had yesterday . . .  cleaning, laundry, errands . . . thank BADness I got that extra crafty time in over the weekend.

Remember the first card I did with the Spellbinders™ Cherry Pickin’ Frame?  If you don’t, you can see it here.  A week or so ago, I received an email from our Blog Team Coordinator and she wanted to know if I still had that card.   If I did, which I do, she asked if I could send it to her for the upcoming Spellbinders appearance on HSN (which appearance is May 6 and 7).  Now that’s pretty cool . . . they want to use one of my cards as a sample for television!  The last time they were on and I was watching, I saw my Chunky Tag on display!  Did I get excited you ask . . . yeah!  I said to myself, out loud even, “oh my gosh there’s my tag!”

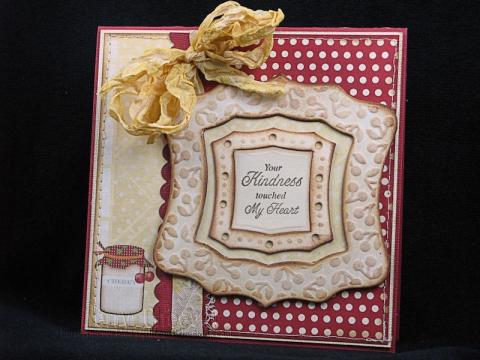
I’m getting ready to mail that card off this week and thought I would include one more sample with the Cherry Pickin’ die template . . .  just in case!

It just so happens that some of the designs in the new Webster’s Page Triple Pack Collection has some cherries in it . . . which immediately made me think of the die template anyway.

APRIL19 Signs of Life

So the background papers are Webster’s Pages Spring Market, Yacht Club & County Estates Collection, which have been sewn down to other cardstock.  The sentiment is from JustRite Signs of Life (which I just recently received).    Oh and I dyed the seam binding with Scattered Straw Distress Ink because I wanted to pick up some of the yellow in the paper.

The outer frame was cut from a piece of illustration board.  Now the die template won’t cut all the way through the thicker illustration board.  What I do is get the outline of the die from a few passes in die cutting machine, and then I can finish cutting out the thicker frame with either scissors or mat knife.  The inner frame was die cut/embossed from a thin chipboard coaster . . . no problem at all . . . its cuts like butter through the thin coasters.  I then covered both frames with Antique Linen Distress Stains, highlight the embossed area and edges with Vintage Photo.  To give some added dimension to the frames, I die cut a square from another thin coaster before I adhered the designer paper on.  the frames are then mounted on that square.  It worked great to raise the frame off the card for some extra height.

That’s about it for me on this project.  You’re gonna love tomorrow’s project . . . it’s another E-Team Blog Hop and all I can say is . . . Honey, you’re gonna have a POPpin’ good time!

Thanks for stopping by and remember . . . life is short, embrace the adventures that come your way!

SHERRY SIGNATURE

Project Supplies:

Good morning!  I hope y’all had a great weekend.  I didn’t do much of anything really.  I worked in the studio both days (since I’m way behind on projects) and that’s about it.  Saturday we had such crappy weather that I didn’t mind hiding out in the basement all afternoon.  I finally put everything to the side and came upstairs right before Thunder Over Louisville began.  That way I could watch them on a better television and cuddle with the pups when they became scared of all the loud booms.  For those of you not from my area, Thunder Over Louisville is the opening event of the Kentucky Derby Festival and the largest fireworks display in North America.  It’s 28 minutes of solid fireworks set to music.  They are shot off 2 barges anchored in the Ohio River and from our Second Street Bridge.  It’s not the same watching them on television . . . there’s just something about being there in person with your body booming along with all the fireworks.  Just in case you’re interested in seeing what it might look like, I pulled a link for you: Thunder Over Louisville Pictures.

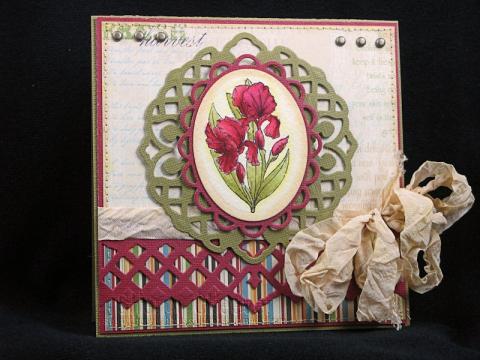
One of the cards I worked on over the weekend is with the JustRite Stampers Beautiful Day Set.  I just received this set and couldn’t wait to watercolor on the images.  I picked the iris for my card, water coloring with Distress Re-Inkers.

BeautifulDayApril18(4)

One of the prettiest irises I’ve ever seen is a deep maroon specimen that my neighbor grows.   I guess you could say that was my inspiration for this card.  The colors used were Peeled Paint, Aged Mahogany and Scattered Straw (for the background highlighting).

I didn’t start out using the Lattice Pendant when I first designed the layout of the card.  However, when I decided to use the Lattice Borderabilities, the whole design changed for the image then.  What can I say . . .  sometimes it just has to change!  I dyed the seam binding with Antique Linen, as it was the ink I used to sponge the edges of all the paper and my image.

Well, that’s all I have for today!  I’m heading back into the studio to work on some other big projects that need to be done before the end of the month.  Thanks for stopping by today and remember . . . . life is short, embrace the adventures that come your way!

SHERRY SIGNATURE

Project Supplies:

Happy Friday!  Last week I was asked by Kellie Fortin if I would participate in today’s JustRite challenge.   The challenge this week is to make a flower embellishment for a card, layout, altered item, etc. Spellbinders™ is sponsoring the grand prize this week, which prize is two die template sets.  For full details about the prize packages and to enter the challenge, which will run April 15 – April 28 at 8am Central, please visit the JustRite Inspiration Blog.

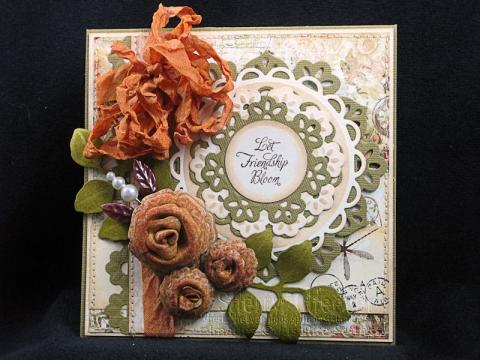
For my project, I decided to make GrungePaper flowers using the JustRite Friendship Blooms set.  There are two flowers in this set that were created to work with Spellbinders S4-312 Blossoms Three, and that’s what I did.  These are the same type of flowers I created back in the winter for CHA and I’m reposting the video tutorial for your convenience.

Now for my card.

SherryCheeverJustRiteChallengeApril15(6)

Can you see the white stamping on the flowers in the photo?  That white is the JustRite flower stamped in Snowcap Pigment ink, dried and then inked over with Wild Honey and Rust Hinge Distress Inks.   The sentiment is from the same Friendship Blossoms set, die cut/embossed with Spellbinders Circles and then mounted with Lacey Circles and Floral Doily.  I kept the sentiment and all the layers flat so that the flowers and leaves could be placed over the top.

The seam binding was dyed with Wild Honey, Rusty Hinge and a touch of Vintage Photo.

I hope you are inspired to make your own flowers and join the fun over at the JustRite Inspiration Blog.

For me, that’s all I have today, except to say . . . . life is short, embrace the adventures that come your way and thanks for stopping by!

SHERRY SIGNATURE

Supplies Used:


Good Monday morning!  I hope you had a great weekend.  As for me, on Saturday I helped Kate finish up some painting that she had started earlier in the week.  Then on Sunday, I slept in and watched the race before I headed into the studio for the first time in a couple of days.

Remember when I told you I had received some of the new JustRite releases?  Well, I had an idea for a card with some of the new sentiments  . . . I need some thinking of you type of cards . . . and thought these might make some good general purpose cards.

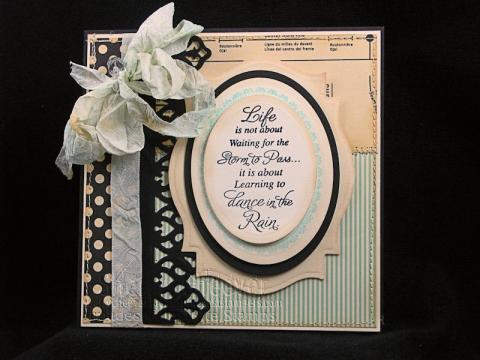
One of the reasons I picked some of the sets I did, was because they work so well with Spellbinders™.  For today’s card I’m using the My Rainbow Set.

MyRainbowMarch28

Of course, I had to do some sewing and add a bit of dyed seam binding.   Antique Linen Distress Ink was used for all the edges and SU Caribbean Blue was used for the border and the seam binding.  Boy that blue in the paper was extremely hard to match.

I think that’s all for me right now.  Thanks for stopping by and remember . . . life is short, embrace the adventures of the day!

SHERRY SIGNATURE

Listing of Supplies Used:

Good morning!  I hope y’all are enjoying your weekend so far.  It has been nice and quiet around here and the sun is shining as well.  You can’t ask for anything more!

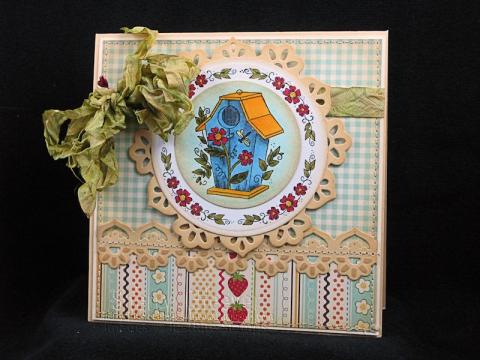
A few weeks ago I was the lucky recipient of a number of new JustRite stamp sets.  Unfortunately, when I got them I didn’t have time to play with them . . . until yesterday!  I absolutely love how all the JustRite images work with Spellbinders™.  For my first card I decided to work with the set, Birdhouses.  Unfortunately, I colored my image first and then went looking for paper . . . should have found my paper first (because its easier for me).

SherryCheeverJRBirdhousesMarch21(4)

I colored the image with Copic Markers and the paper I settled on was October Afternoon Fly a Kite.   The edges of all the paper and the images were sponged with Antique Linen Distress Ink.    The images were die cut with Spellbinders™ S4-114 Standard Circles – Large and S4-116 Standard Circles – Small.  For the larger base piece, the cardstock was die cut/embossed with S5-041 Floral Doily Motifs and the border is from S5-040 Floral Doily Accents.

I kept thinking that I wanted a red ribbon, but couldn’t find just the right color so I decided to dye seam binding with Peeled Paint.   If you missed my video the other day on how to dye seam binding, you can find it here on YouTube.

I guess that’s all for me today.  Thanks for stopping by and remember . . . life is short, embrace the adventures of the day!

SHERRY SIGNATURE

Product Used:

© 2015 Suffusion theme by Sayontan Sinha