Happy Monday! What a weekend around here. Lazy and lifeless! Hehehe. I finally got the Christmas decorations down out of the attic, and started decorating late yesterday. One small tree is up and decorated and the larger tree is up, but only the lights are on. The upside, is that everything is down (which is the hard part) and sitting in the garage waiting for me to bring it in. I’m a little late getting started this year – normally Mallory and I decorate over the Thanksgiving Holiday. But since she is away at school things are a little different. Hopefully, I’ll be done by the week’s end!

I have a number of chores and errands I must get done today (because I did sit around here all weekend in a lifeless state), and was up early and ready to stamp. When the Try a New Technique Challenge on Splitcoast was posted this morning, I couldn’t wait to get started. The challenge today is all about stamping on tiles. Well, I don’t have any tiles – but I do have four Holiday coasters that I have been saving for a few years now, waiting to do something with.

I have a plate rack on my Dining Room wall that holds four decorative little plates or coasters. I haven’t been able to find any holiday plates in this area, and bought these little coasters and stamped these horrible gold images in the middle just to have something to hang up. Well, I reached for one today, looked at it, scraped off the existing image, used some acrylic paint and distress ink to cover where I scraped, and went to work. I have been meaning to make something new for the plate rack and this is my perfect motivation.

TLC145

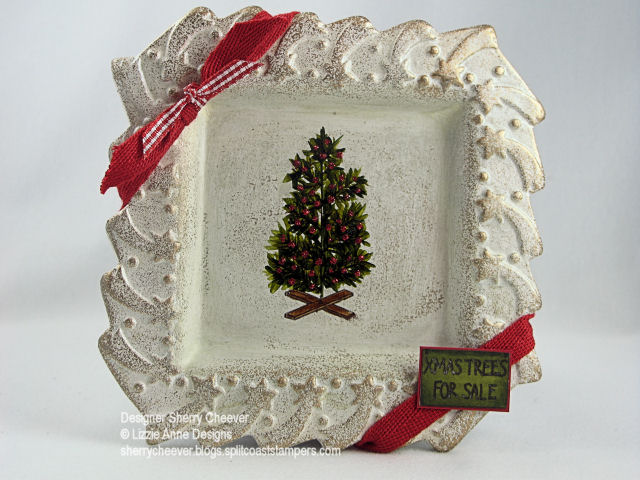
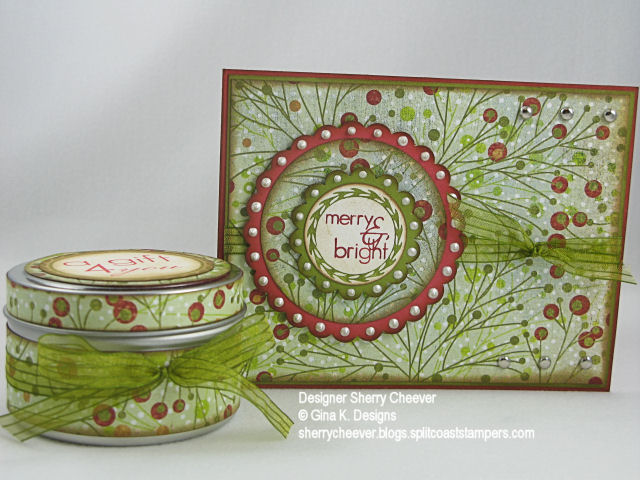
The image of the three was stamped in Adirondack Espresso and then colored with Copic Marker. Red Stickles were placed randomly on the tree just because I wanted. I found this great red twill in my stash, and wrapped it around the coaster and tied in a bow. The little sign was also colored with Copic Markers, cut out and then mounted on red cardstock. I had so much fun making this and can’t wait to complete the other three.

Stamps: Christmas in the City by Lizzie Anne Designs

Paper: Neenah Classic Crest Solar White, SU Real Red

Ink: Adirondack Espresso, Tim Holtz Ranger Weathered Wood Distress Ink

Accessories: Copic Markers, Black Spica Marker, Ranger Red Stickles, Coaster, Off White Acrylic Paint

Good Monday morning! My house is finally back to normal after the long Holiday weekend. Lance is finally back at work and Mallory is back at school. I didn’t realize how much I enjoy my quiet days during the week until they were all home at once. Don’t get me wrong, I love when everyone is together, but I also love the “ME” time I have during the days.

Yesterday afternoon, after Mallory had left and football was on the television, I headed in to stamp. I’ve had these adorable little tins from Gina K. Designs for weeks now and I’ve been wanting to do something with them. How nice it was to work on a project just for the heck of it.

GKD Gift Set

To coordinate the set, I used BasicGrey Fruitcake paper and some new May Arts Ribbon that I just got from Jacksonbelle Embellishments.

Gift Set CardI used the Punchy Words from Gina K. Designs for the card, coloring the stamp with Old Olive and Ruby Red makers. The edges of all the paper were sponged with distress ink. Ranger Liquid Pearls were added to each scallop, just because I wanted, and each layer of the sentiment is raised on mounting tape. My first instinct was to add antique copper brads (my favorite), but then realized that in order for the card to match the tin, I needed silver.

Gift Set Tin

I cut strips of the Fruitcake paper. The bottom strip is 1″ wide and the strip around the lid is 5/8″ wide. The edges were sponged with the distress ink. The strips were then wrapped and fastened around the tin. I fastened the ribbon on the back of the tin with a little piece of double-stick tape and then tied off on the front in a bow. The sentiment on the top is from the Festive Labels set.

Stamps: Punchy Words and Festive Labels from Gina K. Designs

Paper: SU Ruby Red and Old Olive, BasicGrey Fruitcake

Ink: SU Ruby Red and Old Olive, Tim Holtz Brushed Corduroy Distress Ink

Accessories: May Arts Ribbon, Brads, Ranger Liquid Pearls, Various Punches, Mounting Tape, Sponge Dauber, Alterable Silver Tin from Gina K. Designs

Good morning ya’ll! Today is gonna be a busy one. Jeanne and I are meeting up with some other SCS friends for a day of shopping and gabbing! My trip is winding down, I have but a few more days to cram everything into, and we realized last night that we are not going to be able to fit some things in that we wanted to do. Oh well, that just means I’ll get to see it on my next trip out. Too bad, huh? hehe

I do, however, have some stamping for you today. This is another item that I have made for the SPG Fall Action. While I was on a roll with the Bind-it-All making journals, I kept at it. This journal was made exactly like the one posted the other day, but I changed up the paper and the chipboard. The sentiment was stamped on Very Vanilla and then attached to the chipboard tag.

Star Journal Outside

Star Journal Inside

Stamps: SU Fancy Flexible Phrases

Paper: BasicGrey Fruitcake Collection

Ink: SU Old Olive

Accessories: Bind-it-All, Blank Chipboard, Writing Tablet, Mod Podge, Gold Cord

Hope everyone has a great day and hopefully I’ll have some fun posts for you in the next day or so! Oh and check back tomorrow when we will have another JBWW Challenge!

Hey ya’ll! Well it looks like it’s gonna be another day that I don’t have time for any fun stamping. Jeanne and I have been working on some projects that need to be done, and I’ve made more cards here in one day that I ever do back home. Jeanne is definitely a stamping machine! When I contemplated doing the Splitcoast Sketch Challenge yesterday, she shook her head at me and said I had assignments that needed to be done. Sorry Roxie, I’ll make it up later!

I didn’t want another day to go by without sharing something with you though, so before I left home I typed up a few posts to have on hand, and this is one project you’ve not seen before.

I needed an altered item for the 3D Swap at the Stampin’ and Pamperin’ Retreat in Cincinnati. I bought the Bind-it-All back in August and this was the first time I was able to play. I have to say, that I am hooked – totally hooked. I cannot stop making little altered books and journals. It is just way too much fun!

Cincy Journal Outside

I covered chipboard coasters with Mod Podge and then covered both sides with Designer Paper. The stars were done the same way, except they are covered only on the front. After I cut the paper off around the stars, I sanded the edges and then covered the bare edges with distress ink. After getting the stars done, I thought the little book itself needed some sponging, so I then sponged the same distress ink along the sides of the coasters. The sentiment is stamped on Very Vanilla and then trimmed down to make a tag attached to the stars with gold cord. I wanted something different for the inside, so I made 6 pocket pages so that when a page is flipped, you have 1 bare page and 1 pocket.

Cincy Journal Inside

To make the pages, I cut a piece of 8-1/2″ x 11″ cardstock long ways in half. I then trimmed off the longer end to 7-1/2″. You should now have a piece of cardstock 7-1/2″ x 4-1/4″. Turning the paper so that the 7-1/2″ side is horizontal, I scored the sheet at 3-3/4″. Turning the paper vertical, I scored at ½”. Trim the bottom flap off on the left-hand side leaving a ½” flap to fold up and close off the bottom. To make the angle cut, I marked from ½” at the top and then 1-1/4″ from the bottom and cut along the diagonal. To finish the pocket, apply adhesive to the flap and when you fold over to make the pocket, join the 2 pieces together.

Stamps: SU Fancy Flexible Greetings

Paper: SU Very Vanilla, BasicGrey Fruitcake Collection

Ink: Tim Holtz Peeled Paint and Fired Brick Distress Ink

Accessories: Bind-it-All, Mod Podge, Mounting Tape, Gold Cord, Bare Chipboard, 4″ Square Chipboard Coasters, Sponge Daubers

Hope everyone has a great day and more later!

Good morning! What a fabulous time we had at the Stampin’ and Pamperin’ Retreat in Cincinnati!! Jeanne arrived here on Wednesday, Kittie on Thursday, and we headed over to Cincinnati on Friday afternoon. We stamped, we were pampered, and met some old and new friends. The weekend started with a birthday cupcake cake made by Amber and ended on Saturday with everyone exhausted but so glad to have been together!

This is the cake that Amber (Bambi64) made for us girls. It was all cupcakes and then a layer of icing over the top — yummy!

Amber’s Cake

We just couldn’t resist hamming it up just a little. Left to right, Jeanne S, Dawn Lusk, Jen Javorsky (Jen70), Kittie Caracciolo (Kittie747), me, Amber (Bambi64).

Group Inside

JUST BECAUSE WE WANNA

Let’s get to some stamping today. It’s my turn to host the JBWW Challenge, and this week we are going to alter a journal, notebook, etc., anything you have on hand. Don’t forget to come back here and post a link to your altered item and if you upload to your SCS Gallery, please use the keyword JBWW.Every once in a while I mention a sorority when I babble in my posts. I belong to a friendship/philanthropic sorority, Sigma Phi Gamma, Delta Phi Chapter. Each November we have a luncheon and auction to help raise money for Scholarship Fund and charitable donations. Each member is to make a couple of items for the auction, and the journal below is one that I have made for the auction.

This journal is made using the Bind-it-All and the 5×7 chipboard covers. I applied Mod Podge over the chipboard pieces and then covered with different designs of the BasicGrey Fruitcake Designer Paper. The sentiment was stamped in VersaMark and embossed with Dazzling Diamond Dust. Both the tag and the sentiment panel are raised on mounting tape. To make the inside pages, I picked up a $1 writing table from the Dollar General Store, and cut the pages down to the size I wanted.

Snowman Journal Outside

Snowman Journal Inside

Stamps: Let it Snow from Michaels

Paper: BasicGrey Fruitcake Collection

Ink: Versamark

Accessories: SU Stitched Ribbon, Bind-it-All, Blank Chipboard, Writing Tablet, Mod Podge, Dazzling Diamond Dust, Gold Cord

© 2015 Suffusion theme by Sayontan Sinha