Good Tuesday morning!  Since it’s Tuesday, that means its Treasure Hunt Tuesday at Rubbernecker.  Don’t forget to visit the Rubbernecker Stamps Blog for all the information and to find those designers that have blog candy today!  You will also notice that there is a big Clearance Sale going on.  All three stamp lines, Rubbernecker, Stamp Oasis and KK Originals have been discounted and are on sale.

While decorating the tree over the weekend, Mallory left me one of my favorite ornaments to hang, a wood star Santa.  We received it in 1990 as a gift from my brother-in-law and his wife, and it’s hard to believe it’s 18 years old now.  I thought it would be fun to try and make one myself.  Of course, I don’t have the ability to cut down a piece of wood into a star shape, but I do have tons of chipboard coasters in my stash.

Close up Star Santa

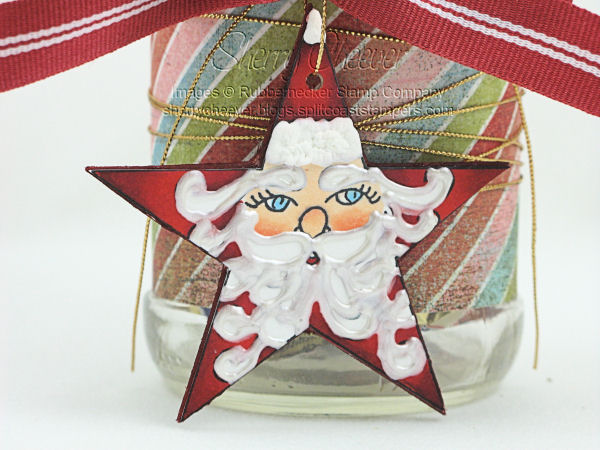
I stamped the KK Originals Star Santa on white paper, colored it with Copic Markers, trimmed it out, and then traced it on a heavy weight chipboard coaster.  The fur on the hat was made with Tulip Dimensional Fabric Paint and the bead was outlined with White Opal Liquid Pearls.  I punched a hole in the top so that there would be a ribbon tie to hang the ornament with.

Now the hard part was deciding how I would present the ornament as a gift.  All of a sudden it hit me that I had an empty glass jar stored in the cupboard.

Star Santa Gift Jar

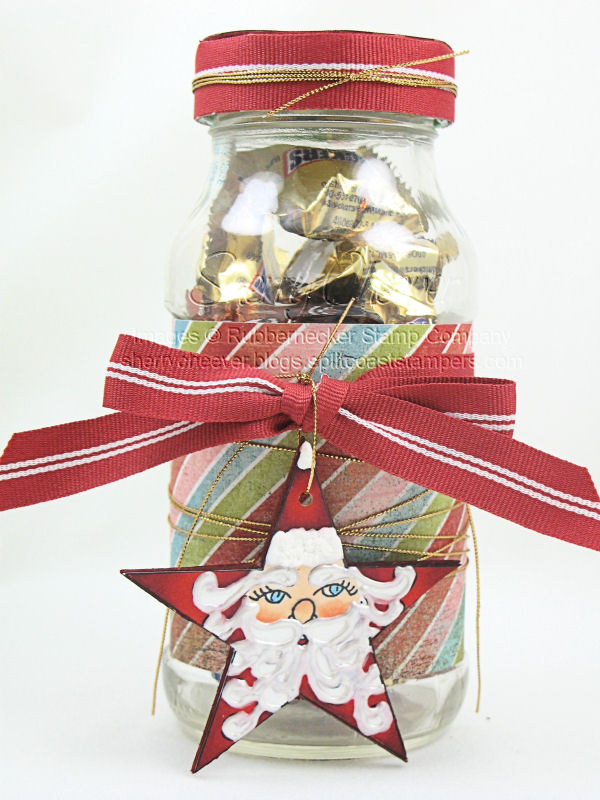
I made a paper band out of BasicGrey Dasher to go around the jar and then wrapped gold cord and ribbon around the band.  The lid was covered in the same paper, using a circle I cut from a thin chipboard coaster with Spellbinders Circle Nestabilities.  I filled the jar with some of my favorite chocolate treats . . . Snickers . . . and tied the Star Santa ornament on the front.  I know, to flippin’ clever!!!!

  • Stamps: KK Originals Star Santa SKU:21-18 KK from Rubbernecker Stamp Company
  • Paper: Neenah Classic Crest Solar White and BasicGrey Dasher
  • Ink: Tsukineko Memento Tuxedo Black and Ranger Aged Mahogany Distress
  • Accessories: Copic Markers; Spellbinders Classic Circle Nestabilities; Tulip White Dimensional Fabric Paint; Ranger White Opal Liquid Pearls and Glossy Accents; Gold Cord; Ribbon; Light and Heavy Weight Chipboard Coasters

Live today to it’s fullest . . . it’s such a great adventure!

Happy Monday!  I hope everyone had a fabulous Thanksgiving and got to spend time enjoying family and friends . . . and doing what you wanted to do!  We traveled to northwest Indiana to visit my in-laws for Thanksgiving and returned home Friday afternoon late.  Then because Mallory was home and she always helps me decorate for Christmas, we started putting up the trees on Saturday.  Her favorite task is to set the Santa collection out.  Of course, this year it ended up in two places, since I can’t help but add a few new Santas every year.  Oh how I love my Santas!

It was a little bittersweet for me when we set up the Christmas tree.  I started collecting ornaments for each of the girls the year they were born.  I have also saved every little thing they ever made while in school.  Last year I boxed them up individually and marked their names on the outside of the box in preparation of them leaving home.  Little did I know then, that Katie would leave.  Sitting in the basement are her boxes of ornaments, a tree and numerous other decorations that I have decided to pass along to my oldest daughter.  I’m so excited for her that she will be decorating her first tree this year, even though I miss seeing all those handmade ornaments that I delicately hung on the tree every year!

Of course, all this decorating along with the weather we are having today (no snow yet), has put me in the holiday mood!  I couldn’t help but pull out Anna’s Snowman for Peace set today.  I guess it’s my way of hoping for a little bit of snow!

Snowman for Peace

I stamped out my scene, colored it with Copic Markers and then cut it out using Spellbinders Square Nestabilities.  Because I wanted to add a background, I left the image in the Square Nestability and used it as a mask for the outside edges.  I stamped the main images out on Eclipse Masking Tape, trimmed them out and masked the main images.  Once I had everything masked, I airbrushed the background with different shades of blue Copic Markers.  To finish off the main image, I added Ranger Glossy Accents to the snowman and Tulip White Puffy Paint for the snow, sprinkled it with glitter and let dry.  The ornament was also highlighted with Ranger Glossy Accents.

  • Stamps: Anna Wight’s Snowman for Peace from Whipper Snapper Designs
  • Paper: Neenah Classic Crest Solar White; BasicGrey Figgy; SU Always Artichoke and Baja Breeze
  • Ink: Tsukineko Memento Tuxedo Black and Ranger Old Paper Distress
  • Accessories: Copic Markers and Airbrush System; Spellbinders Classic Square Nestabilities; Ranger Glossy Accents; Tulip White Puffy Paint; Diamond Gold Ultra Fine Glitter; Sewing Machine; Brads; Ribbon; Venture Foam Tape; Brads; Eclipse Masking Tape

Hope you’re having a great day so far!

© 2015 Suffusion theme by Sayontan Sinha