Smiley from millan.net Today I have my final CHA project to show you. Graphic 45

sent the Design Team a brown bag and asked us to decorate it for the CHA Booth using The Magic of Oz Collection.  It was really cool to see them all hanging together in the booth!

I couldn’t help myself but use the Wicked Witch on one side.  “Something WICKED this way comes” keeps running through my head!

SherryCheeverTreatBagWicked

For this side, I used Black Soot Distress Ink to sponge the edges of all the paper, except the card which was sponged in Vintage Photo.  The border at the top was made with Spellbinders S7-013 Grand Scroll Borderabilities (which I think is retired  . . . I couldn’t find it on the Spellbinders site).  The flying monkeys were glued to purple cardstock, cut out and then mounted on foam tape to raise it up.

SherryCheeverTreatBagWickedCLOSEUP

Here’s a close-up of the compass and the feet to that you can see all the Milled Lavender Distress Stickles.

SherryCheeverTreatBagWizard

For the other side, I used the Wizard when he leaves Dorothy stranded in the Land of Oz.  There are Peeled Paint Distress Stickles on the balloon and Scattered Straw to highlight Oz.

SherryCheeverTreatBagWizardCLOSEUP

Of course, this is the part of the movie when Glenda comes to Dorothy’s rescue, telling her to tap her heals together.  Those are Christmas Red Distress Stickles on the shoes.

I have to admit that once I saw all the bags hanging in the Graphic 45 Booth, I was somewhat disappointed in my own work.  I could have done more and next time I will!  I wish I had kept the picture on my phone now.

Thanks for stopping by today and remember . . . life is short, embrace the adventures of the day!

SHERRY SIGNATURE

Project Supplies:

Happy Tuesday!  I have a personal project to share with you today.  I didn’t really plan on making this, but  . . . well, I just couldn’t resist.

Tonight is social night at Sorority and since I am hosting in October, my sorority sister and I decided to go with a Witch Hat theme.  Of course, we all all sorts of devilish delights . . . potato soup, chili, pumpkin cake, wine . . . . and it is mandatory that all our sisters wear witch hats.

Saturday night is the annual Witches and Bitches Burn hosted by my friend Bad Bev and her sister, Terri.  It’s been a few years since I’ve been able to attend for one reason or another  . . . for the last couple of years I have been out of town working stamp shows . . . but I’m definitely planning on taking my BAD self, along with some Shark Fin, to the burn.  Once again, a witch hat is mandatory!

Now I’m not real fond of spending an entire evening sitting around in a witch hat.  First off, the brim gets in my way and I inevitably catch myself on something.  I did find my hats yesterday and quite frankly, I hate them both . . .  SO, I decided to make myself a new one that better expressed who I am!

Yesterday on my way back from physical therapy (wrist), I stopped at the store to pick up the drinks and deserts for tonight’s gathering, and I found a tan ball cap on clearance for $2.00.  Okay for $2.00, I could afford to buy it and alter it without really caring if I messed up the hat.  Honestly . . . . . I LOVE MY WITCHING HOUR HAT!

HAT

I airbrushed some different masks using Black Copic with the airbrush, then added some additional purple and green color just by spraying around for the fun of it.  I particularly wanted the clock in the front . . . thus, the Witching Hour.  I added some game spinners as clock hands and pushed them through the bill with a long fastener.  The flowers are made from GrungeBoard covered in Graphic45 Halloween in Wonderland.  I die cut the GrungeBoard using the Tattered Florals die.

HAT Flowers

I decided the other side of the hat needed a little something, so I found my Memory Glass and Frames and cut out one of the Alice images from the paper.  The sentiment inside the frame came from going through various old books.

HAT Witch

I plan on wearing this hat tonight, as well as to the Witches and Bitches Burn.  I’ll be the bitch who refuses to wear a proper witch hat!

Thanks for stopping by and remember . . .  life is short, take advantage of the adventures that come your way!  Even if it is does mean being a bitch once in a while.

SHERRY SIGNATURE

Happy Saturday!  I thought I would try and get one more Halloween card done before I started into Christmas, so last night I spent a few hours in the studio.  Well, in between needing to be upstairs some and after dinner at Kate’s.

SpookyTimeOct23

All the images are from Crafty Secrets and the background paper is from Graphic45.  I decided to mount the game on illustration board and cut frames using Spellbinders Nestabilities.  Inside I stamped Happy Halloween.  I guess I better be getting some of these cards ready and in the mail soon!  I’m so bad about that.

Thanks for stopping by and I hope you have a fabulous weekend!

SHERRY SIGNATURE

Good Monday morning!  I’m saying good now, but we’ll see later in the day.  The first thing I need to tell you . . .  I’m having my morning coffee without cigarettes!  Yes, this is the start of day 2 for me going smoke-free!  I truly don’t have an option.  As much I like to smoke and haven’t wanted to give it up entirely, the time has come that I must for health reasons.  I have for years carried the nicotine gum with me when I was at places I could not smoke or were smoke free.  This time I have decided that I absolutely need to kick the nicotine (and trust me, I am totally addicted and I know it) and started on my first patch Sunday morning.   I have quit twice before for over 5 years both times; but now it’s a must . . . there’s no sneaking and there’s not starting up again!  My saving grace yesterday was a drinking straw.  I cut it into thirds and each time I felt the need to light a cigarette, I drew threw the straw instead.  This gave me the sensation of filling my lungs with the smoke, which for me is the hardest part of all of it right now.  I will periodically update you on my progress and don’t be surprised if I come yelling a loud HELP and ask for your support.

Okay enough of all that!  It’s time to move on and talk about something else.  How about Halloween?

I love Halloween!  I think it’s the time of year which leads me into the Holiday Season.  When  my girls were small, I decorated the house from top to bottom and would sit outside in my own costume when the kiddos came Trick or Treating.  I can’t remember when it all started, but I would put on a big pot of chili and both my girls would have their friends in for chili before going out on Halloween night.  It became quite the tradition and my daughters’ friends looked forward to it every year as much as I did.  Now I’m lucky if I put one pumpkin out . . .  with the girls gone and the neighborhood kids all grown up and gone . . . well, its just not the same for me.   Mallory will be home this coming weekend, and in my state of mind to keep busy so I won’t have the temptation to puff away, I’m going to crawl up in the attic and find the Halloween decorations.   Which brings me to today’s project!

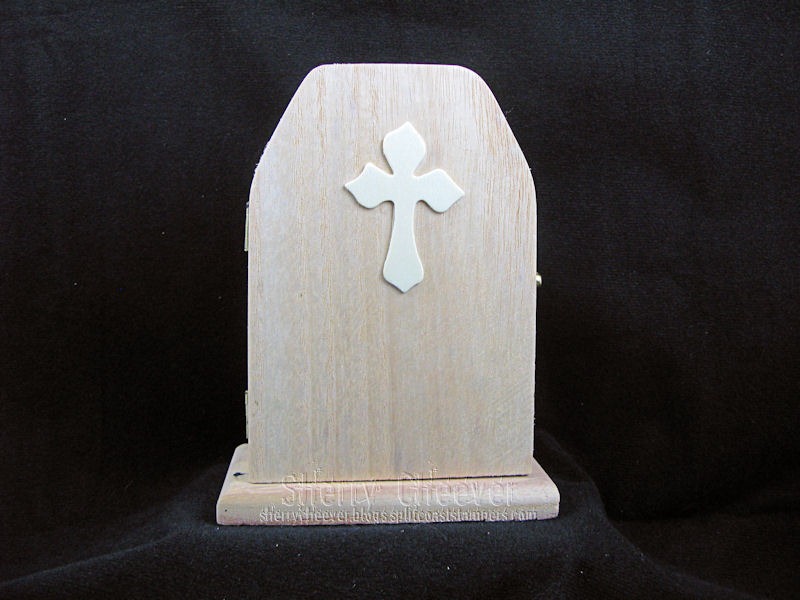
On Friday while mom and I were out running around, one of our stops was Michaels.  I was browsing in the seasonal $1 area and saw little coffins, masks, etc., but deep in the back and almost hidden, was this . . .

Plain as Purchased

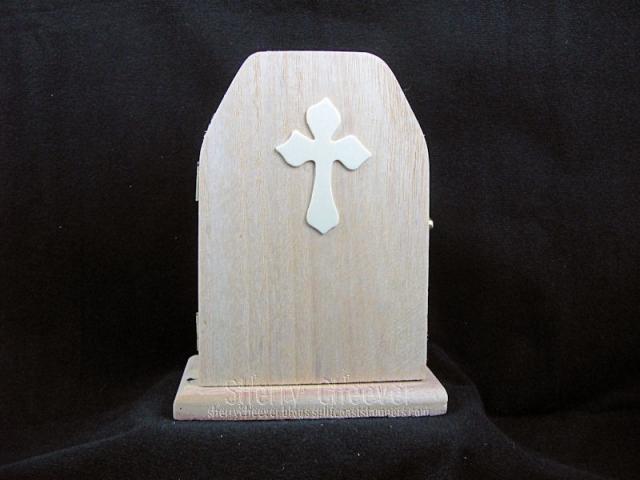
a headstone.  It’s hinged and even opens.

Painted Inside

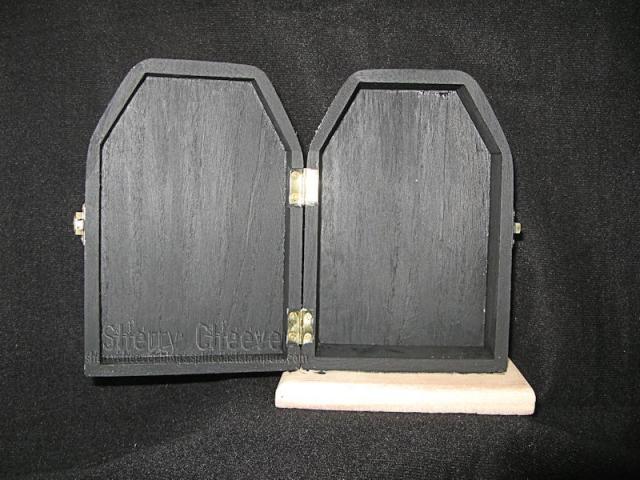
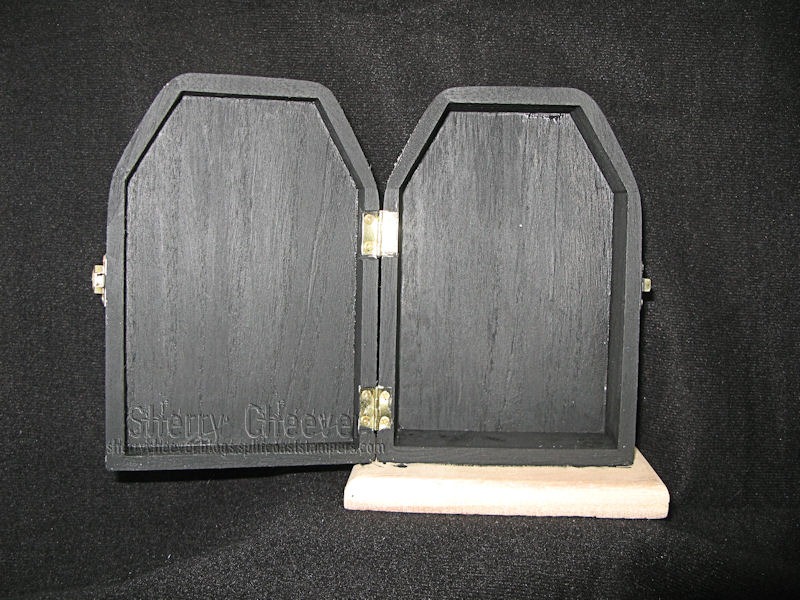
I painted both the outside and inside black before I started doing anything else to the headstone.

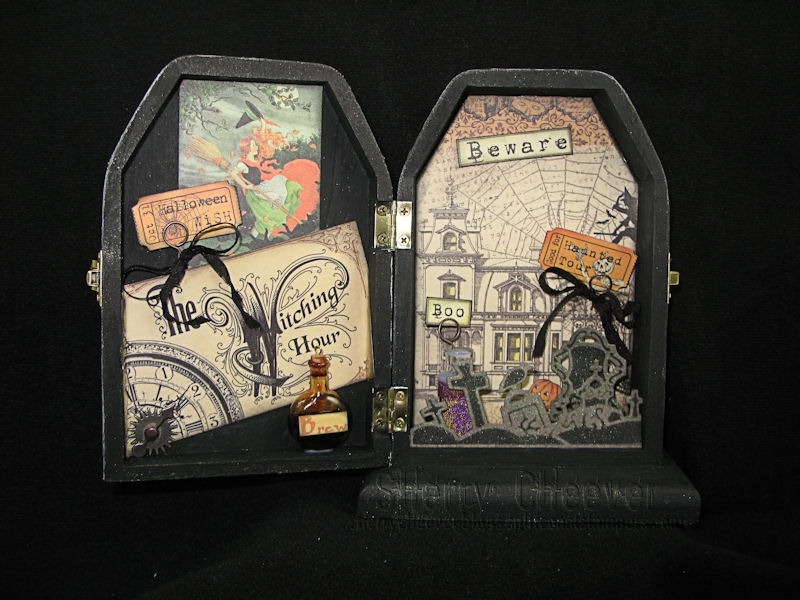
Because I am so intriqued by old cemeteries and headstones, I wanted this one to look old.  I painted the outside with Milled Lavender Distress Crackle Paint, brushed on some Green Patina Perfect Pearls and then sponged on some Black Soot.  Unfortunately you can’t see the green patina in the photo, but trust me . . . it looks so cool in real life!

Finished Outside

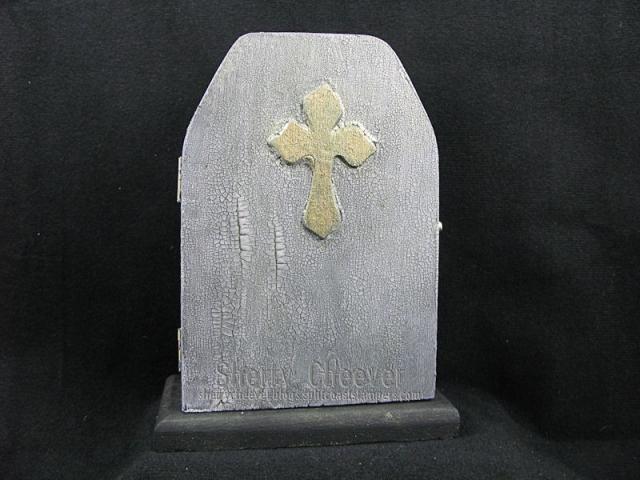
To highlight the cross, I dabbed on some gold acrylic paint and then added some more Black Soot ink.  Just look at all those cracks . . .

When I first saw the headstone, I knew immediately that the Spellbinders Graveyard Scene would be perfect for this  . . . you know how I love the play on play thing!

Finished Inside3

I die cut the graveyard border and one extra headstone from GrungePaper, inked them with Pumice Stone and then stenciled with Black Soot.   There’s also a little Green Patina Perfect Pearls added on those pieces.  All the paper and images is from Crafty Secrets.  While at CHA Sandy gave me this sheet, Halloween Greetings, and it worked perfect for this project.  I had a couple of little miniature bottles in my stash.  One I filled with Tea Dye re-inker and Matte Accents, stirred it up, and it became “Brew.”  I filled a second one with gold and purple microbeads, topped it off Matte Accents, and stuck a memo pin in it.  I forgot to add anything to the outside, but quite frankly, I like that purple popping out in the photo.

I’ve debated the front over and over and finally decided not to add anything.  At first I thought it would be cool to add some dead flowers, but the more I looked at it . . . well here’s what I thought.  It looks rather plain and you don’t really expect anything on the inside . . . and then you open it and find a surprise!  This thought made me leave the front alone.

That’s all I have for today . . . I have my first therapy session for my wrist today, so I’m out the door.  Thanks for stopping by and remember . . .  life is short, make each moment count and take advantage of the adventures that come your way today!
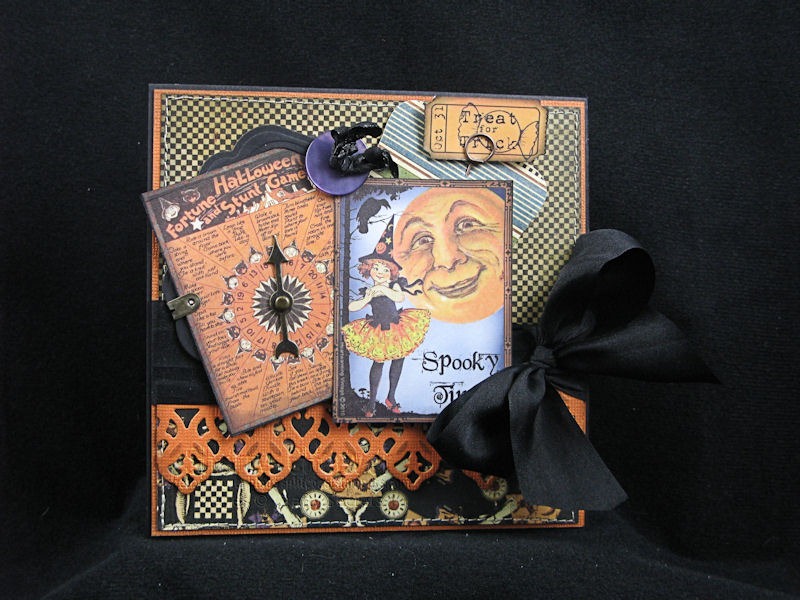
SHERRY SIGNATURE

© 2015 Suffusion theme by Sayontan Sinha