Good morning! I’ve got a few things for you today, but I will be back a little later. First, it is Treasure Hunt Tuesday at Rubbernecker! A few of you have emailed me this week and said that today will be your first Treasure Hunt! Have fun shopping and then let me know what you got. You can find the first clue and all deets on the Rubbernecker Home Page. Kittie and Broni both are offering up some Rubbernecker Blog Candy today and you will want to pop over to their blogs to check it out.

Second, I just found out last night that Rubbernecker needs some help at the Hartford, Connecticut show. If you are available July 12-13 and would like to work in the Rubbernecker Booth at the Rubber Stamp and Scrapbook Expo, please send me an email or leave a comment on this post.

I haven’t been able to squeeze in a Color Challenge for a few weeks now, so I’m hoping to get to do the SCS Challenge today and will be back to edit my post.

Well, I’m back! Today are Primary Elections here in Indiana, and I wanted to make sure that I got out to vote. Mallory went with me, since this is the very first election she could participate in. It was rather exciting for me to be with my youngest daughter the first time she voted. We went over the ballot in the paper before we left so that she would know how to mark it (not who to vote for, but what she needed to do). I’m definitely a proud mom today!

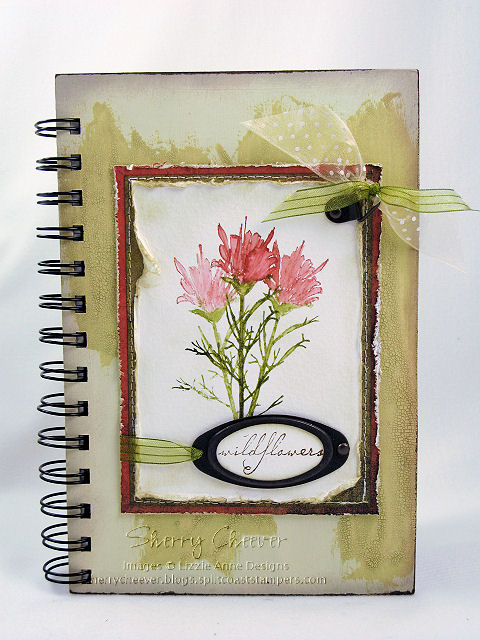
When we got home, the SCS Color Challenge had been posted, and I was ready to go to work. The colors today, Certainly Celery, Pretty in Pink and Lovely Lilac, at first had me stumped. Then I remembered that I needed to make one more Mother’s Day card, the one that I myself would send to my mother.

CC165

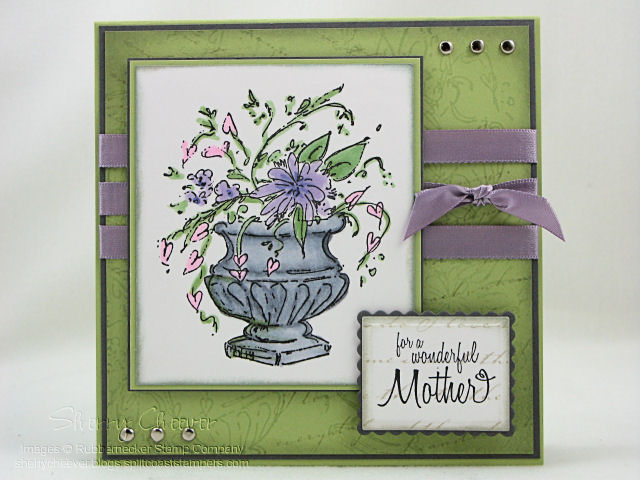
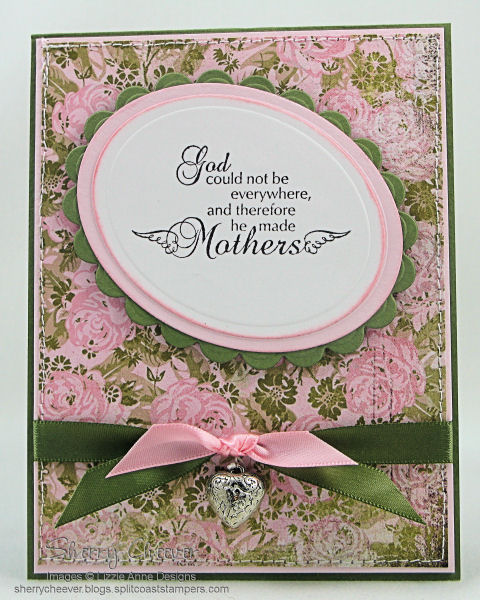
The image was stamped with Black Soot Distress Ink and then colored with Copic Markers. The edges were sponged with Lake Mist. To make the background panel, I chose Certainly Celery, and stamped the same flower image in Distress Embossing Ink. Once that had dried, I stamped a second background of script in Lake Mist over the flowers. For the sentiment, I stamped the script background on white and then stamped the sentiment over the top and cut it out with rectangle Nestabilities. For inside of the card, I picked a white linen paper and stamped the sentiment “God could not everywhere, and therefore he made Mothers.”

CC165 PRODUCT

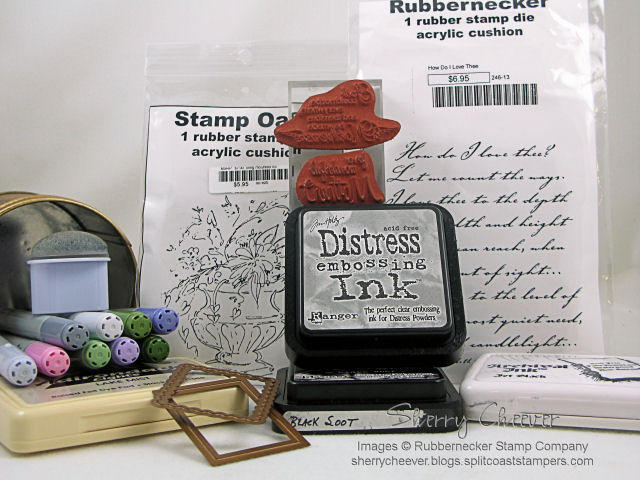
Stamps: Rubbernecker Valentine Collection How Do I love Thee SKU:246-13 and Stamp Oasis Flower Collection Hearty Vase SKU:20 SO GM from Rubbernecker Stamp Company; and Simply Singles Wonderful Mother and Winged Mother from Lizzie Anne Designs

Paper: Neenah Classic Crest Solar White; SU Certainly Celery and Basic Gray

Ink: Ranger Tim Holtz Black Soot Distress Ink and Distress Embossing Ink, Archival Jet Black and Lake Mist

Accessories: Copic Markers, Spellbinders Rectangle Nestabilities, Tsukineko Sponge Dauber, Brads, Ribbon, Mounting Tape

I hope each of you have a wonderful afternoon. I can’t decide if I’m gonna run some errands or go back to the stamp room.

Oh and right as I was finishing up this post, I got email notification from Leslie Miller’s Blog, Running with Scissors. Leslie used the same stamp today and both cards are entirely different! You’ve got to check out her card.

NEW SIG

I hope everyone is enjoying their weekend so far. I meant to make this post earlier this morning, but I got a little sidetracked in the stamp room. I posted back on April 7 about my sister’s birthday. I hadn’t seen her then to give her the present I made, and didn’t want to spoil her surprise by posting it here until she had received it. Not only was this her birthday present, but it was also my Project of the Month for Lizzie Anne Designs. Now that it has been posted on the Lizzie Anne Designs website, and that my sister actually has it in hand, I can finally show you.

LAD POM Journal

I started with 7.5″x5″ Zutter Craft Covers. Both covers were painted front and back with Cermacoat Antique White Acrylic Paint. Once the covers had dried completely, the edges and some of the top finish were sanded with a coarse sanding block. The covers were then painted, inside and out, with Ranger Tim Holtz Scattered Straw Distress Crackle Paint and left to dry overnight. Taking a Shabby Shutters Distress Ink Pad directly to the covers, I wiped the pad across both covers, inside and out, working the distress ink into the cracks of the Crackle Paint. The acrylic paint acts as a resist to the distress ink, and where the finish was sanded lightly, the paint picked up a very light color of the distress ink. The edges of both covers were then sponged with Vintage Photo Distress Ink.


The inside pages of the journal are from a Top Flight 6″x9″ 120 Sheet Ruled Writing Tablet. The pages were trimmed down to 4-3/4″x7-1/4″ to fit inside the journal.


The image was inked with Peeled Paint and Fired Brick Distress Ink, misted with water, and then stamped three consecutive times on 120 lb. Canson Watercolor Paper. While the ink was still wet, a paint brush loaded with water, was used to blend the distress inks. Once the image was dry, the edges were distressed with scissors, and then sponged with Old Paper Distress Ink. The background panels are BasicGrey Infuse. The edges of the bottom panel were distressed with a distressing tool, and the edges were lightly sponged with Old Paper Distress Ink. The edges of the top background layer were sponged with Old Paper Distress Ink, and then both pieces of the designer paper were sewn together on the sewing machine. All three panels were then adjoined together.


The sentiment was stamped in Vintage Photo Distress Ink on Canson 120 lb. Watercolor Paper and punched out using a large oval punch. The edges of the sentiment were sponged with Old Paper Distress Ink, and then placed in the hardware. The hardware was attached to the image panel with a brad and the right and ribbon on the left, wrapped around the panel and taped to the back. An additional piece of hardware was attached to the top right corner and ribbon tied off in bows.


To assemble the journal, the covers and pages were punched with a Zutter Bind-it-All. Using a 3/4″ O wire, the journal was assembled in the appropriate order, and then fastened with the Bind-it-All. The image panel was then affixed to the front of the journal.


Stamps: In the Meadow by Lizzie Anne Designs

Paper: Canson 120 lb. Watercolor Paper; BasicGrey Infuse

Ink: Ranger Tim Holtz Shabby Shutters, Vintage Photo, Peeled Paint, Fired Brick and Old Paper Distress Inks

Accessories: Zutter Bind-it-All, 7.5″ x 5″ Craft Covers, and 3/4″ O Wire Binding; Sewing Machine; Tonic Scissors and Tim Holtz Distressing Tool; Tsukineko Sponge Dauber; Ranger Tim Holtz Scattered Straw Crackle Distress Pint; Cermacoat Antique White Acrylic Paint; Top Flight 6″ x 9″ Ruled Writing Tablet; Sanding Block; Hardware; Brads; Ribbon; Paint Brushes

I hope you enjoy the rest of your weekend, and I’m heading back to the stamp room. Too much to do and so little time!

NEW SIG

Can you believe it’s Thursday already? I can’t! Not only that, I can’t believe it’s already afternoon here. We are still having some technical difficulties with the blogs, but I have no doubt that the guys will figure it out. They have been working the last few days and are probably screaming as loudly as we are. I’ve got to give them props though, they are the best!


A few days ago I was out walking the dogs and noticed that my Bleeding Hearts were starting to bloom, but the Hyacinth are so pretty this year that I had to snap a picture.


Flower bed


You can just barely see the Bleeding Hearts in the background. I also see the Astilbe peaking up behind the Hyacinth. I also see tons of work to be done in the flower bed and should really be out there while it’s pretty and not in the house. I also need to move some hostas from the front walk, but I keep procrastinating. Do you think the gardening fairies will come visit?


Today’s Ways to Use it Challenge on Splitcoast is to find ways to use eyelets, grommets, etc. Now lets face it, I’m not an eyelet person. I LOVE my brads and never ever reach for anything that resembles an eyelet. For me, this definitely WAS a challenge!


WT161 Thanks Bunches


The image was stamped, and then cut out with rectangle Nestabilities. I embossed it, and then using the die as a stencil, the background was airbrushed very lightly. I colored the image with Copic Markers, and then decided that it was too flat and highlighted the flowers with Spica Glitter pens. Which, you can’t even see in the photo. The background paper, my new BasicGrey Cupcake, was sewn to a panel of SU Old Olive. The grommet was inserted into the triangle panel (it helps if you have something that will set these things – I thought a Crop-o-dile would – BWAHAHAHAHAHA), and the ribbon was wrapped around the background panel, up through the grommet and tied in a bow. I was a little bothered with the size of the flower panel, and decided to cut a larger scalloped panel for the bottom. I then raised the top panel with mounting tape. I like it better.

WT161 PRODUCT


Stamps: Thanks Bunches from Lizzie Anne Designs


Paper: Neenah Classic Crest Solar White; SU Old Olive; BasicGrey Cupcake


Ink: Ranger Adirondack Pitch Black


Accessories: Copic Markers, Airbrush System and Spica Glitter Pens; Spellbinders Rectangle Nestabilities and Wizard; Karen Foster Favorite Things Grommet; Sewing Machine; Ribbon


I hope all of you have a terrific day and if the sun is shining where you are – enjoy! It’s gonna be in the mid-70’s here today but we are expecting thunderstorms. I need to catch up on some projects I have going and I keep getting farther and farther behind.

NEW SIG

Well, we have been having some technical difficulties today on the SCS blogs. There was an upgrade last night and some of us lost our blogroll and categories. Well actually they are there, we just can’t get to them. I’m sure that the great guys behind the scenes will have it fixed for us very soon! Anyhoo, I’m going to keep this simple today.


This card is the SCS Sketch Challenge today. I don’t know why I drug my heels all day in getting to this, it’s really a very simple and quick card. More me anyway!

SC171 Winged Mother

I cut the ovals out with Nestabilities, and then stamped the sentiment on the white oval. The background paper is my NEW Sugared by BasicGrey. I stitched it to a pink panel, tied the ribbon and then layered it onto the card. The heart is actually a charm from an old piece of jewelry that I had in some stash.


Stamps: Winged Mother from Lizzie Anne Designs


Paper: Neenah Classic Crest Solar White, Prism Herbal Garden Medium and Iced Pink, BasicGrey Sugared


Ink: Ranger Adirondack Espresso and Shell Pink


Accessories: Spellbinders Wizard and Oval Nestabilities, Ribbon, Old Jewelry


I have to say, that I couldn’t get the photo adjusted just right, and the colors are somewhat off from the actual card, but I always find that with pink.


Hope you guys had a great day today!

NEW SIG

Happy Hump Day! I hope everyone is having a great day so far. I slept in this morning – not on purpose, but wow – it sure felt good! Of course, that now puts me behind in my day, but who cares! I sure don’t!

Before I went to bed last night, I checked in on the SCS Sketch Challenge. I was so excited to see that the sketch was from a card made by <a href=”https://leslierich.bl

© 2015 Suffusion theme by Sayontan Sinha