Smiley from millan.net Happy Monday!  I’ve got to tell ya, it’s already been a very busy morning around my house.  Even though it’s quiet, it has been busy!  I can hardly believe that I’ve already had a shower, dressed for the day and have been in the studio already.  Yes, I might have a fever!!!!

After I caught up on emails and my blurfing this morning, I checked out the Technique Lovers Challenge on Splitcoaststampers.  It’s such a great challenge today!  If you find yourself giving gift cards during the holidays, this is one you need to check out.  The challenge is to make a pop-up gift card holder!  Oh my BADness, they go together so quickly and would also be great if you are giving a bit of cash instead of a gift card.  I myself am a little leery about gift cards this holiday season . . . you never know if the company is going to be in business long enough for the gift card to be redeemed.

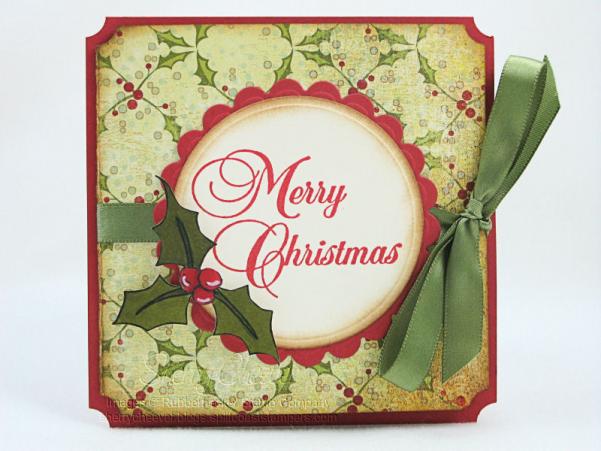
I decided to show you both the front,

TLC196 front

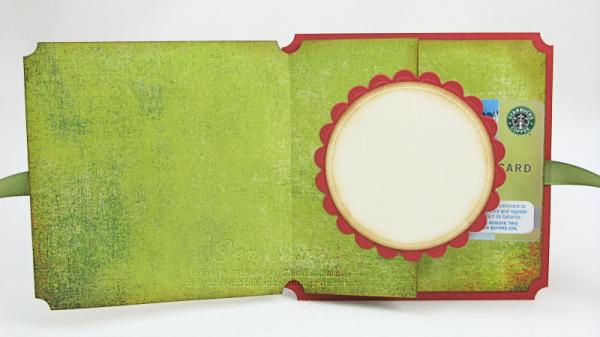
and the inside.  I made the same design for the inside that I used for the image on the front, so that I could write a personal note.

TLC196 inside

The holly was colored with Copic Markers and then cut out, so that I could mount them on the sentiment panel.  Spellbinders Circle Nestabilities were used to make both the image panel and the one on the inside.

  • Stamps: KK Originals Christmas:  Holly SKU:21-07 KK and Rubbernecker Winter Holiday:  Christmas Script SKU:255-04 from Rubbernecker Stamp Company
  • Paper: BasicGrey Fruitcake; SU Very Vanilla and Riding Hood Red
  • Ink: Tsukineko Memento Tuxedo Black; Ranger Vintage Photo Distress; and SU Riding Hood Red
  • Accessories: Copic Markers; Spellbinders Classic Circle Nestabilities; Tsukineko Sponge Dauber; Venture Foam Tape; Ribbon; Ticket Corner Punch; Ranger Inkssentials White Opaque Pen

Have a great day everyone!  I might break down and give these stinky dogs a bath – remember I said “might.”

Good Saturday morning! It just dawned on me that we have another long Holiday weekend coming up – WOO HOO! I’ll be hiding in my stamp room trying to be creative! My first Stamp Club meeting of the year is next Saturday, I have new SU stamps not yet mounted and projects need to be planned. The same day the SU pre orders arrived, I also received my new Tim Holtz Anthology stamps. Which by the way, Rubbernecker Stamp Company currently has on sale!

Mallory was home the day the Anthology stamps arrived and needless to say, she went nuts over them. I also have had some Grunge Board around here for the last few weeks, which Mallory had already been into. Being my typical daughter, she wanted to know if I was going to make her a new journal to take back to school. The thought had crossed my mind, but her asking me to make one was just the push I needed. We sat down, discussed what colors she would like, and I went to work last night.

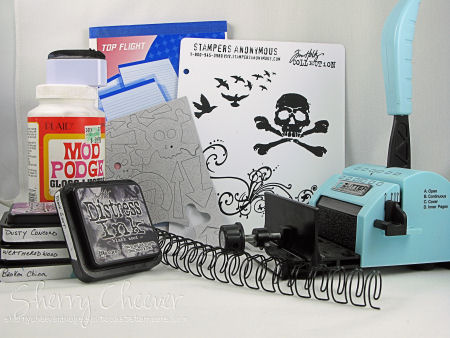
I think today, the first thing I will do is show you the products used to make the journal. This might turn into a mini tutorial of sorts and I would rather you know what is being used as we go along.
Dec 29

The list of what I used: Zutter Bind-it-All, 3/4″ Double OWire Binding, 7.5 x 5″ Chipboard Cover; Tim Holtz Distress Inks; Tsukineko Sponge Dauber; Tim Holtz Anthology Stamps, Tim Holtz Grunge Board Elements; White Cardstock; 6×9″ ruled writing tablet; and Mod Podge. (Most of these items you can find at My Favorite’s Page, and they also happen to be on sale.)
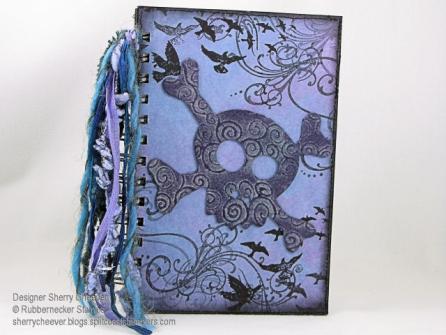
Anthology Journal Cover

To start, cut the white cardstock to size so that you have four pieces to cover the front and back of the chipboard covers. Using Dusty Concord, Weathered Wood and Broken China Distress Inks, work the color onto the white cardstock with a sponge dauber, and then sponged the edges with Black Soot Distress Ink. (You can find these specific techniques in my Distressing Tutorial). Once these pages have dried, stamp the main images randomly using Black Soot. To add more texture to the pages, stitching around the edges was done with black thread.

To begin preparing the journal, the edges of the cover were inked with the Black Soot Distress Ink and then sponged toward the middle of the cover. (Since this particular journal is not covered completely with designer paper, I did not want the edges of the covers to show.)

Adhere the paper to the covers using Mod Podge. A thin coat of Mod Podge was painted on the cover, the paper was placed on the cover and using a brayer, roll across the top of the paper to get out any air bubbles and to make sure that all edges of the paper are adhered. This is important when running a cover through the Bind-it-All, so that the paper around the punched holes doesn’t come loose.

If you like lined pages in a journal, you can trim down the pages of writing tablet. These pages were trimmed down to 7-1/4″ x 4-3/4″ so that they would fit in the journal, but not come out to the edges.

We are not ready to assemble the journal. I find it easiest to work in order and assemble in order. Starting with the back cover, and using the Cover setting [C] on the Bind-it-All, line up the cover, press down in the center and then punch the first set of holes. To continue along with the line of punching, set the Bind-it-All to the Continuous setting [B], line up the next to last-punched hole in the notch, and continue punching. It is important to line up the next to last-punched hole, leaving one at the end, so that the punching will be continuous. You’ll find that if you don’t do this, you will have a gap in the holes. (How do I know this, well – I’ve done it!) At this point, I go ahead and punch the front cover and set it aside.

For the inside pages, use the Inner Pages setting [D], butt the edge of the paper up to the end, press down in the center and punch the first set of holes. Continue punching the remaining holes using the Continuous setting [B] as with the covers.

Once all the pages are punched, assemble the journal back to front as it would look when bound. Now here is the important part – flip that back cover over to the front, just as you would if it was attached with the coils. So what you have in order is, inside back cover, outside front cover, lined pages. Now thread the binding through the pages so that the square edge is on your left. To bind the journal, set the Bind-it-All to the width of the bindings. For this journal, 3/4″ since we are using 3/4″ Owires. Hold the journal by the covers and pages, placing the Owires into the binding section. Gently press the down on the handle until you feel the Owires come together.

To finish the front of the journal, I picked the largest Skull and Cross-Bones from the Grunge Board and covered it with Weathered Gray Distress Ink. I worked the ink down into the grooves of the Grunge Board, and then scraped the Dusty Concord pad across the top to highlight the design in the Grunge.

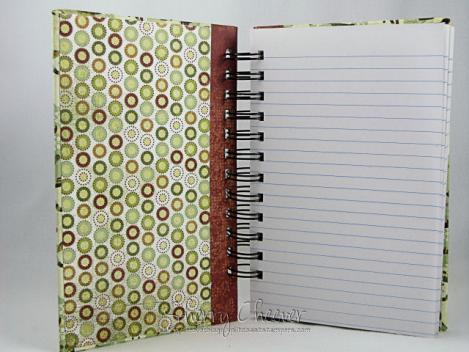
And here’s a picture of the inside of journal.
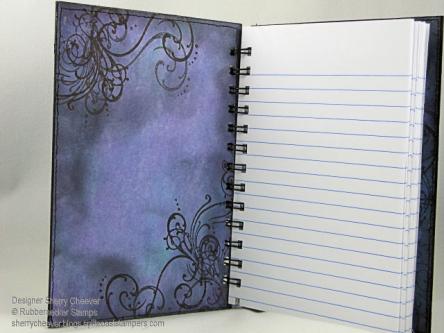
Anthology Journal Inside

Happy Monday ya’ll! I hope you had a great weekend and look forward to stamping fun this week! I actually finished my holiday decorating yesterday and now this place looks more like Christmas. I’ll share photos later, I know Mallory is probably interested on what I’ve done this year! There is a garland or two Mal, so don’t worry!

FYI – I’ve been asked about my distressing and sponging, again! What I’ve decided to do, is show you what I do here on my blog. I need someone here to help me with photos first, but hopefully in the next day or two I can talk my sister and/or Kate to give me a hand.

Let’s move onto today’s stamping. What a fab Try a New Technique Challenge on Splitcoast today – Paper Piecing a Gift Card. I’ve only done this technique maybe once before, so I couldn’t wait to try it again. For a gift card, the only thing I could think of today was a stocking. For years now at Christmas, by parents (now my mom), pass out little red stockings to each of us. Those little red stockings are the highlights of the year – we really love receiving what is inside! My sister has had the same stocking for years – she put her initials on it with glitter – can’t miss which one is hers.

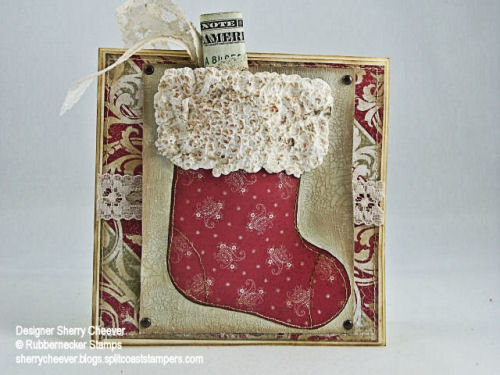
Anyhoo, I had the perfect image to use today. The larger stocking from Rubbernecker Stamps. I stamped the image once on buff cardstock, and then on a piece of Daisyd’s Snowflakes & Holly paper. I trimmed both images out, but only the stocking part of the designer paper (which I sponged the edges of with Tim Holtz Vintage Photo Distress Ink). The DP was then sewn to the trimmed image of the buff stocking at the heel and toe. To make the gift card pocket, I traced the stocking image on another piece of buff cardstock, and then painted outside the traced area with Distress Crackle Paint. Once the crackle paint was dry and starting to crack (which I sped along the process with a heat gun), the stocking was sewn to the background layer. The stocking was sewn leaving the top open so that there was a pocket to either put in money or a gift card.

500 Stocking

This top panel was attached to another background panel of the Daisyd’s Snowflake and Holly paper. Now when I went to sew this panel, the paper buckled and wrinkled on me. But I liked it, and kept it as it was and did a bit of distress sponging. The lace is some I’ve had in a stash, and thought that it went with the feel of the card. To keep it from being bright white, I sponged some of the distress ink on it. The pocket panel is attached to the background panel with the corner brads (it leaves a little play in the card for what you might be adding inside the stocking). For the stuffing, I tied a bow around a roll of money and tied it off to hang on the outside of the pocket. This way, all you have to do is pull on the ribbon to get to the contents. Once the card was finished, I masked off the area around the top of the stocking, and applied Tulip Puffy Paint. Instead of letting it set for hours to dry, I took the heat gun and went to work. Once again, to achieve more of an aged look, I sponged on a little of the distress ink and reheated the puffy paint.

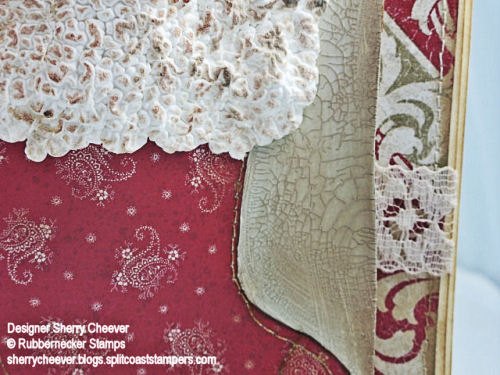
I was so taken with the look of the crackle paint along with the puffy paint, I had to take a closeup to show you.

500 crackle

Stamps: 53-09 Grand Stocking from Rubbernecker Stamp Company

Paper: Buff; Daisyd’s Snowflakes and Holly

Ink: Adirondack Raisin, Tim Holtz Vintage Photo Distress Ink

Accessories: Sewing Machine, Tulip Puffy Paint, Tim Holtz Old Paper Distress Crackle Paint, Tsukineko Oblong Sponge Dauber, Brads, Lace

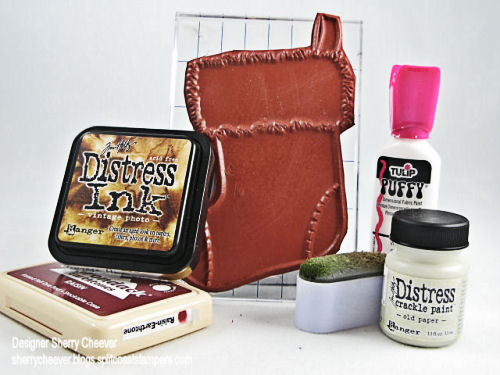
Once again, I decided to post a photo of the products that I’ve used. I get so many questions, I thought this might be helpful to you. Let me know if you like this having this extra information and if it helpful to you. All products in the photo except for the Tulip Puffy Paint are available at Rubbernecker Stamp Company. The Tulip Puffy Paint I found at Meijers on clearance – WOO HOO! The Daisyd’s Snowflakes & Holly Designer Paper used today is from Jacksonbelle Embellishments.

500 supplies

Good Monday Morning! It’s Thanksgiving Week and I go pick up Daughter #2 at school tomorrow. YAHOO! I haven’t seen her since Labor Day. When she was home last, I was in Texas. Of course, she’s been calling 5 to 6 times a day the last week so I think she misses me too! She’s also had some exciting things happening: initiated into Sorority, new schedule for the next semester and has forwarded her Christmas List. Yep, gotta get that shopping list home!

I slept in today. I woke up at 6:00, moved around a bit and then went back to bed. My mother called me at 9:15 and woke me up. Guess I should quit staying up all hours of the night chatting online. By the time I feel tired and get ready for bed, then I have to read for a bit. I always have a book going and read before I fall asleep. I don’t care what time I get to bed, I’ve gotta read at least a few pages. Right now I’m reading another Fern Michaels – The Marriage Game. I have to say this one is keeping me mesmerized. I have just a few chapters left and I don’t have my next book lined up to read. I don’t like that! I normally have a couple of books sitting on the nightstand in order of what I want to read next. Guess I’ll be shopping or dig out something that I’ve tried to read and haven’t been able to yet for one reason or another. Most times, it’s because my head just isn’t in it.

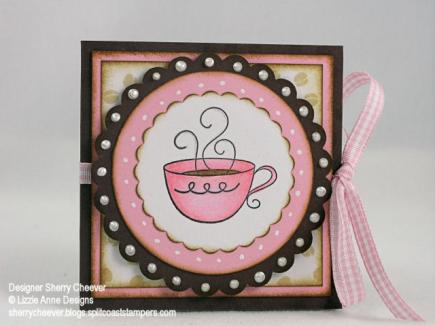
Anyhoo, let’s get to today’s Splitcoast Challenge. I’ve enough I think. Today it’s the Try a New Technique Challenge and we are to make tea bag holders. I love making these little cards, but have never made one to put anything in other than a tag. I had to play along today. I don’t drink tea either, but I know I can find little packets of coffee (or make my own) to put in the holder. I just didn’t do that today.

TL143

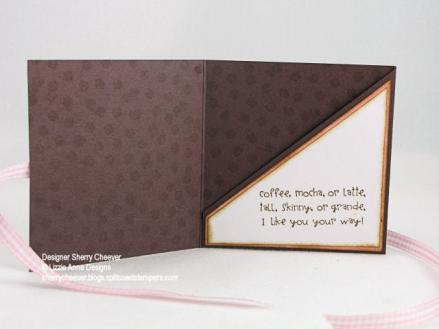
and here’s the inside of the holder.

TLC143 inside

I used the Latte singles from Lizzie Anne Designs on my project today. The latte cup is colored with Copic Markers and the steam is highlighted with a Sakura Stardust pen. Liquid pearls were used to make the dots around the large scallop circle and a Signo white gel pen for the small dots on the pink circle. All the edges were sponged with Vintage Photo distress ink and the coffee beans were stamped using Antique Linen distress ink. To add some ribbon, I made a tie attaching the ribbon under the main image on the front, wrapping it around the back and then tying on the side in a bow. This will also help keep the tea bag holder together once something is put in the inside pocket.

Stamps: Latte Cup, Latte Saying and Coffee Beans by Lizzie Anne Designs

Paper: Georgia Pacific White, SU Pretty in Pink and Chocolate Chip

Ink: Brilliance Graphite Black, Tim Holtz Vintage Photo and Antique Linen Distress Ink

Accessories: Copic Markers, Ranger Liquid Pearls, White Signo Gel Pen, Sponge Dauber, Mounting Tape, Ribbon, Sakura Stardust Pen

Good morning! What a fabulous time we had at the Stampin’ and Pamperin’ Retreat in Cincinnati!! Jeanne arrived here on Wednesday, Kittie on Thursday, and we headed over to Cincinnati on Friday afternoon. We stamped, we were pampered, and met some old and new friends. The weekend started with a birthday cupcake cake made by Amber and ended on Saturday with everyone exhausted but so glad to have been together!

This is the cake that Amber (Bambi64) made for us girls. It was all cupcakes and then a layer of icing over the top — yummy!

Amber’s Cake

We just couldn’t resist hamming it up just a little. Left to right, Jeanne S, Dawn Lusk, Jen Javorsky (Jen70), Kittie Caracciolo (Kittie747), me, Amber (Bambi64).

Group Inside

JUST BECAUSE WE WANNA

Let’s get to some stamping today. It’s my turn to host the JBWW Challenge, and this week we are going to alter a journal, notebook, etc., anything you have on hand. Don’t forget to come back here and post a link to your altered item and if you upload to your SCS Gallery, please use the keyword JBWW.Every once in a while I mention a sorority when I babble in my posts. I belong to a friendship/philanthropic sorority, Sigma Phi Gamma, Delta Phi Chapter. Each November we have a luncheon and auction to help raise money for Scholarship Fund and charitable donations. Each member is to make a couple of items for the auction, and the journal below is one that I have made for the auction.

This journal is made using the Bind-it-All and the 5×7 chipboard covers. I applied Mod Podge over the chipboard pieces and then covered with different designs of the BasicGrey Fruitcake Designer Paper. The sentiment was stamped in VersaMark and embossed with Dazzling Diamond Dust. Both the tag and the sentiment panel are raised on mounting tape. To make the inside pages, I picked up a $1 writing table from the Dollar General Store, and cut the pages down to the size I wanted.

Snowman Journal Outside

Snowman Journal Inside

Stamps: Let it Snow from Michaels

Paper: BasicGrey Fruitcake Collection

Ink: Versamark

Accessories: SU Stitched Ribbon, Bind-it-All, Blank Chipboard, Writing Tablet, Mod Podge, Dazzling Diamond Dust, Gold Cord

© 2015 Suffusion theme by Sayontan Sinha