Happy Tuesday!  Yes I’m running a little late with a post today . . . but hey . . . what the heck.  Last week on the same day as our E-Team Hop, I had a frame and tutorial posted on the Graphic 45 Blog. Since there is a tutorial involved, actually two in one, I thought I would repost the entire thing over here.
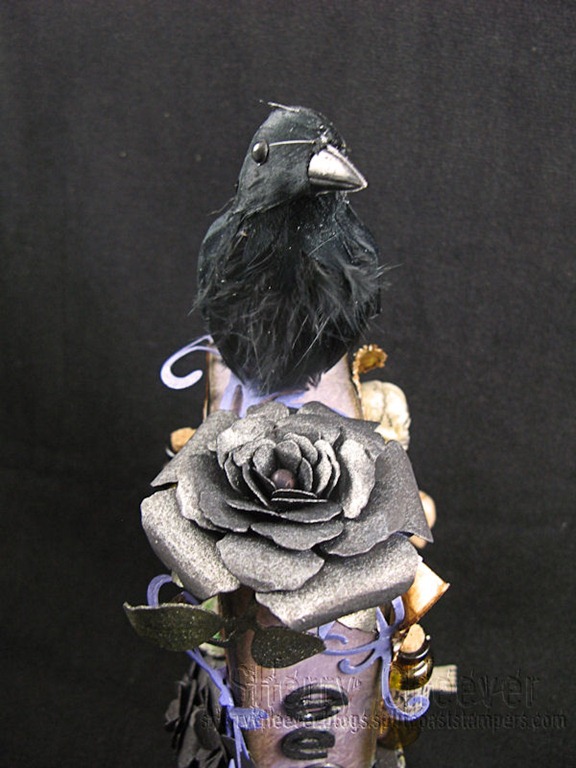
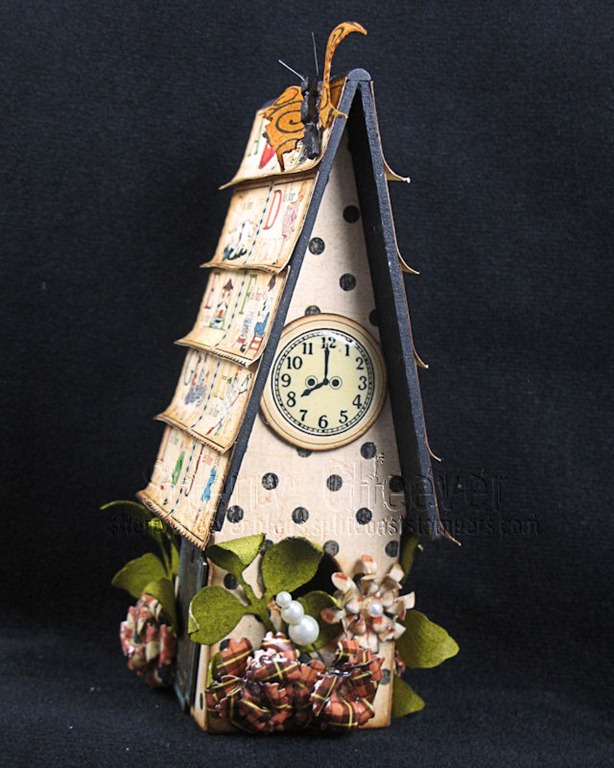
Here’s the frame.

SherryCheever Complete Frame

Here’s the tutorial which includes a new revised tutorial on Faux Porcelain and another on how to cover a bare frame Bad Sherry way.

The base of the project is a plain 2×3 wood frame that has been sanded down to remove the clear finish.

clip_image002

The entire frame was then painted black.

clip_image004

Score-Tape was added to the front of the frame in order to attach the Graphic 45 paper.

clip_image006

The Score-Tape hangs over the sides and needed to be trimmed down with a matte knife. Turn the frame over and using the edge of the frame as a guide, trim off the excess.

clip_image008

Place the paper you are covering the front of the frame with face side down and place the frame on the back of the paper, leaving an excess over the sides.

clip_image010

When the frame is flipped over it will looks like below.

clip_image012

Remove the excess paper by sanding off at the edges.

clip_image014

Once all the edges have been sanded, it will look like this.

clip_image016

The sanded edges were then sponged with Vintage Photo Distress Ink.

To measure the inside panel, the glass from the frame was used as a guide.

clip_image018

The inside image was sponged with Antique Linen Distress Ink, mounted on black cardstock and then mounted on the other side (matching the frame) to the above paper.

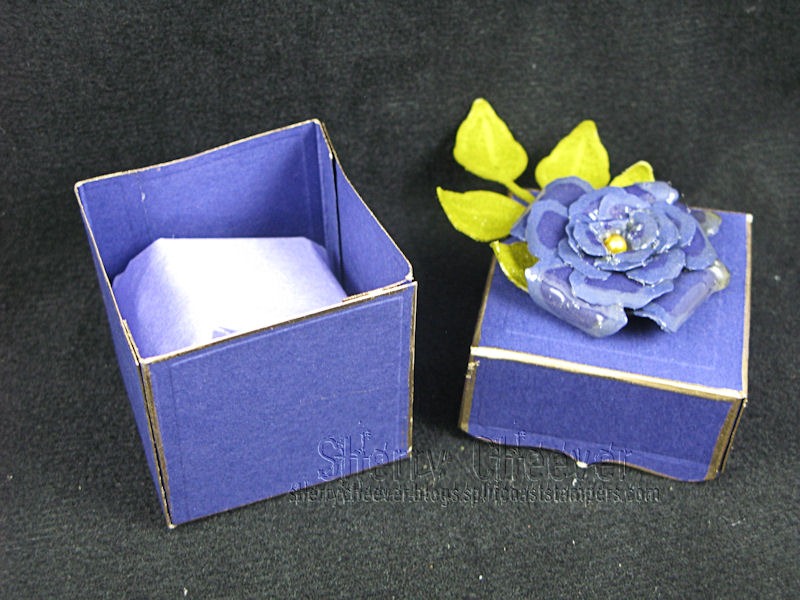
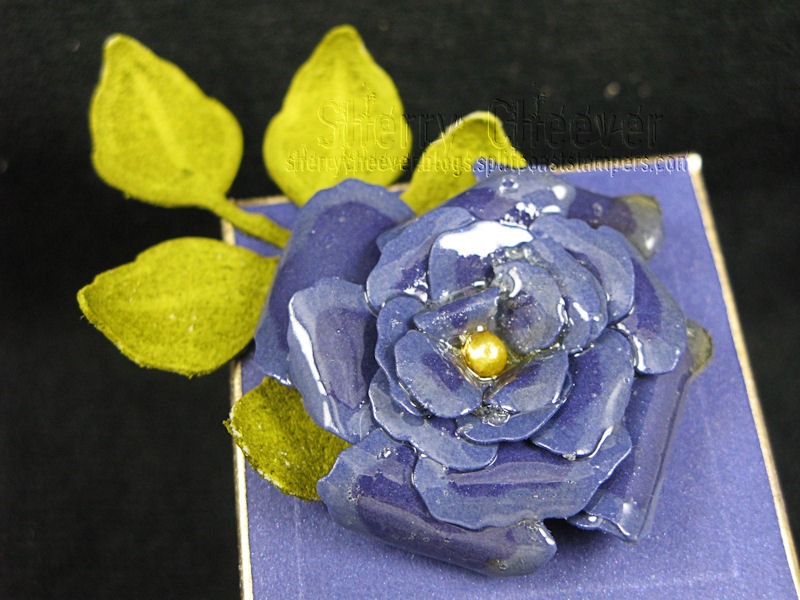
The poinsettia was die cut, shaped and assembled, with corsage pins placed in the middle. The corsage pins were colored with Lemonade Alcohol Ink.

clip_image020

The UTEE was melted in the Melting Pot.

clip_image022

The poinsettia was then dipped into the UTEE, using the corsage pins to hold the poinsettia.

clip_image024

The UTEE needs to be drained from the flower. This was done by holding the poinsettia by the corsage pins over the melting pot until all the UTEE had drained back into the melting pot.

clip_image026

The poinsettia was then placed in a piece of foam to dry completely and cool.

clip_image028

Before embellishing the frame with the poinsettia, the pins were snipped off at the back.

clip_image030

Removing the pins is helpful to make the poinsettia lay flat on the frame.

Assemble the embellishments on the frame with a hot glue gun.

  • Graphic 45: Christmas Emporium
  • Paints/Inks: Ranger Claudine Hellmuth Studio Charcoal Black Semi-Gloss Acrylic Paint, Peeled Paint Distress Stain, Lemonade Alcohol Ink, Antique Linen and Vintage Photo Distress Ink
  • Embellishments: Corsage Pins; idea-ology GrungePaper; Black Cardstock
  • Tools: Spellbinders S5-055 Layered Poinsettia, Grand Calibur; Ranger Ultra-Thick Embossing Enamel (UTEE), Melting Pot, Craft Sheet and Matte Accents

That’s it for now!  I’ve got more to post but that will be later, more than likely in the morning.  Thanks for stopping by and I hope you enjoy the tutorial.

SHERRY SIGNATURE

Project Supplies:

Tags Blog Hop Part 1

Good morning and welcome to the first E-Team Seasonal Tags & ATCs Blog Hop!   When Daisy and I first talked about this hop series, the first thing we realized is that Christmas Tags seem to be overdone . . . BUT . . .  what about all the other holidays?  This new series, Tags & ATCs, will begin of course with Halloween (Be Spooky) and will continue through out all the other Holidays.

Participating in today’s hop are:

Daisy Sparks
Broni Holcombe
Latrice Murphy
Linda Duke
Linda Ledbetter
Sherry Cheever
Starla Nelson

Micki is not participating today because of some family issues.  She posted about it yesterday if y0u want to catch up with her.

It wouldn’t be an E-Team Blog Hop without prizes.  There will be three (3) winners drawn from the individual E-Team blogs, who will each receive a Tag/ATC Box.  Each box will contain an assortment of tags and ATCs, some Twinery samples and other eP Goodies!   It’s easy to win one of these boxes, just leave a comment on the E-Team’s blogs . . . you have 5 chances to win!

To be in the running for an eclectic Paperie $25.00 Voucher, leave a comment on the eP Blog letting Daisy know what your favorite Halloween Treats are.   I think mine have to be Caramel Apples (with nuts on the top)!

I couldn’t contain myself to a simple paper tag for this Blog Hop.  I dug deep into my pile of crap and found a 6” pre-cut and sanded piece of 2×4  . . . which makes a perfect size for a Chunky Tag!  To start, I covered the entire tag (except for the bottom) in two different patters from Fancy Pants Oct 31 6×6 Pads.  The excess was sanded away from the edges, which were then sponged with Black Soot and Vintage Photo Distress Inks.

ChunkyTagBONES

It’s hard for me to say which is my favorite side.  I call the one above Bones.  Rather obvious I guess.  The amber bottle is from a 7 Gypsies project I did at CHA and decided to rip apart.  The wood trim, skeleton, tombstone and skull all came from Michaels.  I was actually stunned that they had so many cool items.  Halloween IS my favorite time to decorate . . . well, Christmas too!  The Mr. Bones Petrified Butterflies sign came from an internet search.

This side I call Haunted Mansion.

ChunkyTagROSES

The image came from an internet search.  It was covered with Rock Candy Distress Stickle Paint and when dry, sponged Vintage Photo ink.  The excess ink was wiped off, leaving the ink in the cracks of the paint.  The black roses and swirls were die cut from Spellbinders™ die templates (shown at bottom).  The flowers were die cut from black cardstock and then misted with Black Smooch Spritz.  First time I’ve really used it and wow, what shimmer it has!  Both amber bottles are enhanced with idea-ology Hobgoblin Tissue Tape, which was covered with Crushed Olive and Dusty Concord.  The leaves were die cut with Spellbinders Foliage die template from GrungePaper.  They were colored first with Crushed Olive Distress Stain and then misted with a combination of Black Velvet and Green Olive Smooch Spritz.

Here’s another find at Michaels . . . The Raven!

ChunkyTagTOP

The rose was made the same way as the smaller two.

I put words down each side using a mixture of William and Noah Mini Alphabets from Maya Road.  (Don’t look to close . . . I misjudged my spacing)

ChunkyTagEERIE

The legs are wood beads that were painted black.  To see if I could get them to adhere better, without drilling, a nail was hammered for each bead.  The bead was then centered over the nail and filled with hot glue.  I’ll let you know if this works.  My thoughts are that the glue will surround the nail and then fill out to the sides of bead . . . hopefully holding the beads on.  A few times I just glued a bead on the bottom and then it pulls off with the paper.  Oh and this time . . . no paper on the bottom.

ChunkyTagSPOOKY

Well, I think that’s all I have today . . .

NO wait!  I just remembered  . . . one of my Christmas projects is being featured on the Graphic 45 Blog today.  When you are finished hoping with The E-Team, check it out!

Thanks for stopping by and remember, life is short . . . embrace the adventures of the day!

SHERRY SIGNATURE

Project Supplies:

Good Thursday morning!  I know I have posted much over the last week, but let me tell you . . . I have been very busy with projects that I can’t show you just yet.  I know what you’re thinking . . . well that just bites!

Tuesday evening I had a sorority meeting and had a gift for the outgoing President.  It had been in the Vice President’s stuff (which was me) in my basement.  It was so tiny (1×1”) I didn’t want to drop it into a gift bag because it definitely would have gotten lost.  All of a sudden I remembered the new Spellbinders™ box templates.  You can tell I haven’t used them yet because they didn’t come to mind until late Tuesday afternoon.

I went to work quickly and came up with this gift box.

I used a Krylon Gold Leaf Pen to mark along all the edges for some added trim.

Sorority Gift Box Open

See how tiny the gift was  . . . wrapped in layers of tissue paper.

Sorority Gift Box Flower

Of course I could envision my “sister” keeping this box so I had to make the flower faux porcelain.    I think she liked the box  . . . she did say it was nice.

Anyway, I have to say that these little boxes are perfect for small gifts.  I can see folding up some money and using these as money boxes for Christmas or possibly even birthdays.  Before I forget, the box was 2” square when completed, and I’m sure if time is taken you will come up with something better than the above.

That’s all for me except . . . thanks for stopping by!

SHERRY SIGNATURE

Project Supplies:

Oh my gosh I’m really late with my post today.  I had to go out for some errands this morning, well before the time of Graphic 45 Blog posts, and it took longer than I thought.

Today on the Graphic 45 Blog they are showcasing a birdhouse I recently made using An ABC Primer.

BIRDHOUSE

Please take a stroll over and check it out.  Jack and Cat’s project is on today as well, and honestly it took my breath away!

SHERRY SIGNATURE

clip_image002

Have I got something fun for you today . . . our very first eclectic Challenge! Daisy thought it would be fun to have you, our readers, to participate along with us in our blog hops.  SO, we are now incorporating a challenge into our blog hops . . . think on the terms of a creative challenge.  For this first challenge, Daisy has challenged us to use Distress Inks (or stains), a die template of our choice and an egg carton.

For those of you playing along with us, Daisy has set up inlinkz on the eP Blog for you to post your creations to. For today’s challenge you have from Friday, August 12 until Sunday, August 21st to post.  One winner will be picked from the submissions on the eP Blog, who will receive a $40 gift voucher to eclectic Paperie.  The winner will be announced on the eP Blog on Monday, August 22.

As in the past, we will continue to give away two prize packages to those readers leaving blog comments.   For this hop, two randomly chosen winners will each receive some 6×6 paper pads that have recently been received at eP along with some other surprises.  You have until Sunday, August 14 to comment.  The winners will be announced on the eP Blog on Monday, August 15.

The E-Team Participating in this first eclectic Challenge are (besides me):

Daisy SparkseP Blog
Broni Holcombe
Latrice Murphy
Linda Duke
Micki Harper
Starla Nelson

Now for my project and that little snippet of the challenge, an egg carton.  Can you guess which part is the egg carton?

AGoodEggChallenge

I started with the larger frame and a scalloped border from Studio 490 Sample Pack Art Parts.  For the base of the frame, I die cut Spellbinders™ new die template, S5-066 Shadow Flowers, to use as a mask.  The base was covered with Crushed Olive Distress Ink first, the Shadow Flowers were placed and then sponged over with Stormy Sky Distress Ink.  The background stamp from It’s More Flower Art was stamped lightly in Archival Coffee.  The sentiment from It’s Face Art was stamped in Archival Jet Black.

The actual frame portion (top) was covered with Graphic 45 An ABC Primer.  The edges were sanded and then sponged with Vintage  Photo Distress Ink.  The scalloped Art Part was painted with Black Soot Distress Stain.  The leaves were die cut with S4-328 Foliage and painted with Crushed Olive Distress Stain.

AGoodEggChallengeFlowersCloseup

All the flowers were die cut with LF-005 Grand Peony Creations.  Two from Graphic 45 An ABC Primer and dipped in melted UTEE to make Faux Porcelain.   The center blue flower is the egg carton.  It was die cut with the Peony Creations and then colored with drops of Red Pepper, Butterscotch and Juniper Alcohol Inks.  The center is black glitter that was sprinkled on Matte Accents.   Before you ask, the egg carton flower was not dipped in UTEE.  IT MELTS!  This was the second attempt at making flowers from an egg carton.  When I first opened the carton and saw the little stars that separate the eggs, I said to myself . . . FLOWERS . . . they are flowers!  So I cut them all out, colored them with red alcohol ink and thought what the hell . . . I took the heat tool to them.  I liked the way they turned dark and curled, BUT they got so thin and I didn’t like the red.  They landed in the garbage.

AGoodEggChallengeButterflyCloseup

The butterfly (not part of the challenge but I just had to show you) was die cut from GrungePaper and Studio 490 Clearly for Art.   Both pieces were die cut with the new Spellbinders LF-006 Wonderful Wings.  The bottom was sponged with Wild Honey Distress Ink and then over stamped in Archival Jet Black with the polka dots from Studio 490 More Flower Art.  The top, Clearly For Art, was heated with the heat tool to soften the Clearly For Art so I could bend the wings.  The middle is a mini clothespin that was stained black with the Black Soot Distress Stain.  Black Artistic Wire is wrapped around the clothespin for antennae.

I plan on sending this back to school with Mallory.  I had that in mind when I picked the sentiment because this is her last year and she can begin to fly.  Not that she hasn’t already!

Thanks for stopping by today, don’t forget to visit The E-Team’s blogs and I really hope you participate in the challenge.  I would love to see what you do with the egg carton!

SHERRY SIGNATURE

Project Supplies:


© 2015 Suffusion theme by Sayontan Sinha