Good Sunday Afternoon! It’s a little snowy here today, not much just a few flurries, but still a perfect morning to stamp. I read the paper this morning, first time in a long time, checked the ads and decided where I NEED to go this week. Then I checked out the Featured Stamper Challenge on Splitcoast. Much to my joy it is Mary Jo Albright. I was lucky enough to meet her at CHA and couldn’t wait to play along today.


However, before I show you my card I have an announcement.

Rubbernecker Stamp Company
needs your help.
The 2008 Show Schedule has begun and we are looking for product demonstrators. We need two demonstrators for shows in the following cities:


Allentown, PA on April 12-13
Minneapolis, MN on May 17-18
Syracuse, NY on May 24-25
St. Louis, MO on June 7-8
Hartford, CT on July 12-13


It’s really simple, if Jeanne and I can do it, so can you! All you will be doing is demonstrating products during the show. It’s tons of fun and goes very quickly.


If you are interested, please leave a comment or send me an email and either Dave or I will respond with all the important deets (i.e., compensation)!


Now for today’s card. I chose this card of Mary Jo’s to case, oink oink. I loved the layout, which I used, but changed up the images and colors.


FS55


The image was stamped three times. Once in VersaMark on light blue paper and the other two times in Adirondack Pitch Black on white. The images stamped on white were colored with Copic Markers. I misted the image on the blue paper with Broken China-Pearl Shimmer Mist and used Ranger Glossy Accents to highlight all the bubbles. I then cut one full image out of the white paper and glued it over the top of the image on the blue paper. To add more interest to the image, I then cut out only the fish from the third I stamped and raised it with mounting tape on top of the fish. The circles were cut using my new Spellbinders Nestabilities and the photo corners were made with a punch. I sponged Broken China Distress Ink on a Grunge Board Heart, and to highlight the swirl pattern of the Grunge, I lighted tapped it with my Dusty Concord pad. I then misted the heart with the same Shimmer Mist I used on the background panel for the image. The edges of the Memory Box background paper and the purple cardstock were sponged with Dusty Concord Distress Ink.


Stamps: Stamp Oasis Fantasy Collection 15 SO JB – Dolphin Dive from Rubbernecker Stamp Company

Paper: Neenah Classic Crest Solar White; Light Blue, Purple and Black Cardstock, Memory Box Echo

Ink: Adirondack Pitch Black, VersaMark, Tim Holtz Broken China and Dusty Concord Distress Ink

Accessories: Copic Markers; Spellbinders Nestabilities; Tsukineko Sponge Dauber; Tim Holtz Idea-ology Grunge Board; Ranger Mini Mister, Perfect Pearls and Glossy Accents; Corner Punch; Brads; Mounting Tape

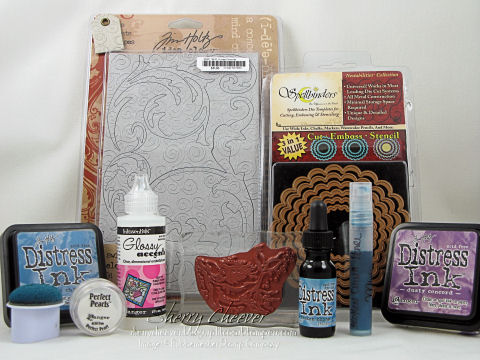
All products shown in the photo below, except the Copic Markers and Spellbinders Nestabilities, can be found at My Favorite Product Page at Rubbernecker.

FS55 Product

Hey ya’ll! Hope everyone is having a good weekend so far. I’m getting caught up on some laundry, still moving some odds and ends down to the new rubber room and getting some stamping in too!


I took the dogs to the groomer yesterday for a mini groom. Of course, it’s one of those things – you take them at 8:30 in the morning and they call when they are done. It could be a few hours or all day, depending on how busy the groomer is. Sydney always comes home pouting and snubs me the rest of the day. I’ve never figured out if she is embarrassed for the lack of hair in her eyes or mad at me for leaving her. Well, I think I figured it out last night! She avoided me all day yesterday. She wouldn’t go outside, wouldn’t play – nothing. I go to get in bed last night AND right in the middle of my bed are THREE wet circles! Of course, she didn’t want to go outside. She was MAD at me and decided to go in my bed. Needless to say, I was not a happy camper having to strip the bed at midnight! Can I prove it was Sydney and not Ellie – NOPE! I can only go on Syd’s behavior yesterday. Sydney has been much for loving today too – hmmmmmmmm. Mallory I hope you are splitting a gut on this one!


Anyhoo, after getting the laundry started this morning, I checked out the Inspiration Challenge on Splitcoast. I check it every Saturday morning, but am not often inspired to stamp. Today I was! I loved the neutral look of the room that is the inspiration piece and immediately thought of the way my mother decorates. So I went with neutrals and more of a tone on tone.


IC113


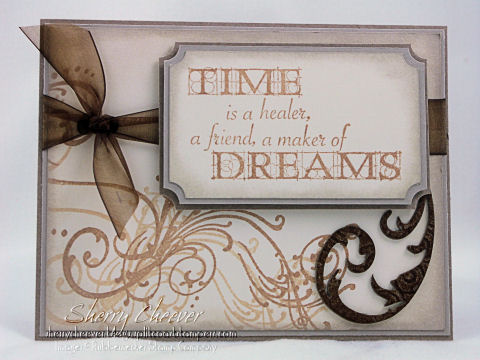
The flair from the Tim Holtz Anthology Set was stamped twice, once in Sandal and then in Latte on vanilla cardstock. I wanted a double-stamped look without stamping off. The sentiment is stamped in the darker Latte. The edges of the vanilla cardstock were sponged with Lake Mist using an oblong sponge dauber. The sentiment panel was mounted on a layer of sand cardstock, and then raised on a layer of kraft cardstock. The entire panel is then raised on the card with mounting tape. I had a small flair Grunge Board, and using a dauber sponged on Sandal and then swiped the Latte across the top to highlight the raised areas of the Grunge.


Stamps: Stamp Oasis Sentiments Collection 1729 SO Maker of Dreams Text and Stampers Anonymous Tim Holtz Anthology from Rubbernecker Stamp Company

Paper: Vanilla, Sand and Kraft Cardstock

Ink: Adirondack Lake Mist, Sandal and Latte

Accessories: Grunge Board, Ticket Corner Punch, Ribbon, Mounting Tape, Tsukineko Oblong Sponge Dauber

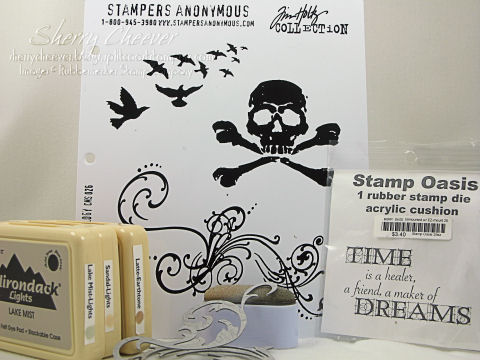
All products shown below are from Rubbernecker Stamp Company.

Feb 2 Product

Good Saturday morning! It just dawned on me that we have another long Holiday weekend coming up – WOO HOO! I’ll be hiding in my stamp room trying to be creative! My first Stamp Club meeting of the year is next Saturday, I have new SU stamps not yet mounted and projects need to be planned. The same day the SU pre orders arrived, I also received my new Tim Holtz Anthology stamps. Which by the way, Rubbernecker Stamp Company currently has on sale!

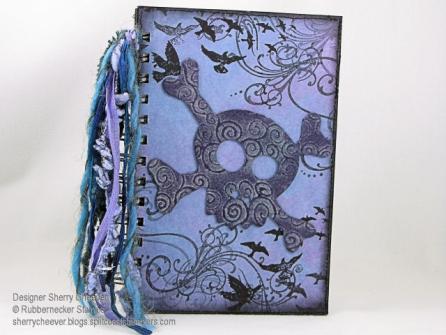
Mallory was home the day the Anthology stamps arrived and needless to say, she went nuts over them. I also have had some Grunge Board around here for the last few weeks, which Mallory had already been into. Being my typical daughter, she wanted to know if I was going to make her a new journal to take back to school. The thought had crossed my mind, but her asking me to make one was just the push I needed. We sat down, discussed what colors she would like, and I went to work last night.

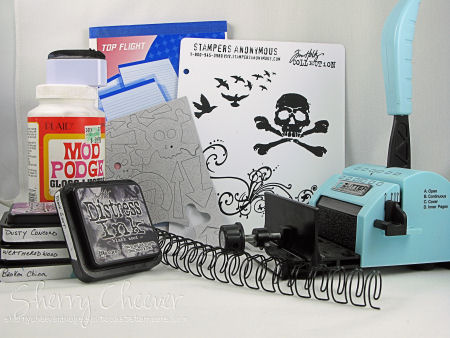
I think today, the first thing I will do is show you the products used to make the journal. This might turn into a mini tutorial of sorts and I would rather you know what is being used as we go along.

Dec 29

The list of what I used: Zutter Bind-it-All, 3/4″ Double OWire Binding, 7.5 x 5″ Chipboard Cover; Tim Holtz Distress Inks; Tsukineko Sponge Dauber; Tim Holtz Anthology Stamps, Tim Holtz Grunge Board Elements; White Cardstock; 6×9″ ruled writing tablet; and Mod Podge. (Most of these items you can find at My Favorite’s Page, and they also happen to be on sale.)

Anthology Journal Cover

To start, cut the white cardstock to size so that you have four pieces to cover the front and back of the chipboard covers. Using Dusty Concord, Weathered Wood and Broken China Distress Inks, work the color onto the white cardstock with a sponge dauber, and then sponged the edges with Black Soot Distress Ink. (You can find these specific techniques in my Distressing Tutorial). Once these pages have dried, stamp the main images randomly using Black Soot. To add more texture to the pages, stitching around the edges was done with black thread.

To begin preparing the journal, the edges of the cover were inked with the Black Soot Distress Ink and then sponged toward the middle of the cover. (Since this particular journal is not covered completely with designer paper, I did not want the edges of the covers to show.)

Adhere the paper to the covers using Mod Podge. A thin coat of Mod Podge was painted on the cover, the paper was placed on the cover and using a brayer, roll across the top of the paper to get out any air bubbles and to make sure that all edges of the paper are adhered. This is important when running a cover through the Bind-it-All, so that the paper around the punched holes doesn’t come loose.

If you like lined pages in a journal, you can trim down the pages of writing tablet. These pages were trimmed down to 7-1/4″ x 4-3/4″ so that they would fit in the journal, but not come out to the edges.

We are not ready to assemble the journal. I find it easiest to work in order and assemble in order. Starting with the back cover, and using the Cover setting [C] on the Bind-it-All, line up the cover, press down in the center and then punch the first set of holes. To continue along with the line of punching, set the Bind-it-All to the Continuous setting [B], line up the next to last-punched hole in the notch, and continue punching. It is important to line up the next to last-punched hole, leaving one at the end, so that the punching will be continuous. You’ll find that if you don’t do this, you will have a gap in the holes. (How do I know this, well – I’ve done it!) At this point, I go ahead and punch the front cover and set it aside.

For the inside pages, use the Inner Pages setting [D], butt the edge of the paper up to the end, press down in the center and punch the first set of holes. Continue punching the remaining holes using the Continuous setting [B] as with the covers.

Once all the pages are punched, assemble the journal back to front as it would look when bound. Now here is the important part – flip that back cover over to the front, just as you would if it was attached with the coils. So what you have in order is, inside back cover, outside front cover, lined pages. Now thread the binding through the pages so that the square edge is on your left. To bind the journal, set the Bind-it-All to the width of the bindings. For this journal, 3/4″ since we are using 3/4″ Owires. Hold the journal by the covers and pages, placing the Owires into the binding section. Gently press the down on the handle until you feel the Owires come together.

To finish the front of the journal, I picked the largest Skull and Cross-Bones from the Grunge Board and covered it with Weathered Gray Distress Ink. I worked the ink down into the grooves of the Grunge Board, and then scraped the Dusty Concord pad across the top to highlight the design in the Grunge.

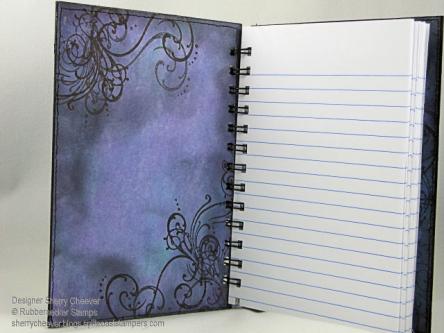
And here’s a picture of the inside of journal.

Anthology Journal Inside

© 2015 Suffusion theme by Sayontan Sinha